Install Bookstack Wiki
💡 Get your corporate Wiki, based on Bookstack, rolled out in a matter of minutes, and start managing your corporate documentation without worrying about its security and safety.
The solution can create new, or run inside your existing VPC. You only need to "BYOC" - Bring Your Own SSL Certificate using Amazon ACM, and [optional] your Google Authentication parameters (ClientId and ClientSecret, as explained in Bookstack documentation - https://www.bookstackapp.com/docs/admin/third-party-auth/#google), if you'd like your personnel to login to the Wiki with their Google accounts.
This solution protects your corporate data via regular backups of document storage (EFS) and database (MySQL RDS instance), to satisfy your RTO and RPO requirements.
We are providing regular Bookstack version updates based on the product's stable and tested releases.
- #1 AWS Marketplace - Setup Guide
- #2 Installation - Setup Guide (Bookstack)
- 📌 0. How to Find Required Parameters
- 📌 1. Check Region Availability for RDS MariaDB & EC2-instance
- 📌 2. Configuring Parameters for main stack
- #3 Switching Authentication Method in BookStack
#1 AWS Marketplace - Setup Guide
Bookstack supports two authentication methods: standard and Google.
#1 AWS Marketplace - Setup Guide
Bookstack supports two authentication methods: standard and Google.
The following table compares the two methods. Choose the one that best fits your needs and click the “Go to AWS Marketplace” button.
|
Feature |
Standard Authentication |
Google Authentication (OIDC) |
|
Login Method |
Local username & password |
Google Single Sign-On (SSO) |
|
User Management |
Managed within BookStack |
Users managed via Google Workspace |
|
Security Level |
Standard password-based security |
OAuth 2.0 authentication with Google |
|
Ease of Use |
Requires manual user management |
Seamless login with Google account |
|
Setup Complexity |
No additional configuration required |
🚨 Requires a one-time login as the default admin to grant admin privileges to your Cognito account. By default, Cognito-authenticated users are assigned the Viewer role, and this step ensures that your account receives Admin permissions. |
|
Multi-Factor Authentication (MFA) |
Not built-in, but can be configured |
Supports Google MFA |
|
Best For |
Small teams, personal use |
Enterprises using Google services |
⚠ Important Notice! At this time, BookStack does not support simultaneous use of both Standard Authentication and Google Authentication (OIDC).
To switch authentication methods, you must manually update the .env file and restart the BookStack docker container (detailed instructions will be provided below).
📌 Deploying BookStack via AWS CloudFormation
Follow these steps to deploy BookStack in your AWS infrastructure:
1️⃣ Go to AWS Marketplace
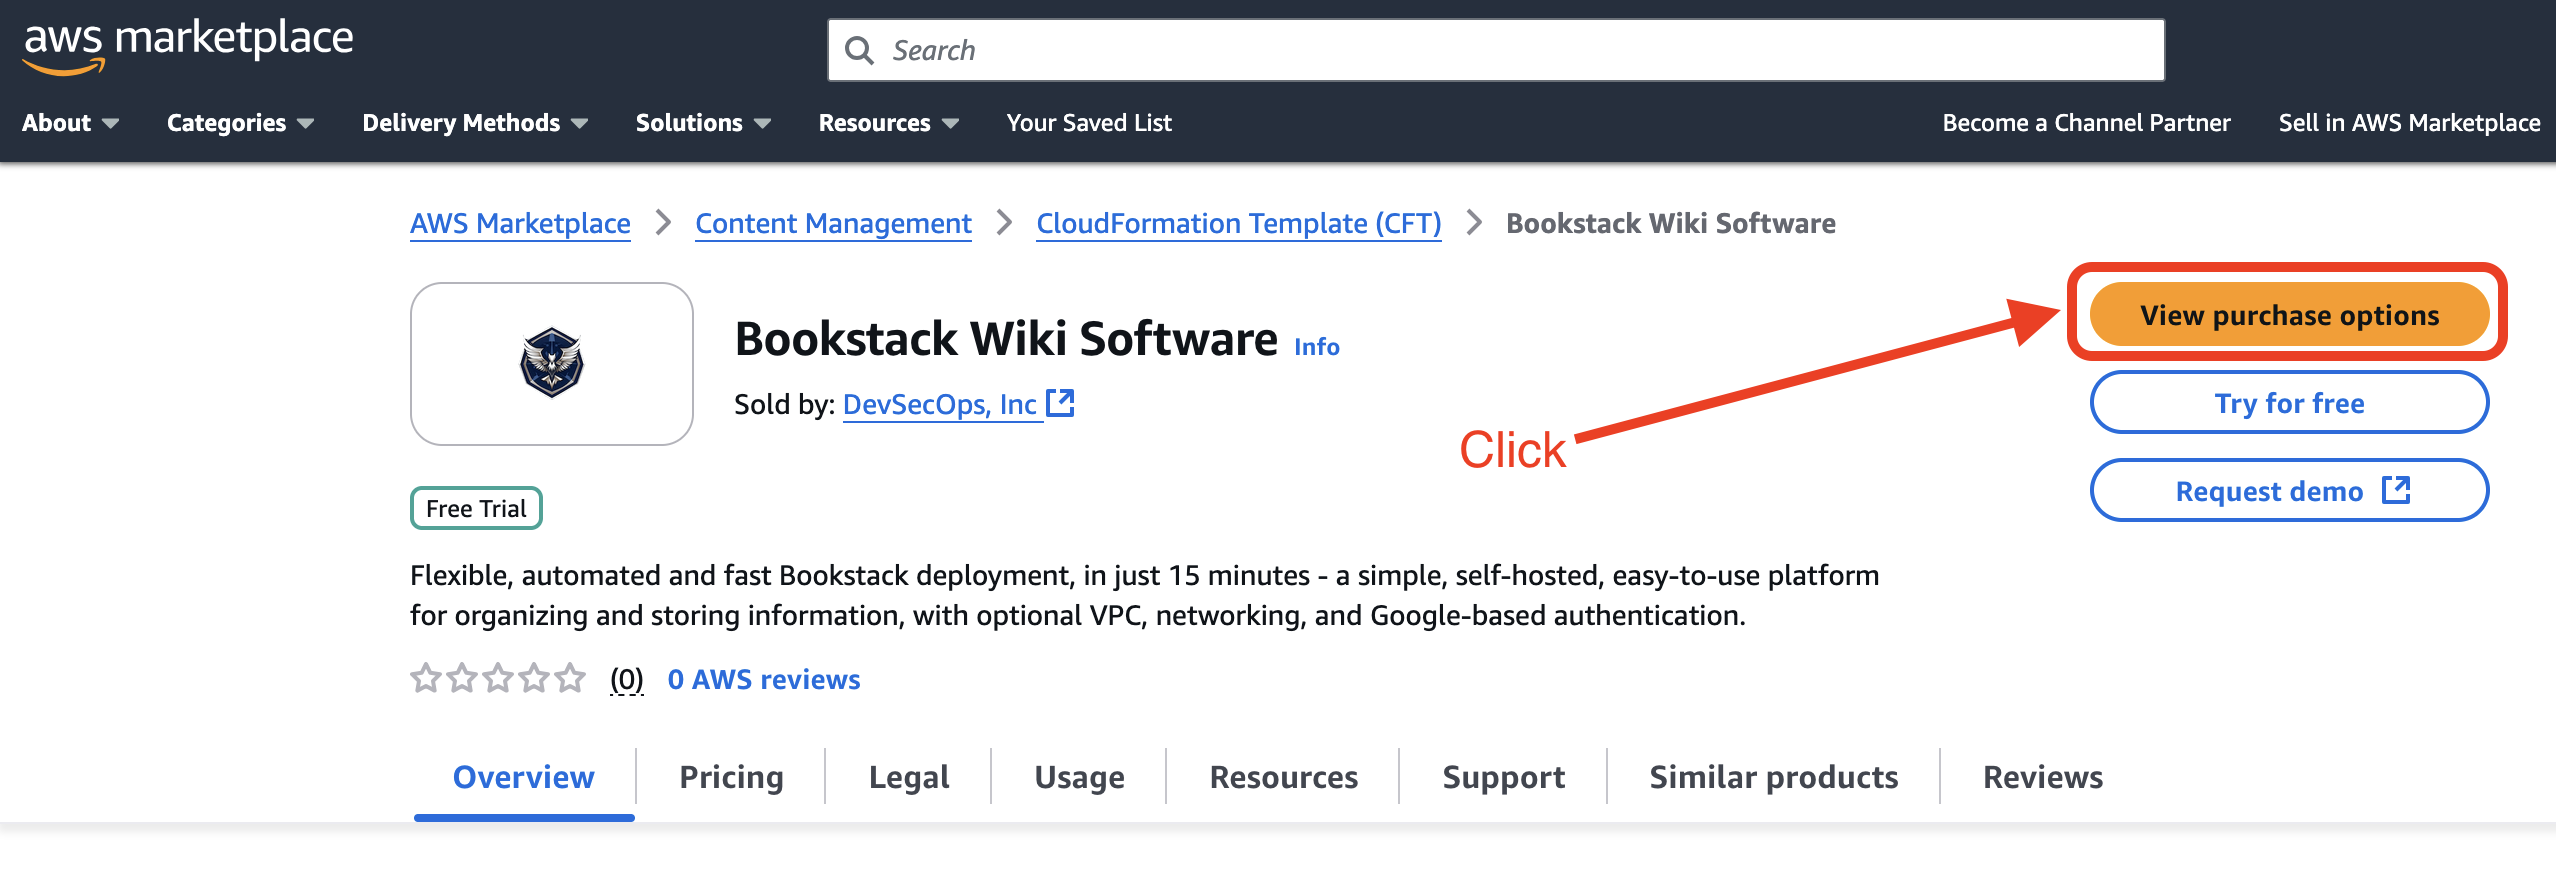
1. Open the BookStack page directly on AWS Marketplace - or type the name of the product Bookstack Wiki Software.
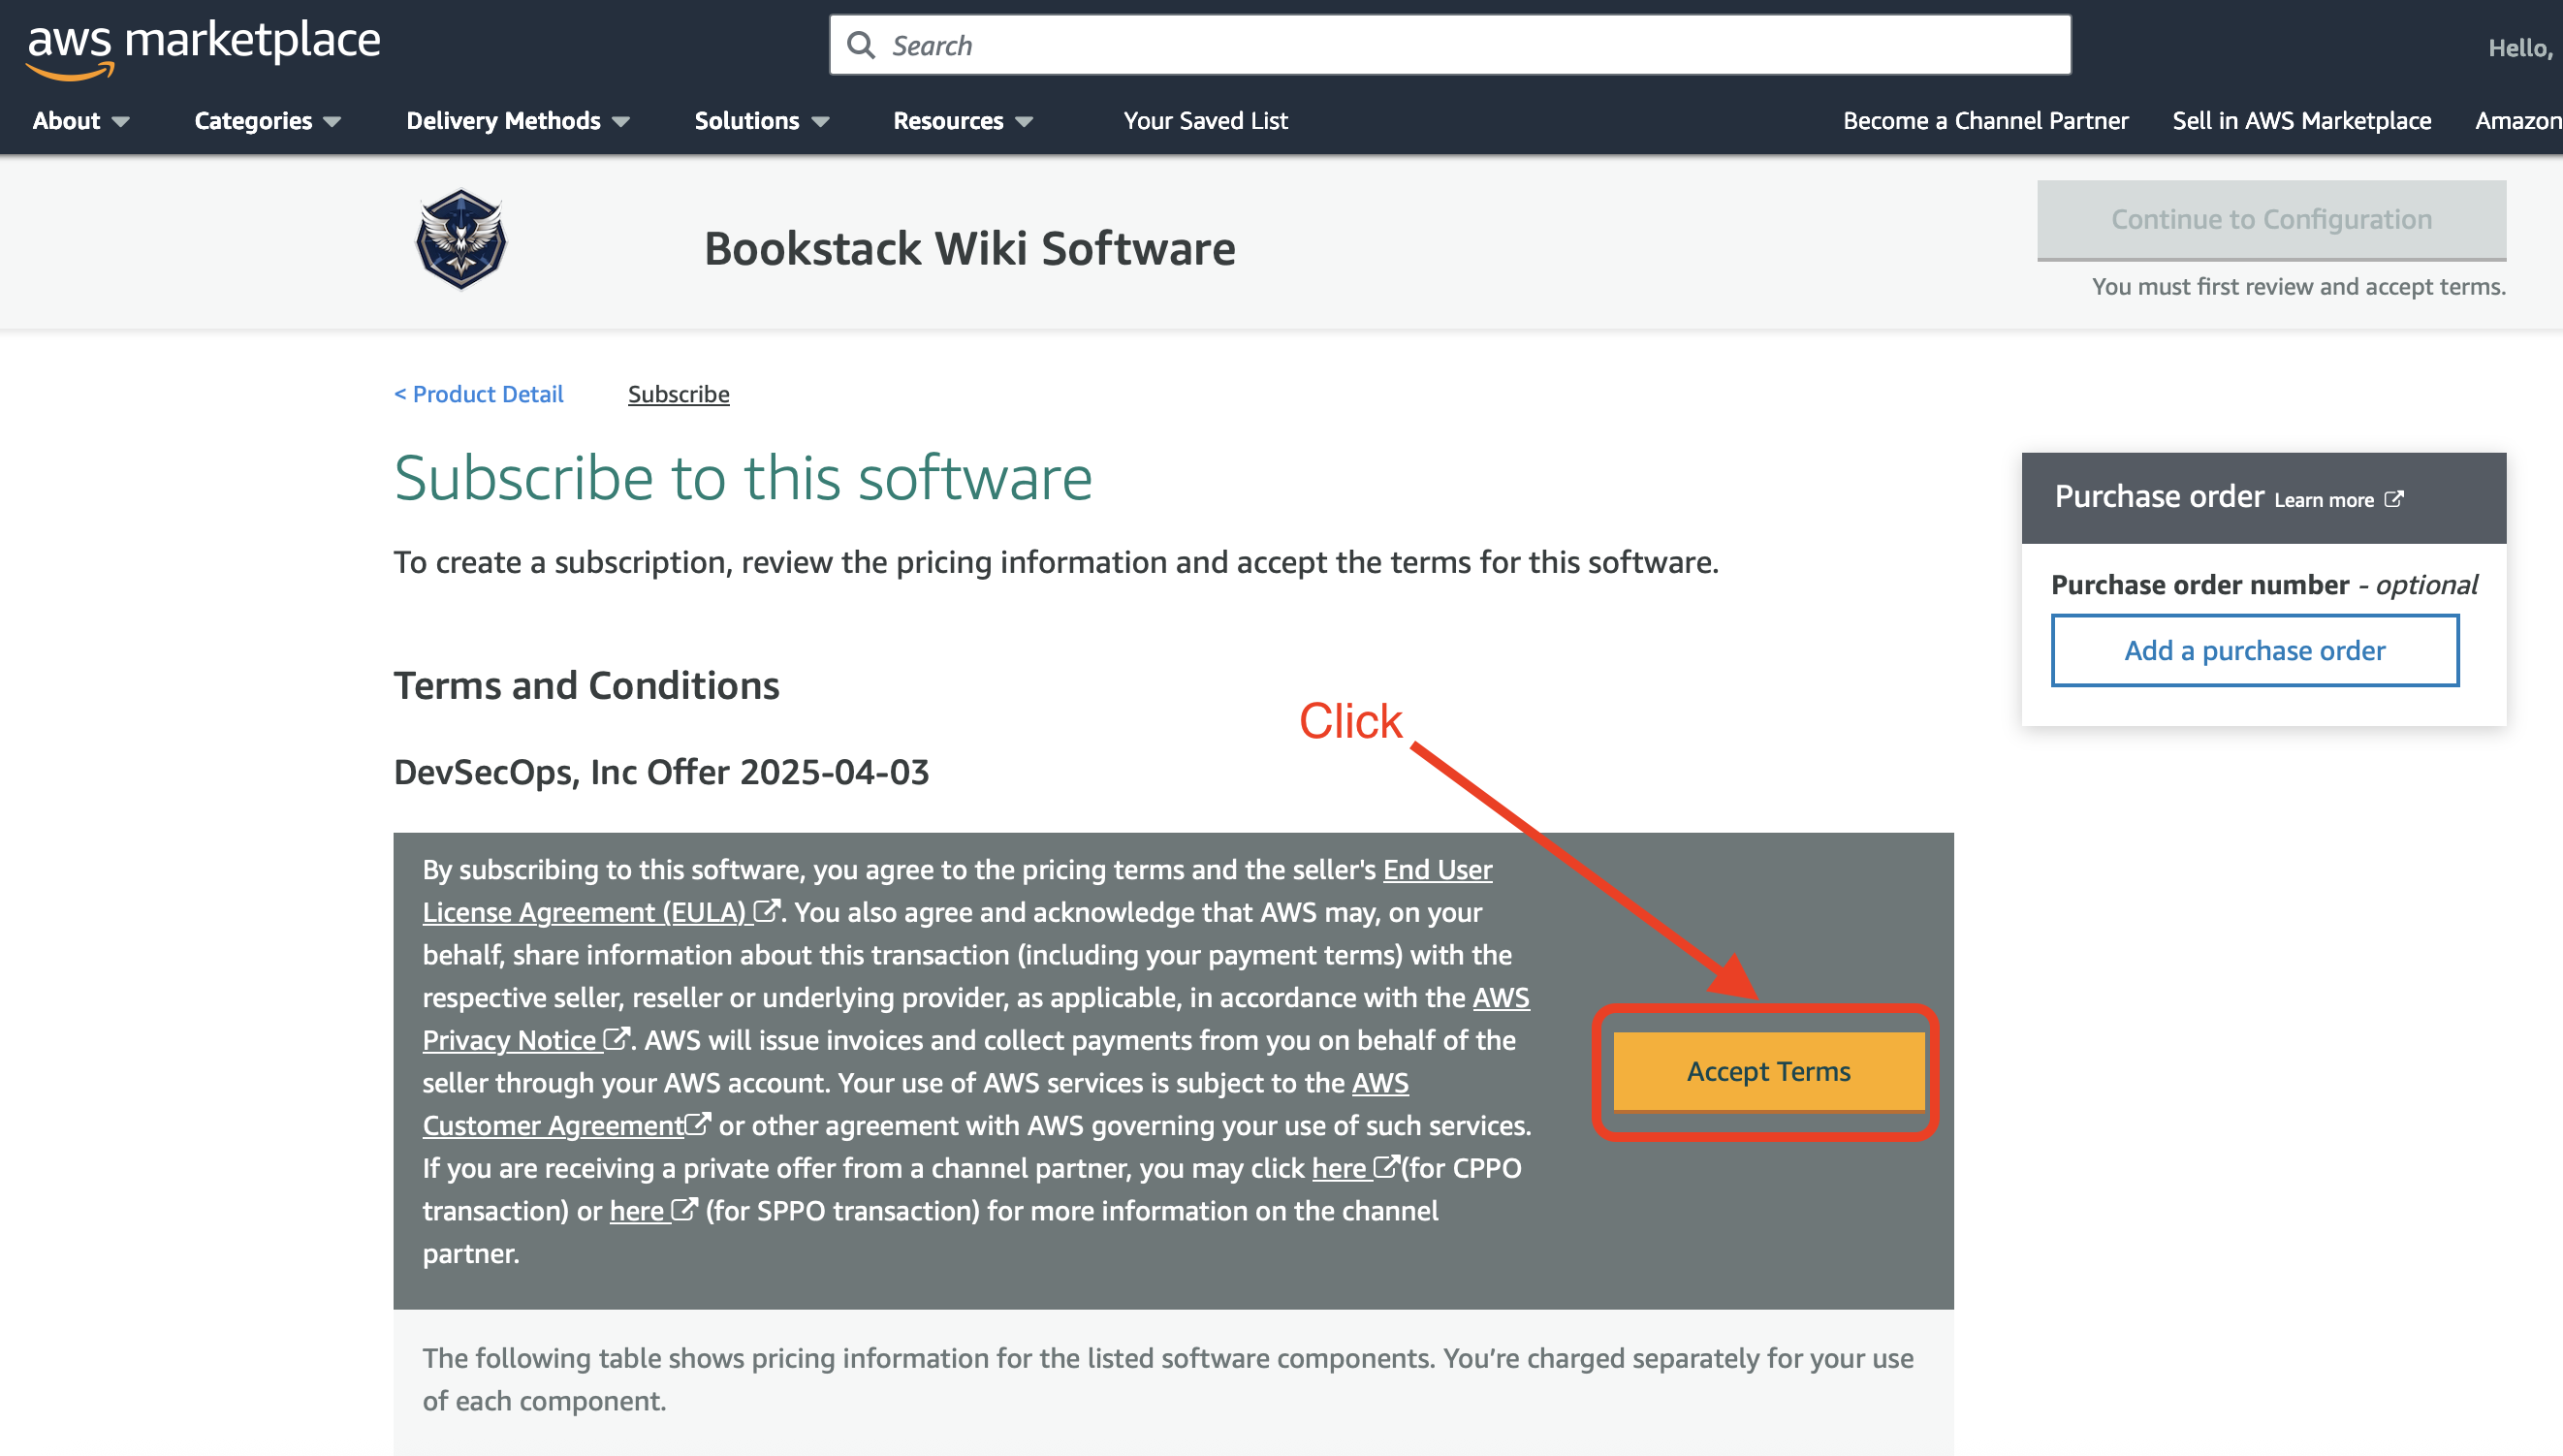
2. Click View purchase options, in appeared page Subscribe to this software review the terms, pricing information and accept the agreement.
3. The subscription is now Pending.
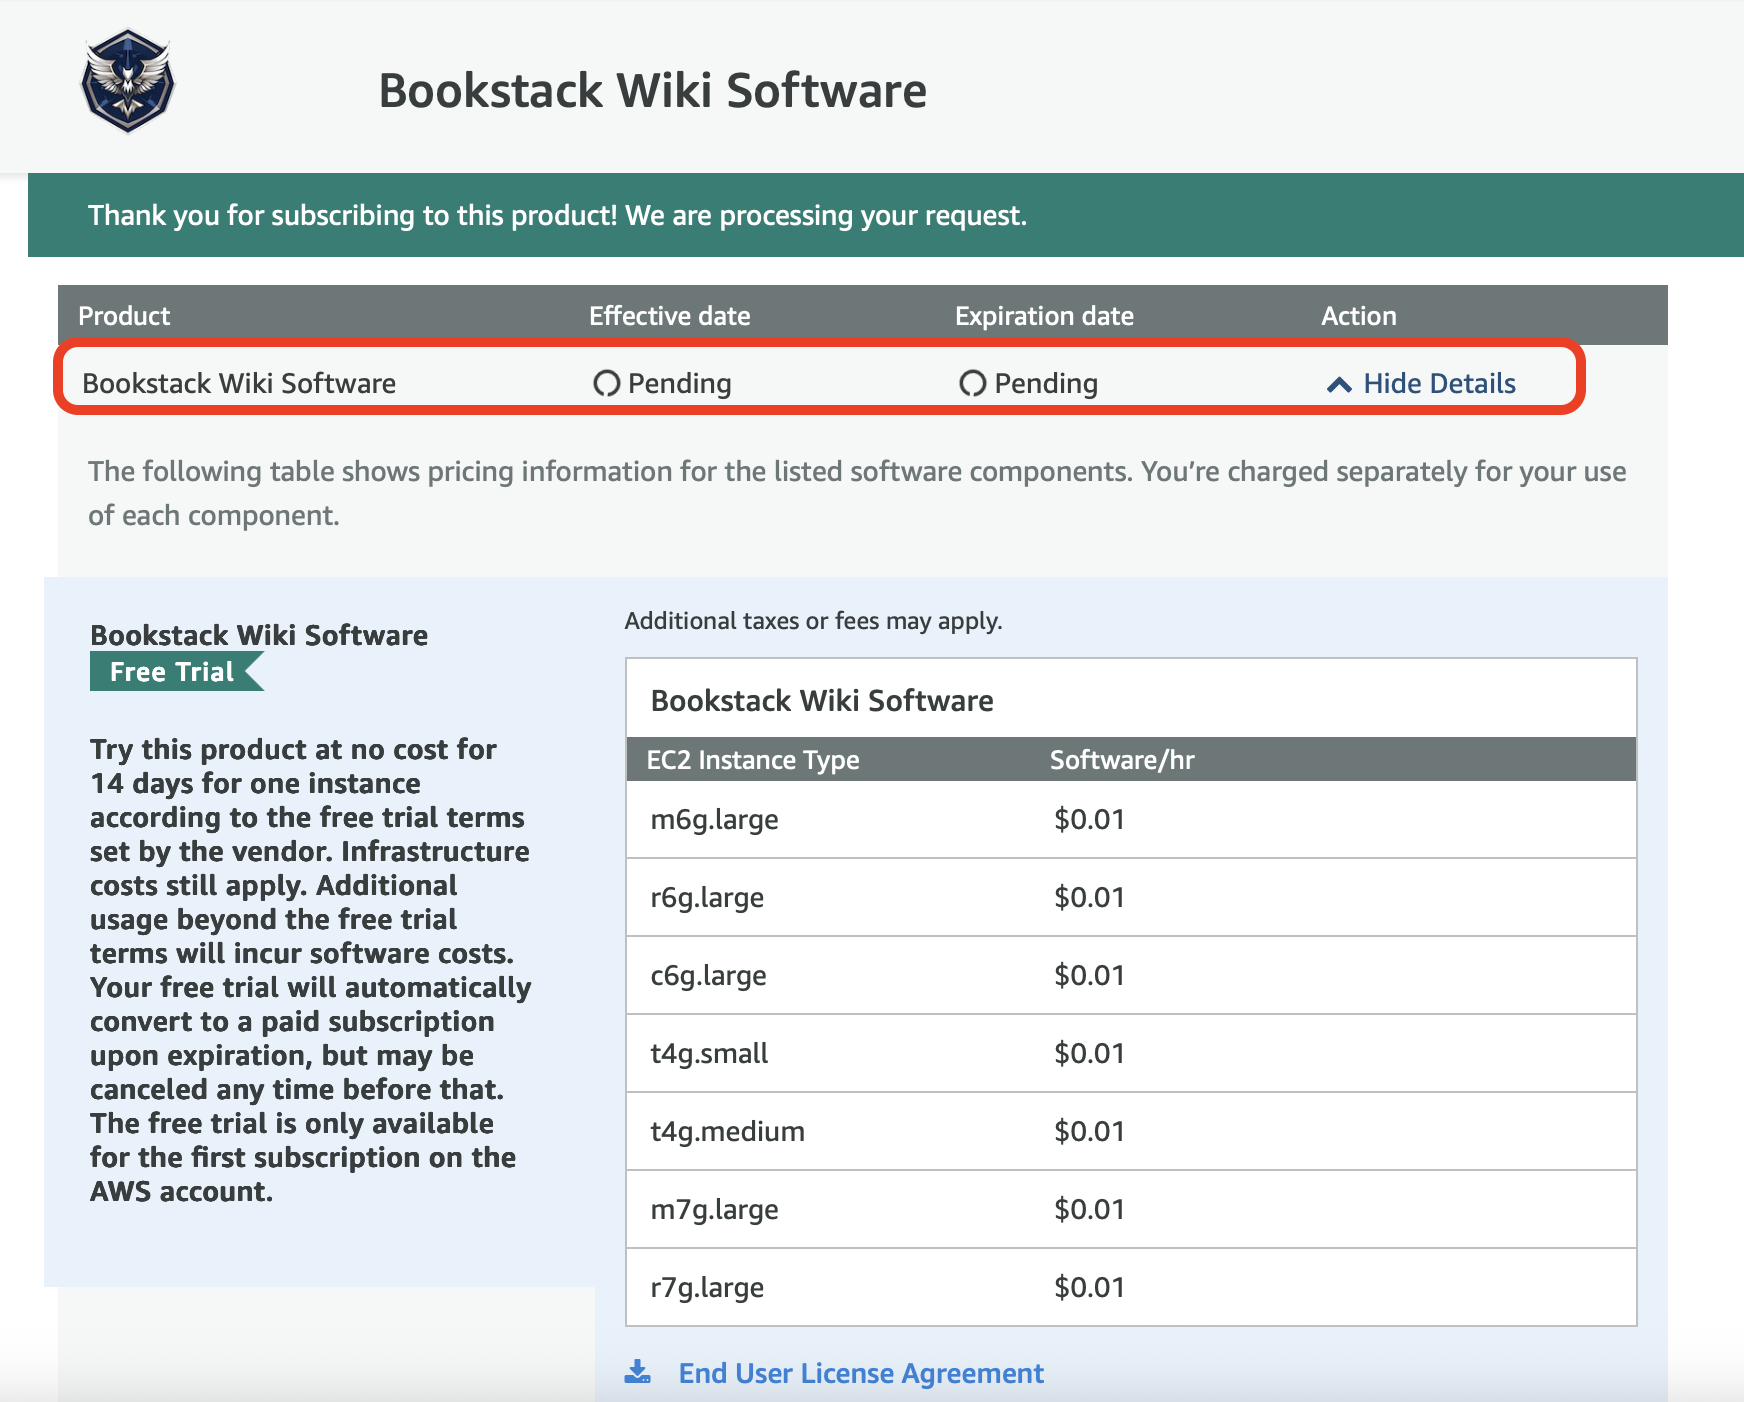
4. Wait until the subscription is active and click on Continue to Configuration.
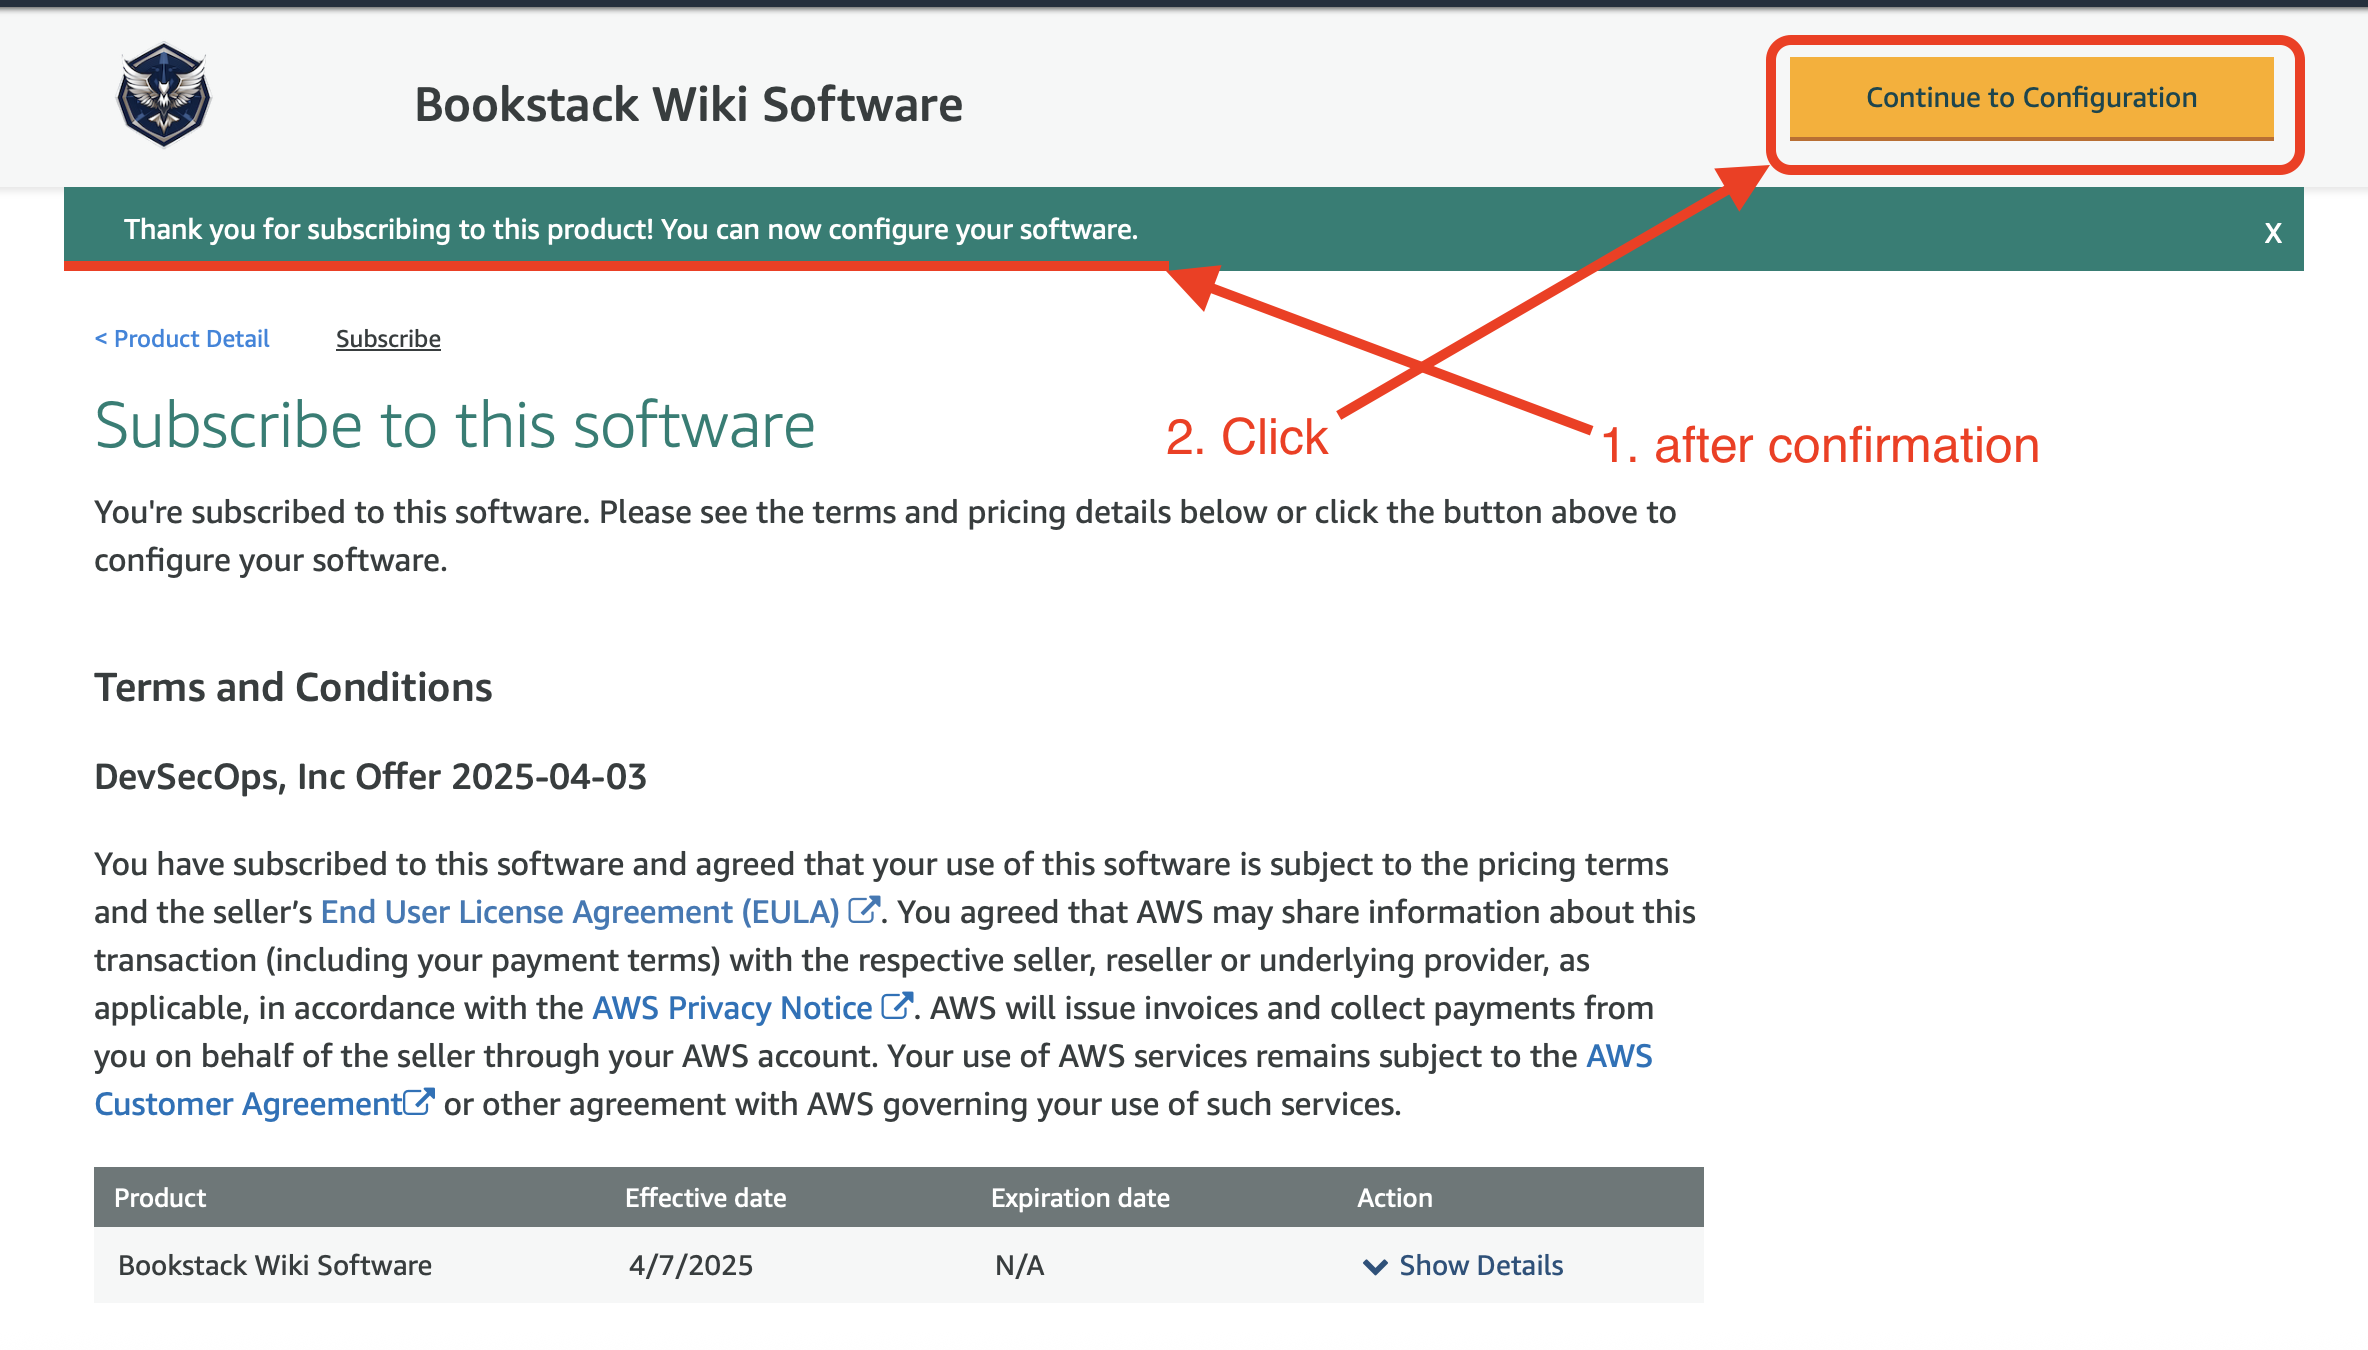
5. Continue with selecting fulfillment option, version, and region.
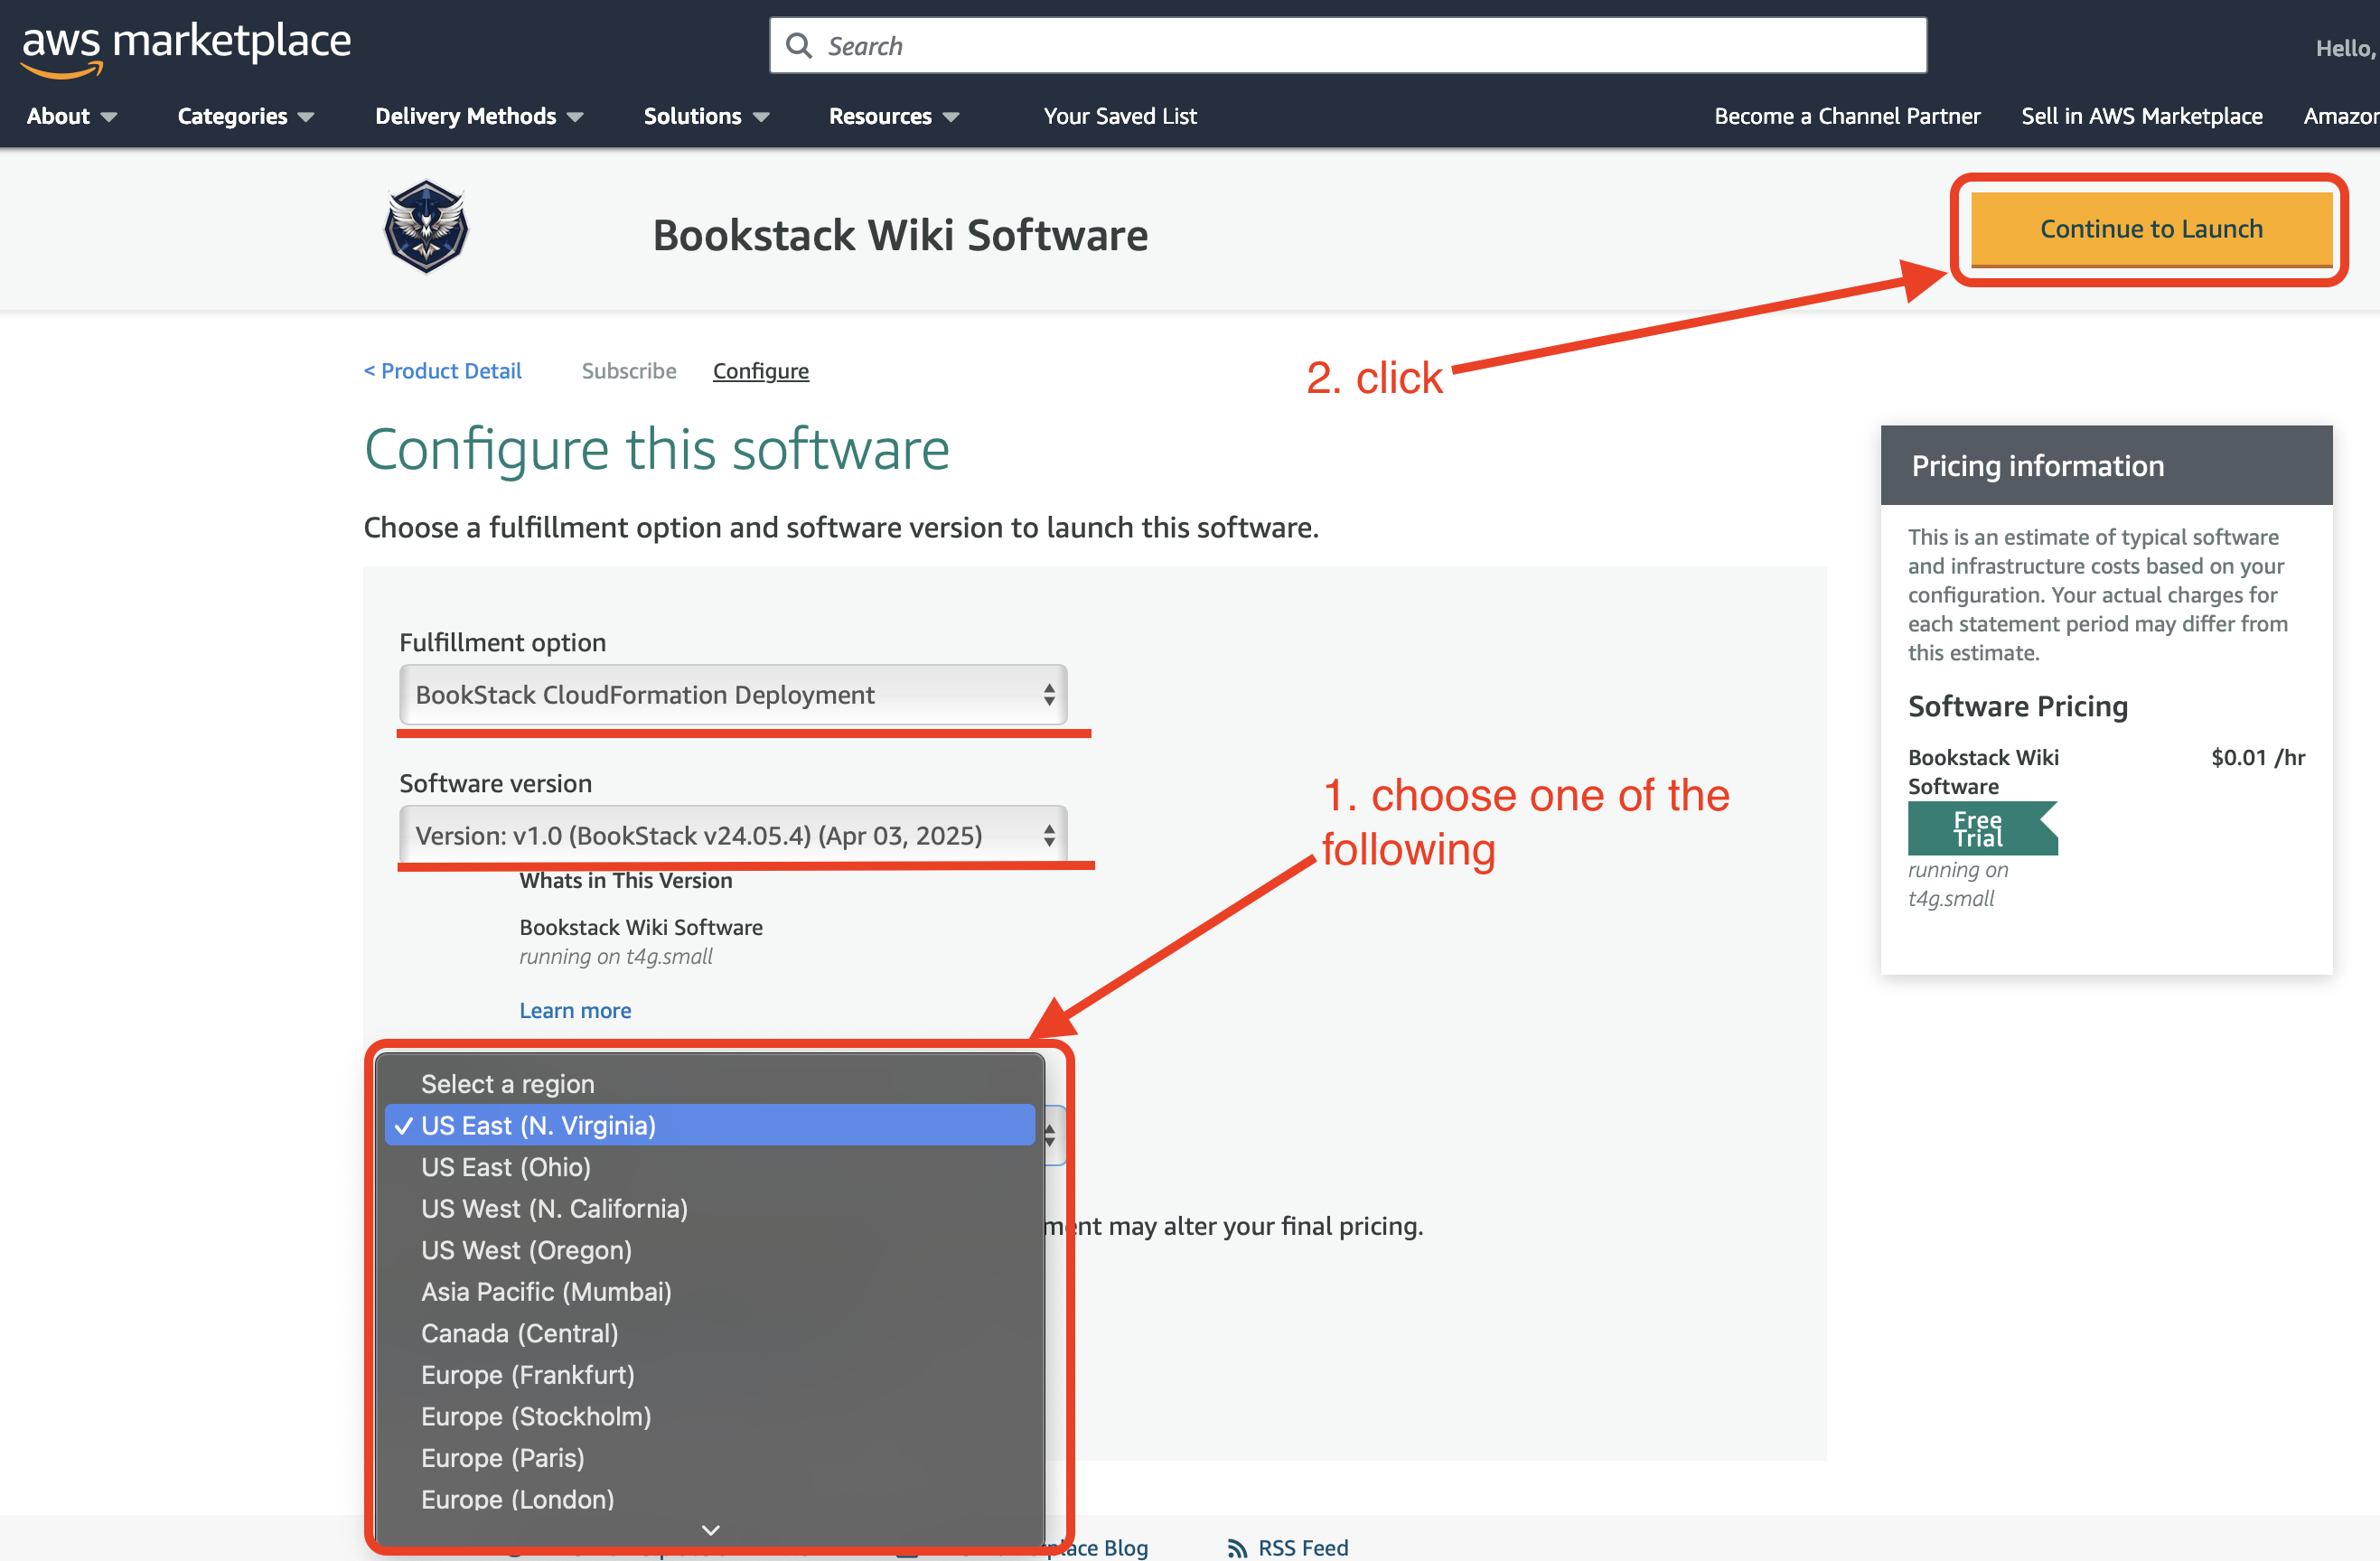
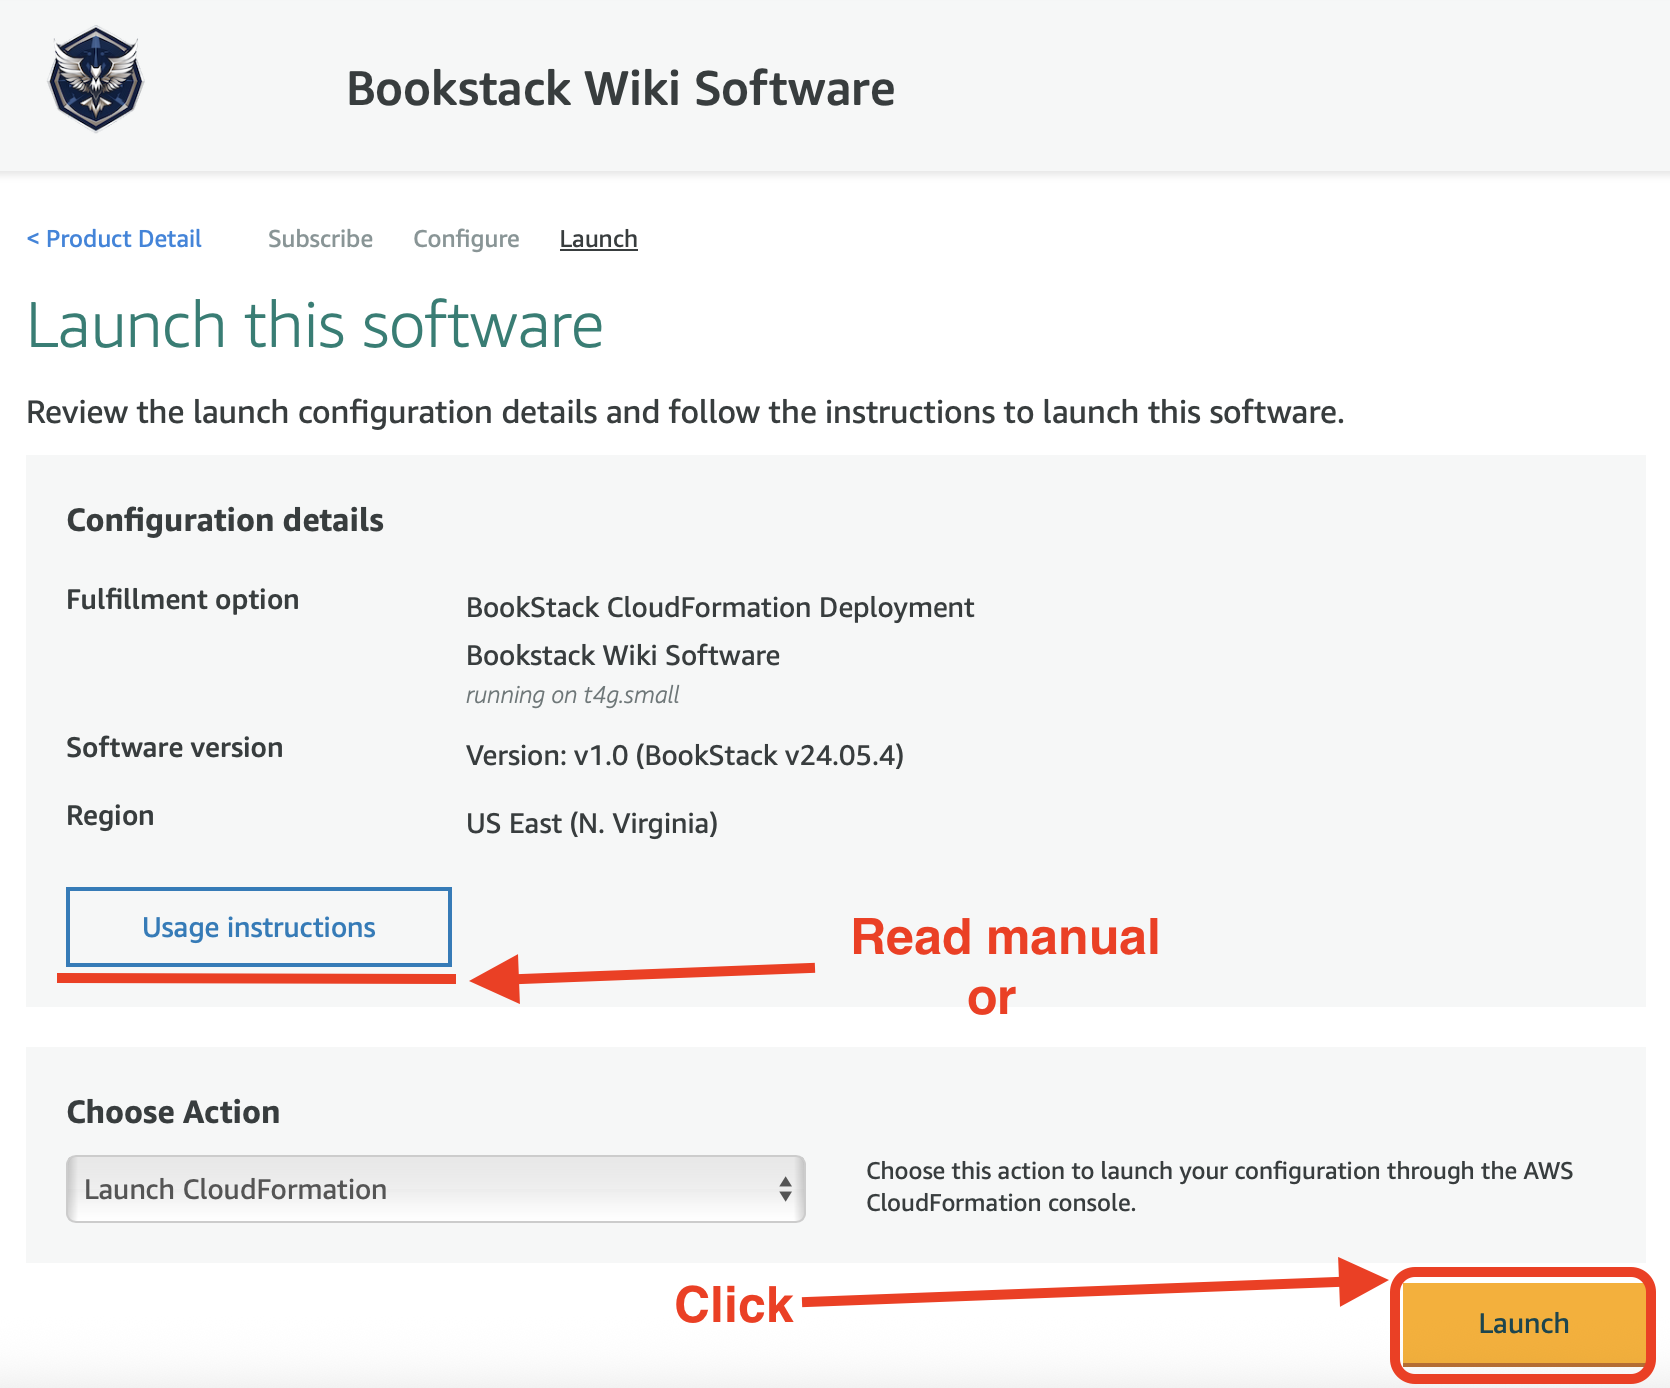
6. Launch. Here, you can read the manual or launch your own wiki.
⚠ Important Notice! We provide three Fulfillment options:
| Fulfillment option | Description | Architecture |
| 1. Bookstack infra without Cognito, default VPC, RDS AutoBackup Off, Single-AZ, EC2. ≈$45.40 | Cost-efficient BookStack deployment utilizing an existing VPC and RDS Single-AZ. AWS Cognito is excluded, but the setup retains EFS Backup, Secrets Manager, Systems Manager, EC2, and CloudWatch Logs for security and monitoring. | Open Diagram |
| 2. Bookstack infra enabled Cognito, default VPC, RDS AutoBackup Off, Single-AZ, EC2. ≈$51.40 | Balanced BookStack deployment utilizing an existing VPC with AWS Cognito for authentication. RDS Single-AZ with AutoBackup disabled ensures cost efficiency, while EFS Backup, Secrets Manager, Systems Manager, EC2, and CloudWatch Logs provide security and monitoring. | Open Diagram |
| 3. Bookstack infra enabled Cognito, new VPC, RDS AutoBackup Off, Single-AZ, EC2. ≈$84.25 |
Optimized BookStack deployment with Cognito authentication, new VPC, and RDS Single-AZ. Includes EC2 instance, EFS Backup, Secrets Manager, Systems Manager, and CloudWatch Logs for enhanced security, scalability, and monitoring |
Open Diagram |
2️⃣ Deployment via CloudFormation
📌 Choosing Parameters
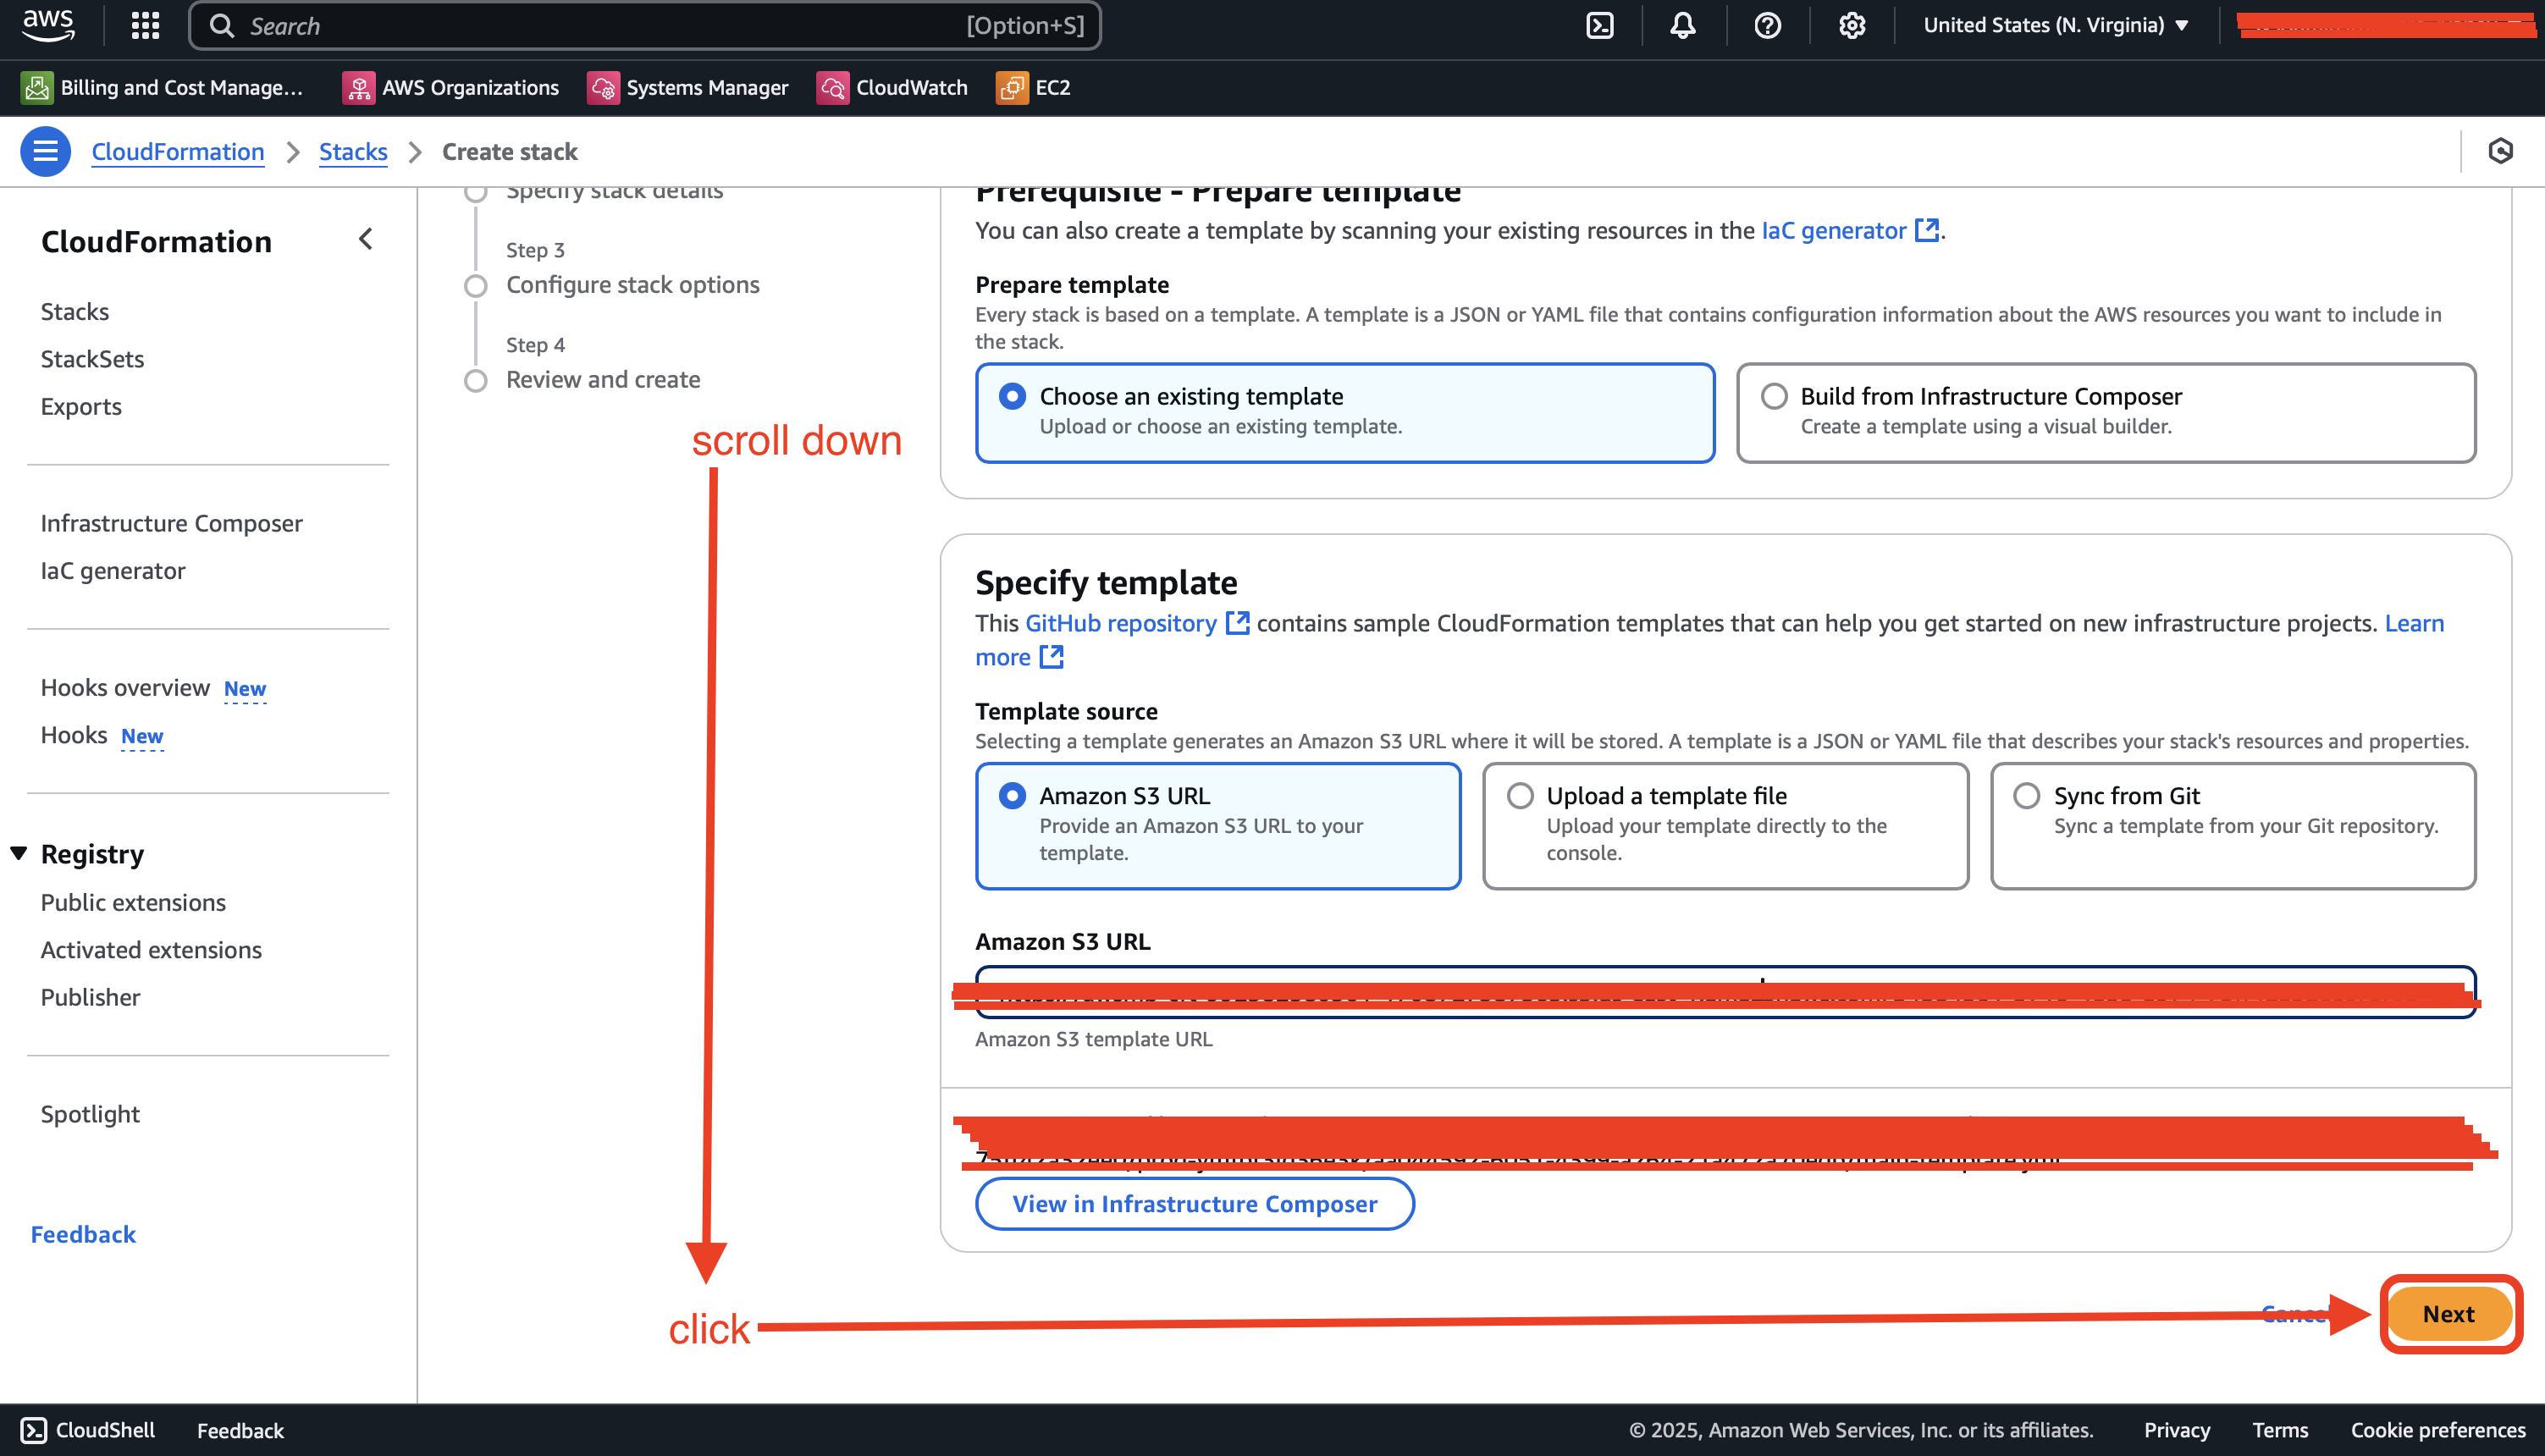
1. You will be redirected to CloudFormation Stack Launch with selected AWS region where you want to deploy BookStack. Click Next.
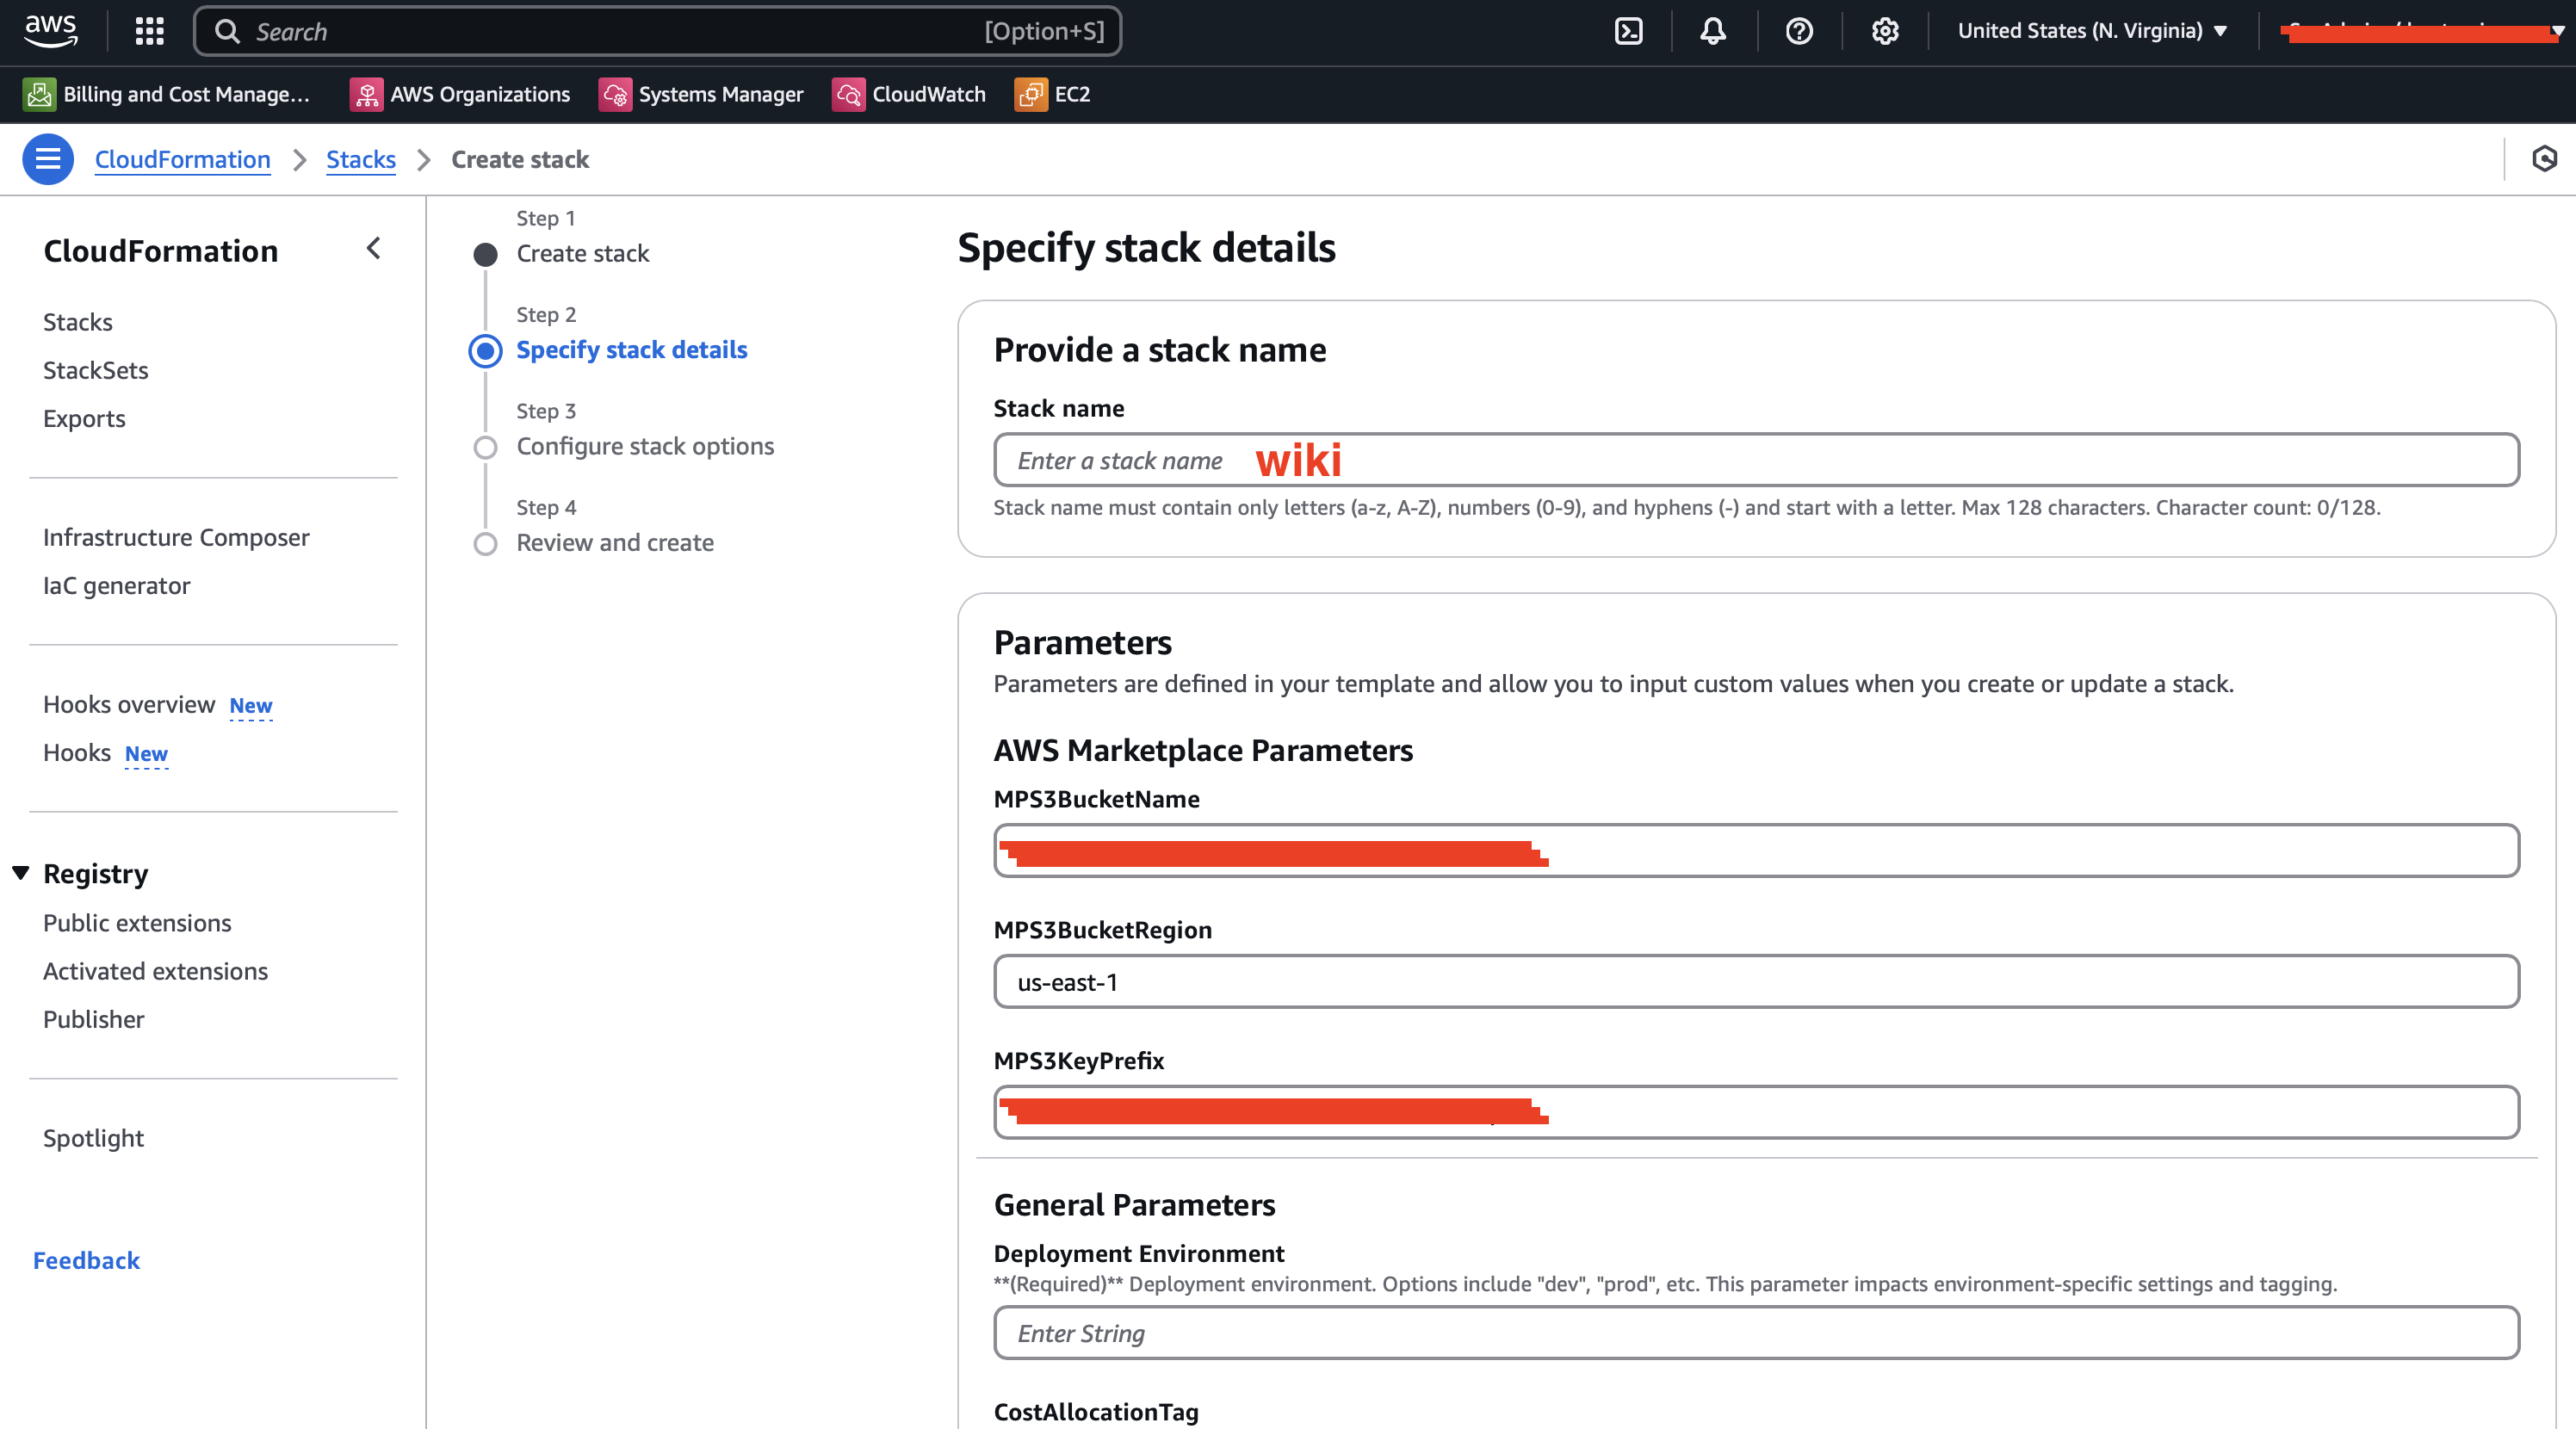
2. Specify stack details. Here, you need to fill in the Stack name. You can choose any name for your stack, but we recommend using a structured format like: bookstack (e.g., wiki, docs, etc.).
For this guide, we will use wiki as an example.
To proceed, please follow this instruction: 2. Configuring Parameters for main stack
#2 Installation - Setup Guide (Bookstack)
Bookstack is managed and configured via CloudFormation.
📌 0. How to Find Required Parameters
To properly deploy BookStack, you need to provide the following network parameters and certificate ARN:
1️⃣ VpcCidrBlock (CIDR block for the VPC)
• If you are creating a new VPC, use 10.0.0.0/16 as the default value.
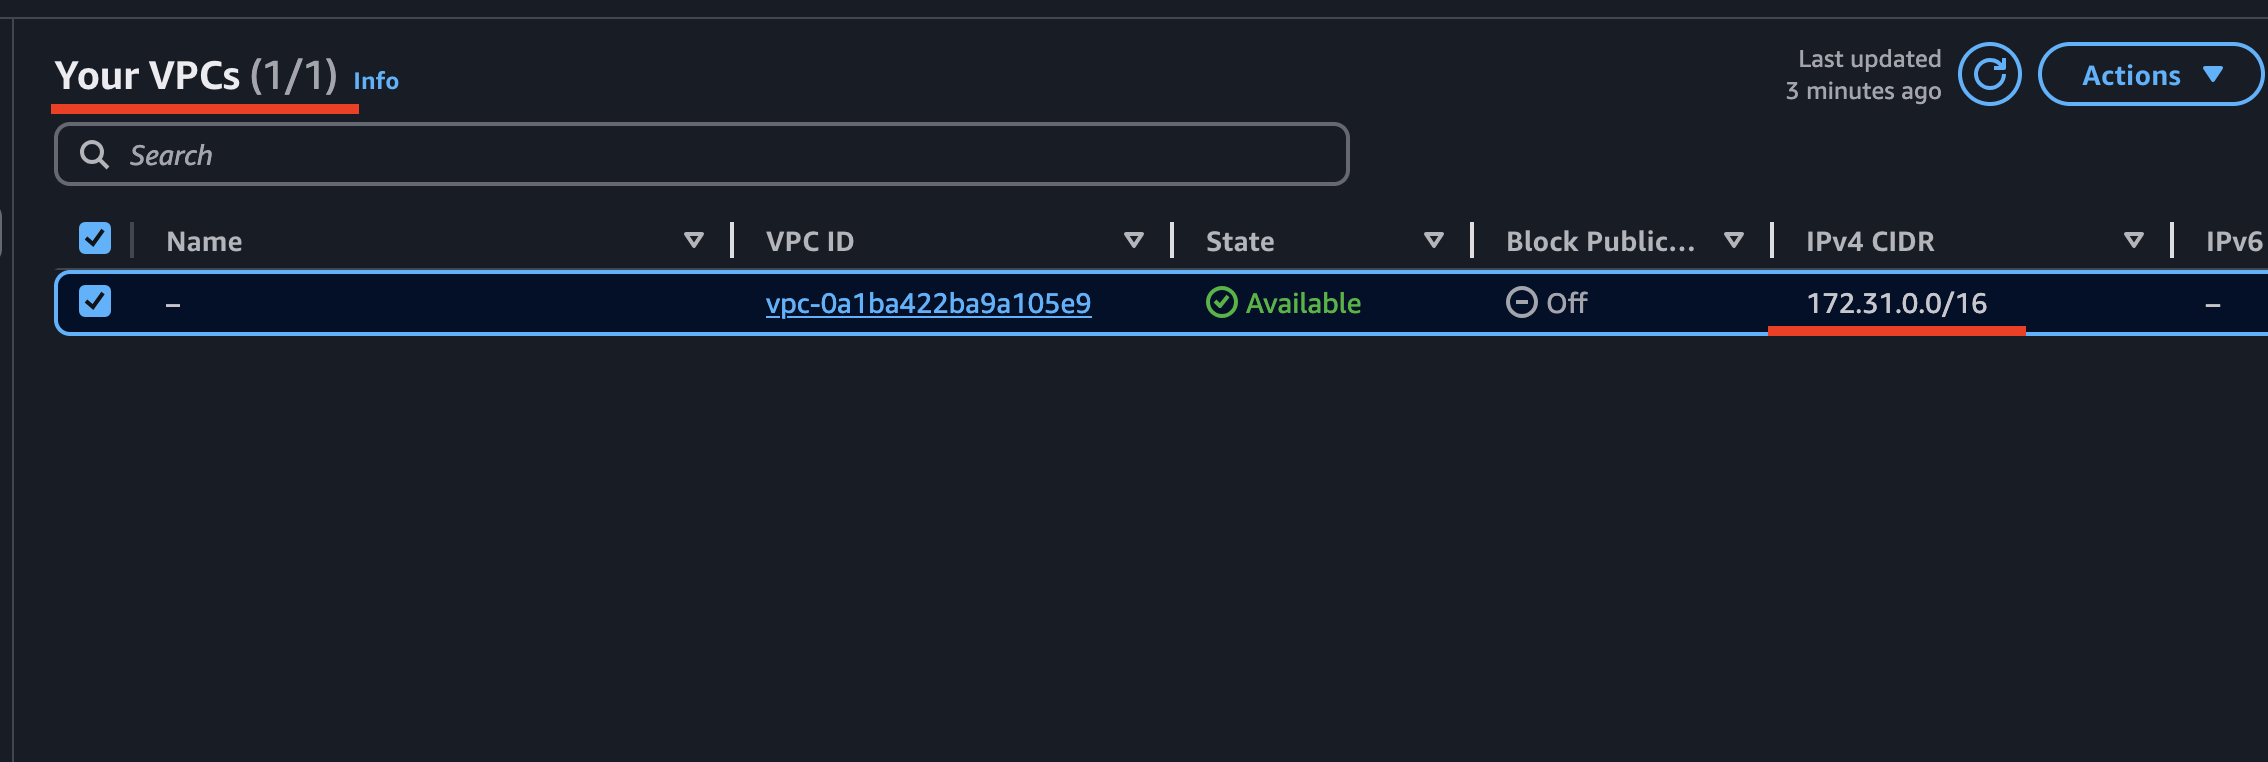
• If you are using an existing VPC, retrieve the CIDR block:
• Open AWS Console → VPC → Your VPCs
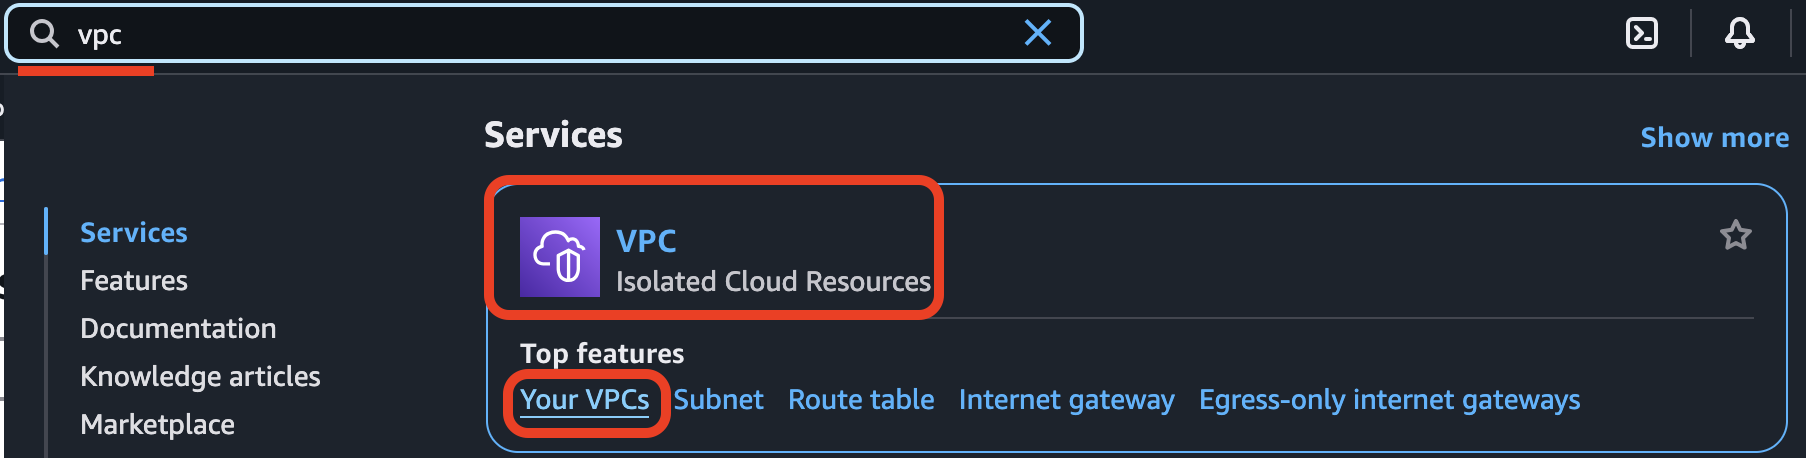
• Locate your VPC and copy the IPv4 CIDR value.
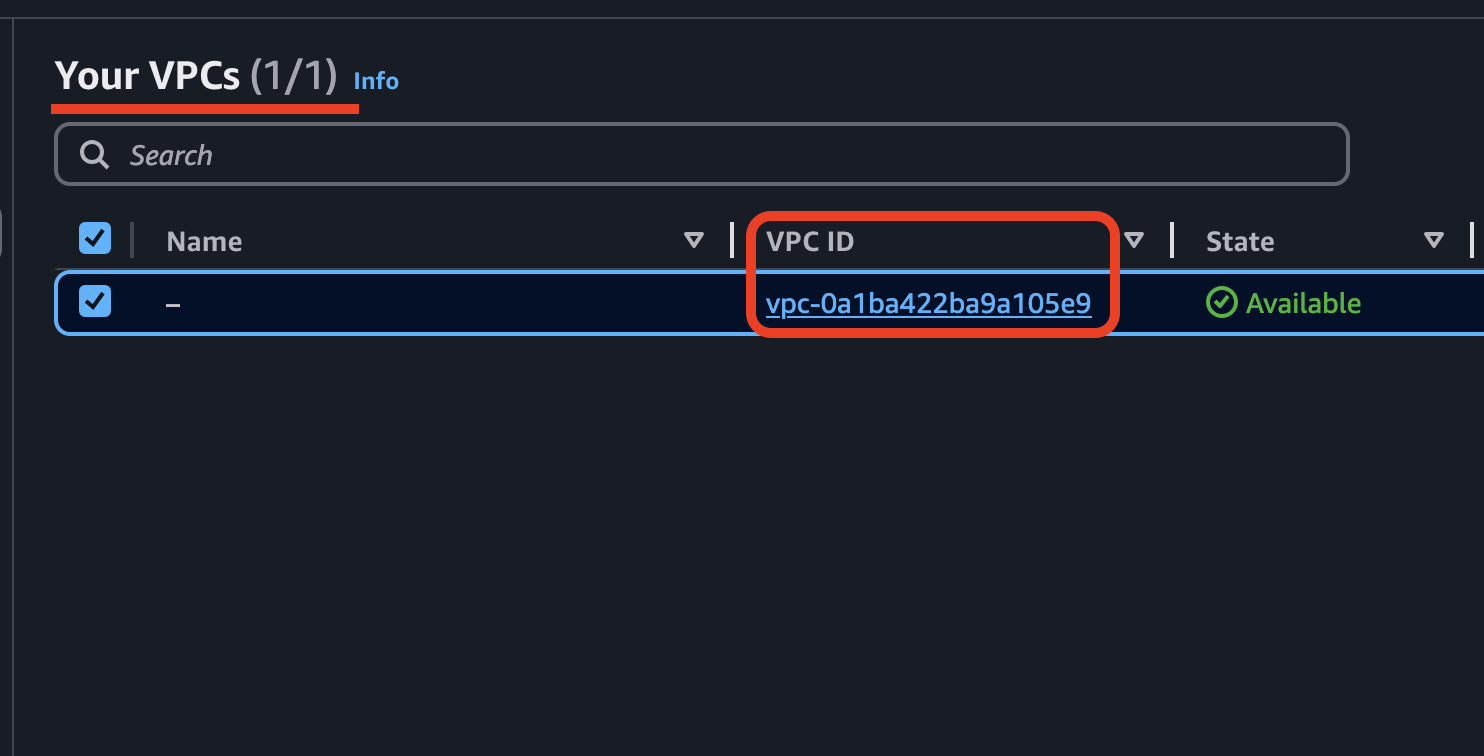
2️⃣ VpcId (VPC ID)
• Locate your VPC and copy its VPC ID (e.g., vpc-0a1ba422ba9a105e9).
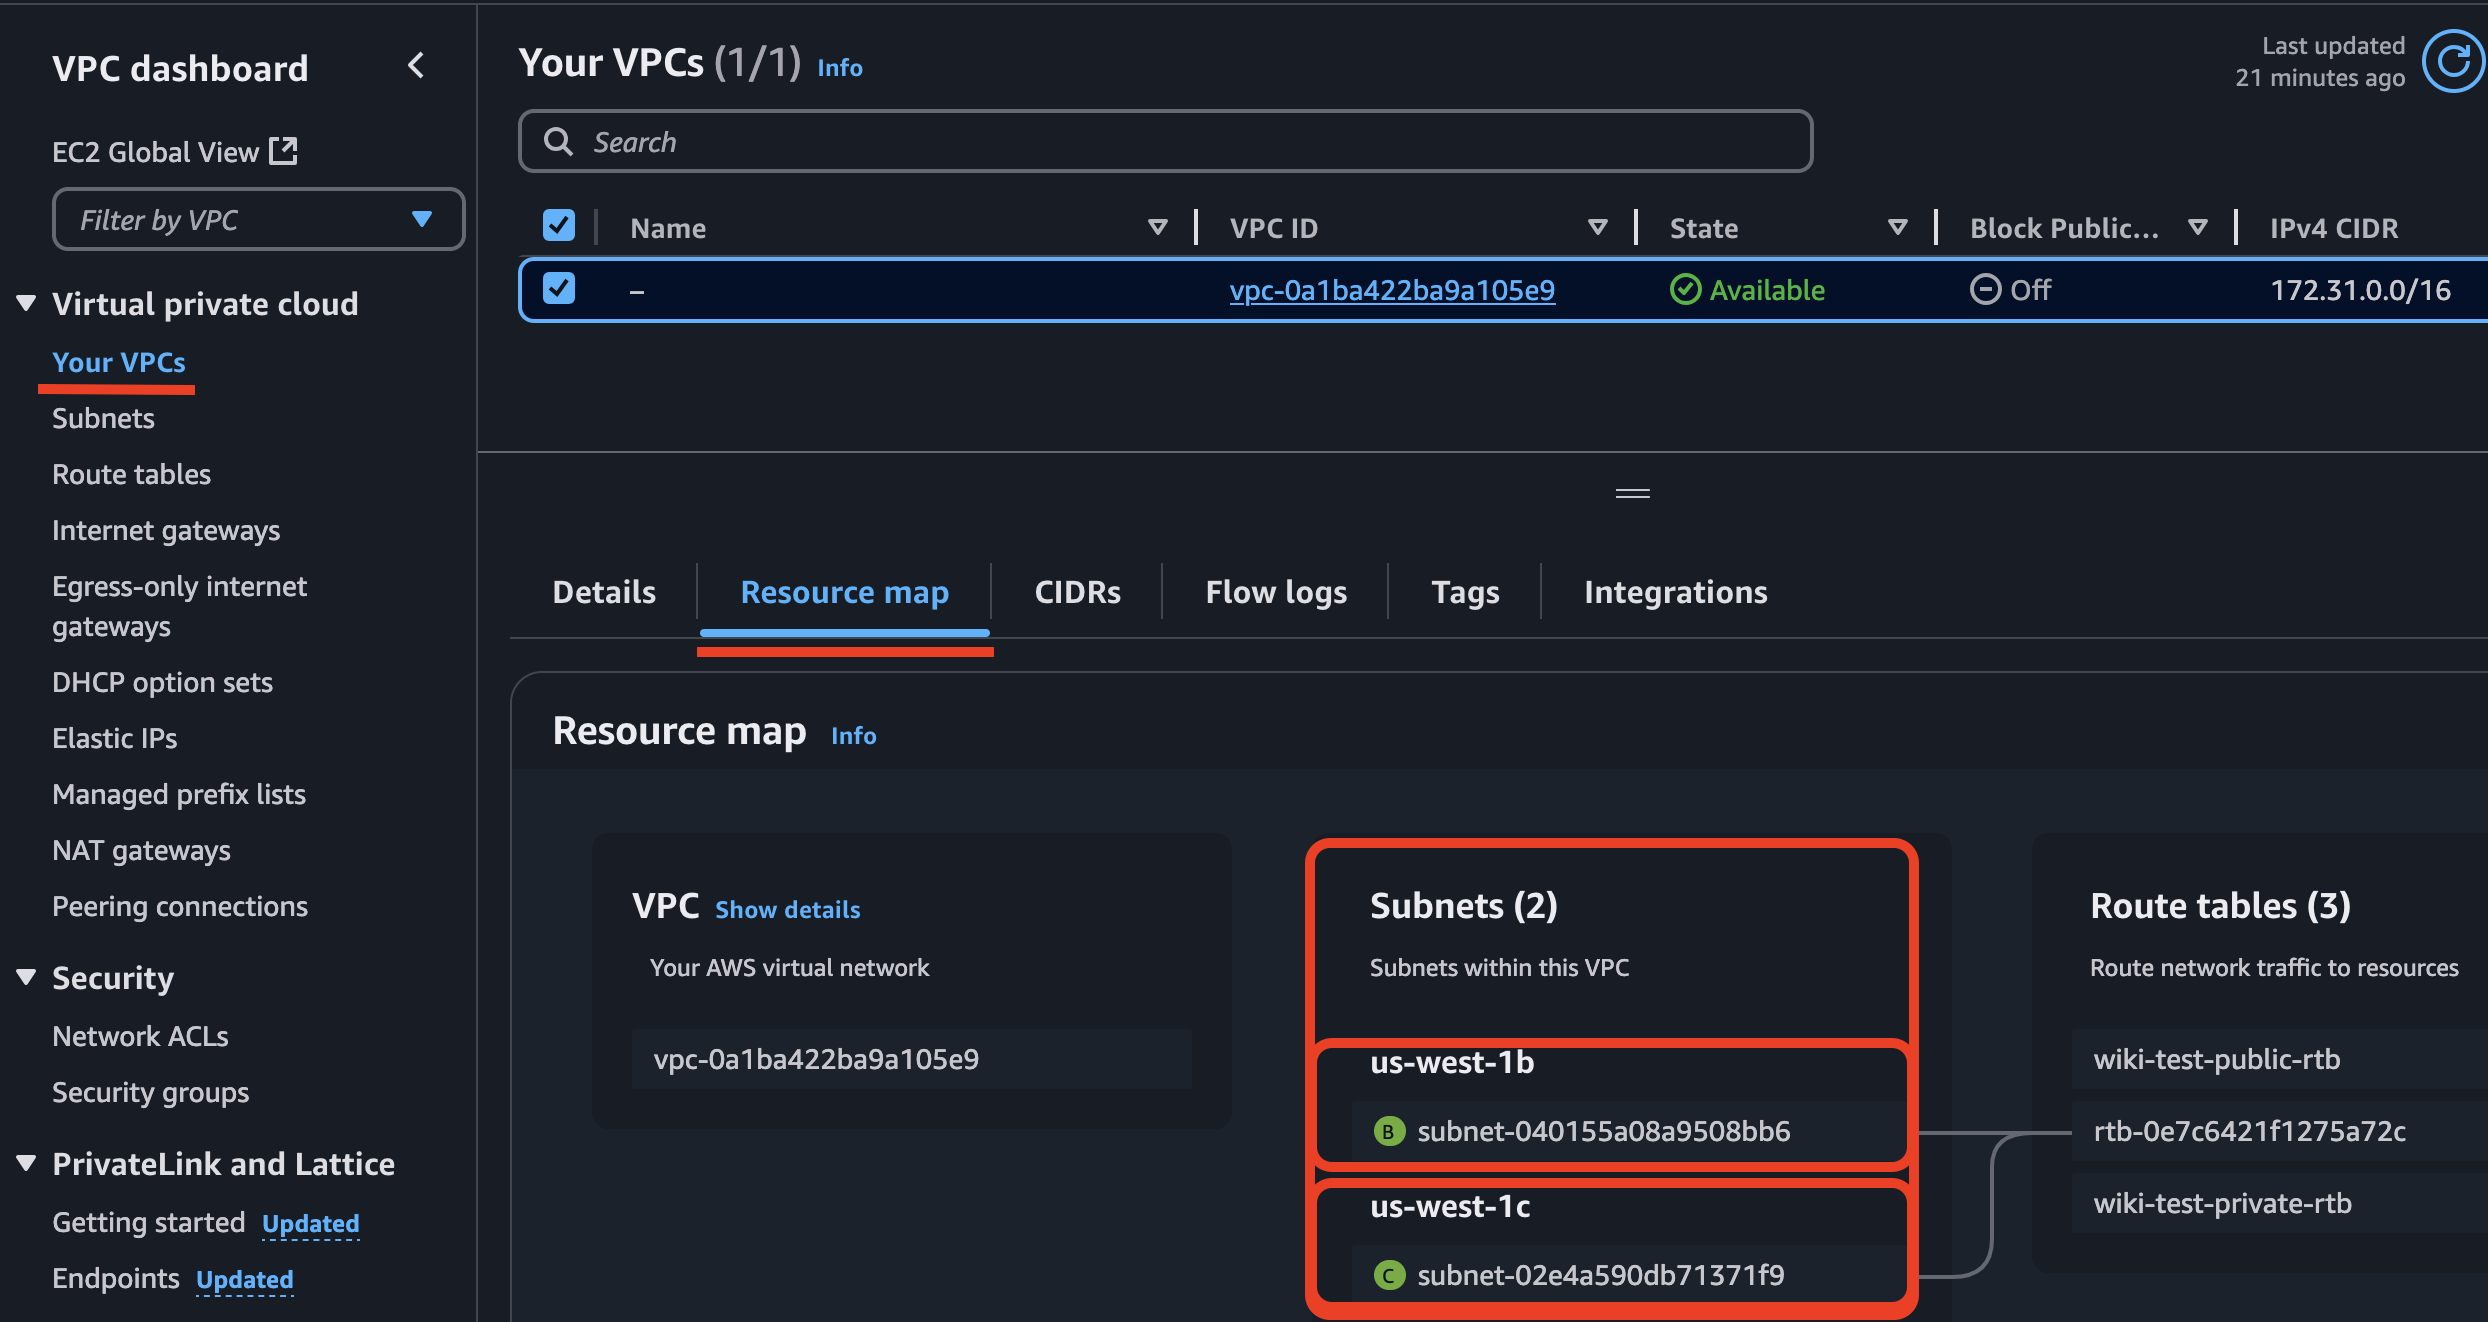
3️⃣ Subnet1Id & Subnet2Id (Subnet IDs)
• Open AWS Console → VPC → Subnets
• Select your VPC, and at the bottom panel, navigate to the Resource Map tab.
• Here, you will see a list of all subnets associated with your VPC.
• Choose two private subnets (preferably in different Availability Zones) and copy their Subnet IDs (e.g., subnet-040155a08a9508bb6, subnet-02e4a590db71371f9).
⚠ Important Notice! Ensure that the region of your resources matches the deployment region in CloudFormation. If you select resource IDs from Region A but deploy in Region B, you will encounter an error stating that the specified resources do not exist. This happens because each AWS region has its own unique set of resource IDs.
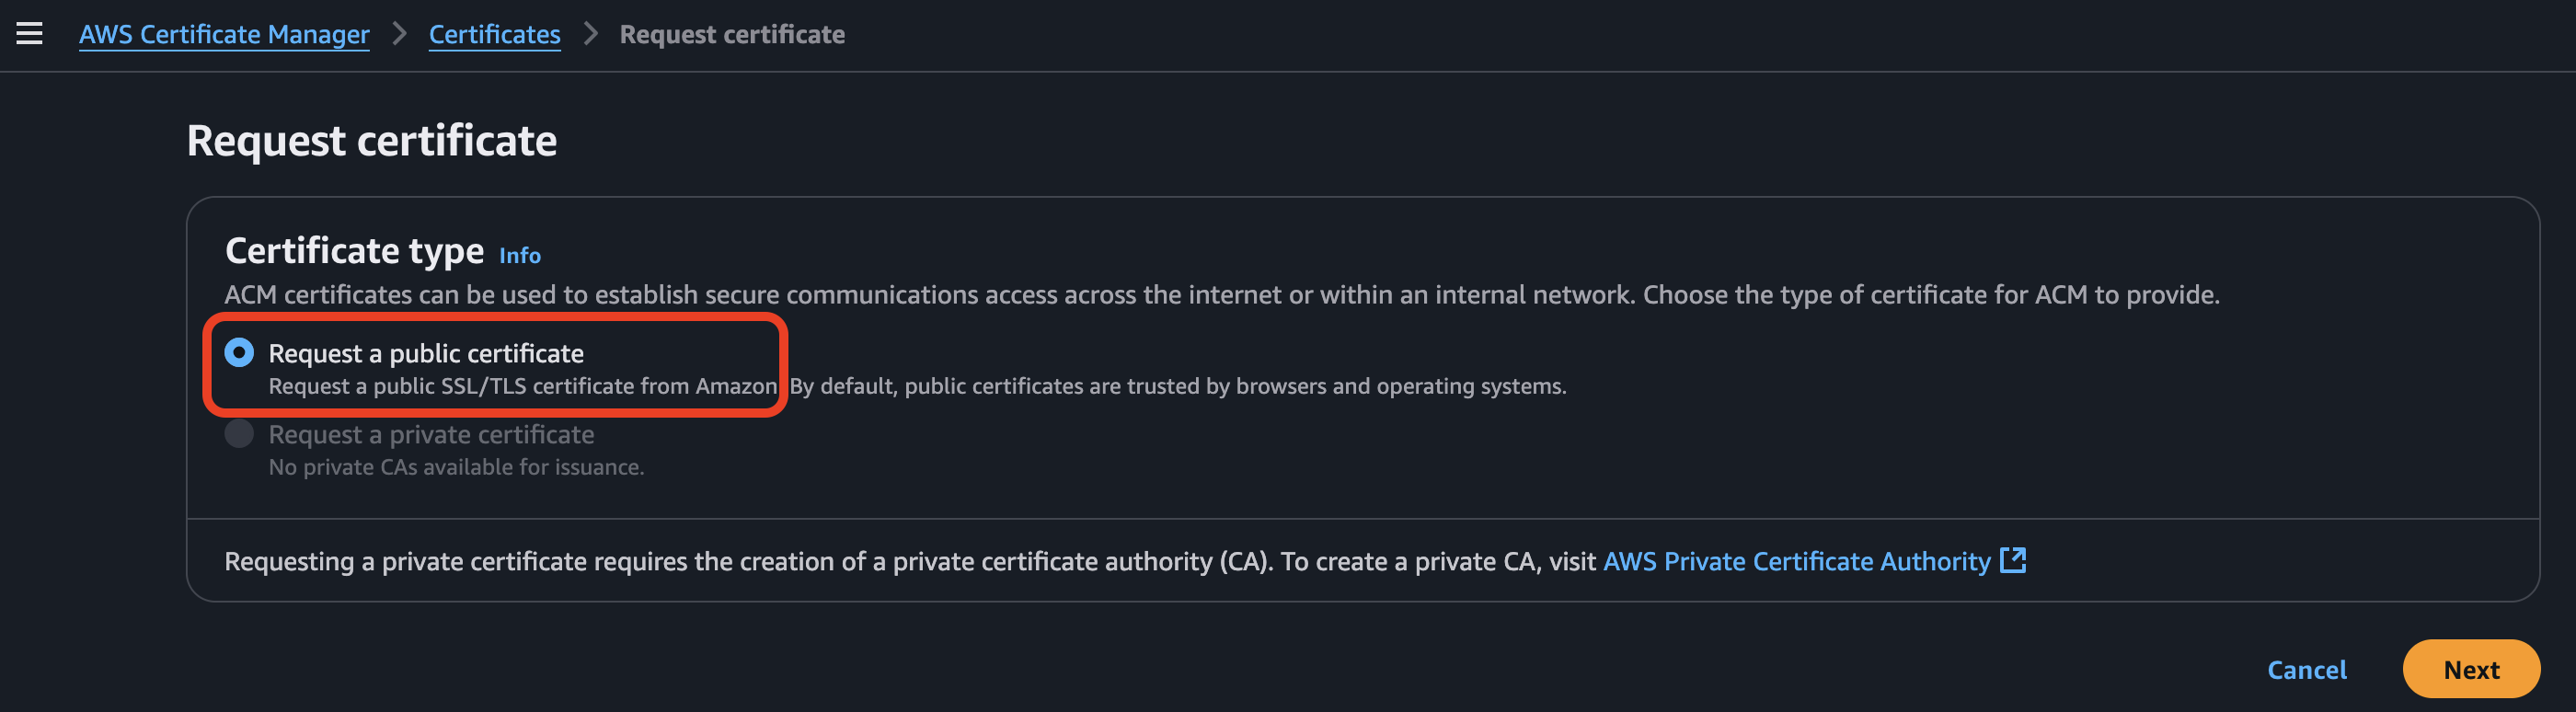
4️⃣ Obtain an SSL Certificate (if you don’t have one):
• Request a new certificate by selecting “Request a public certificate” and click Next.
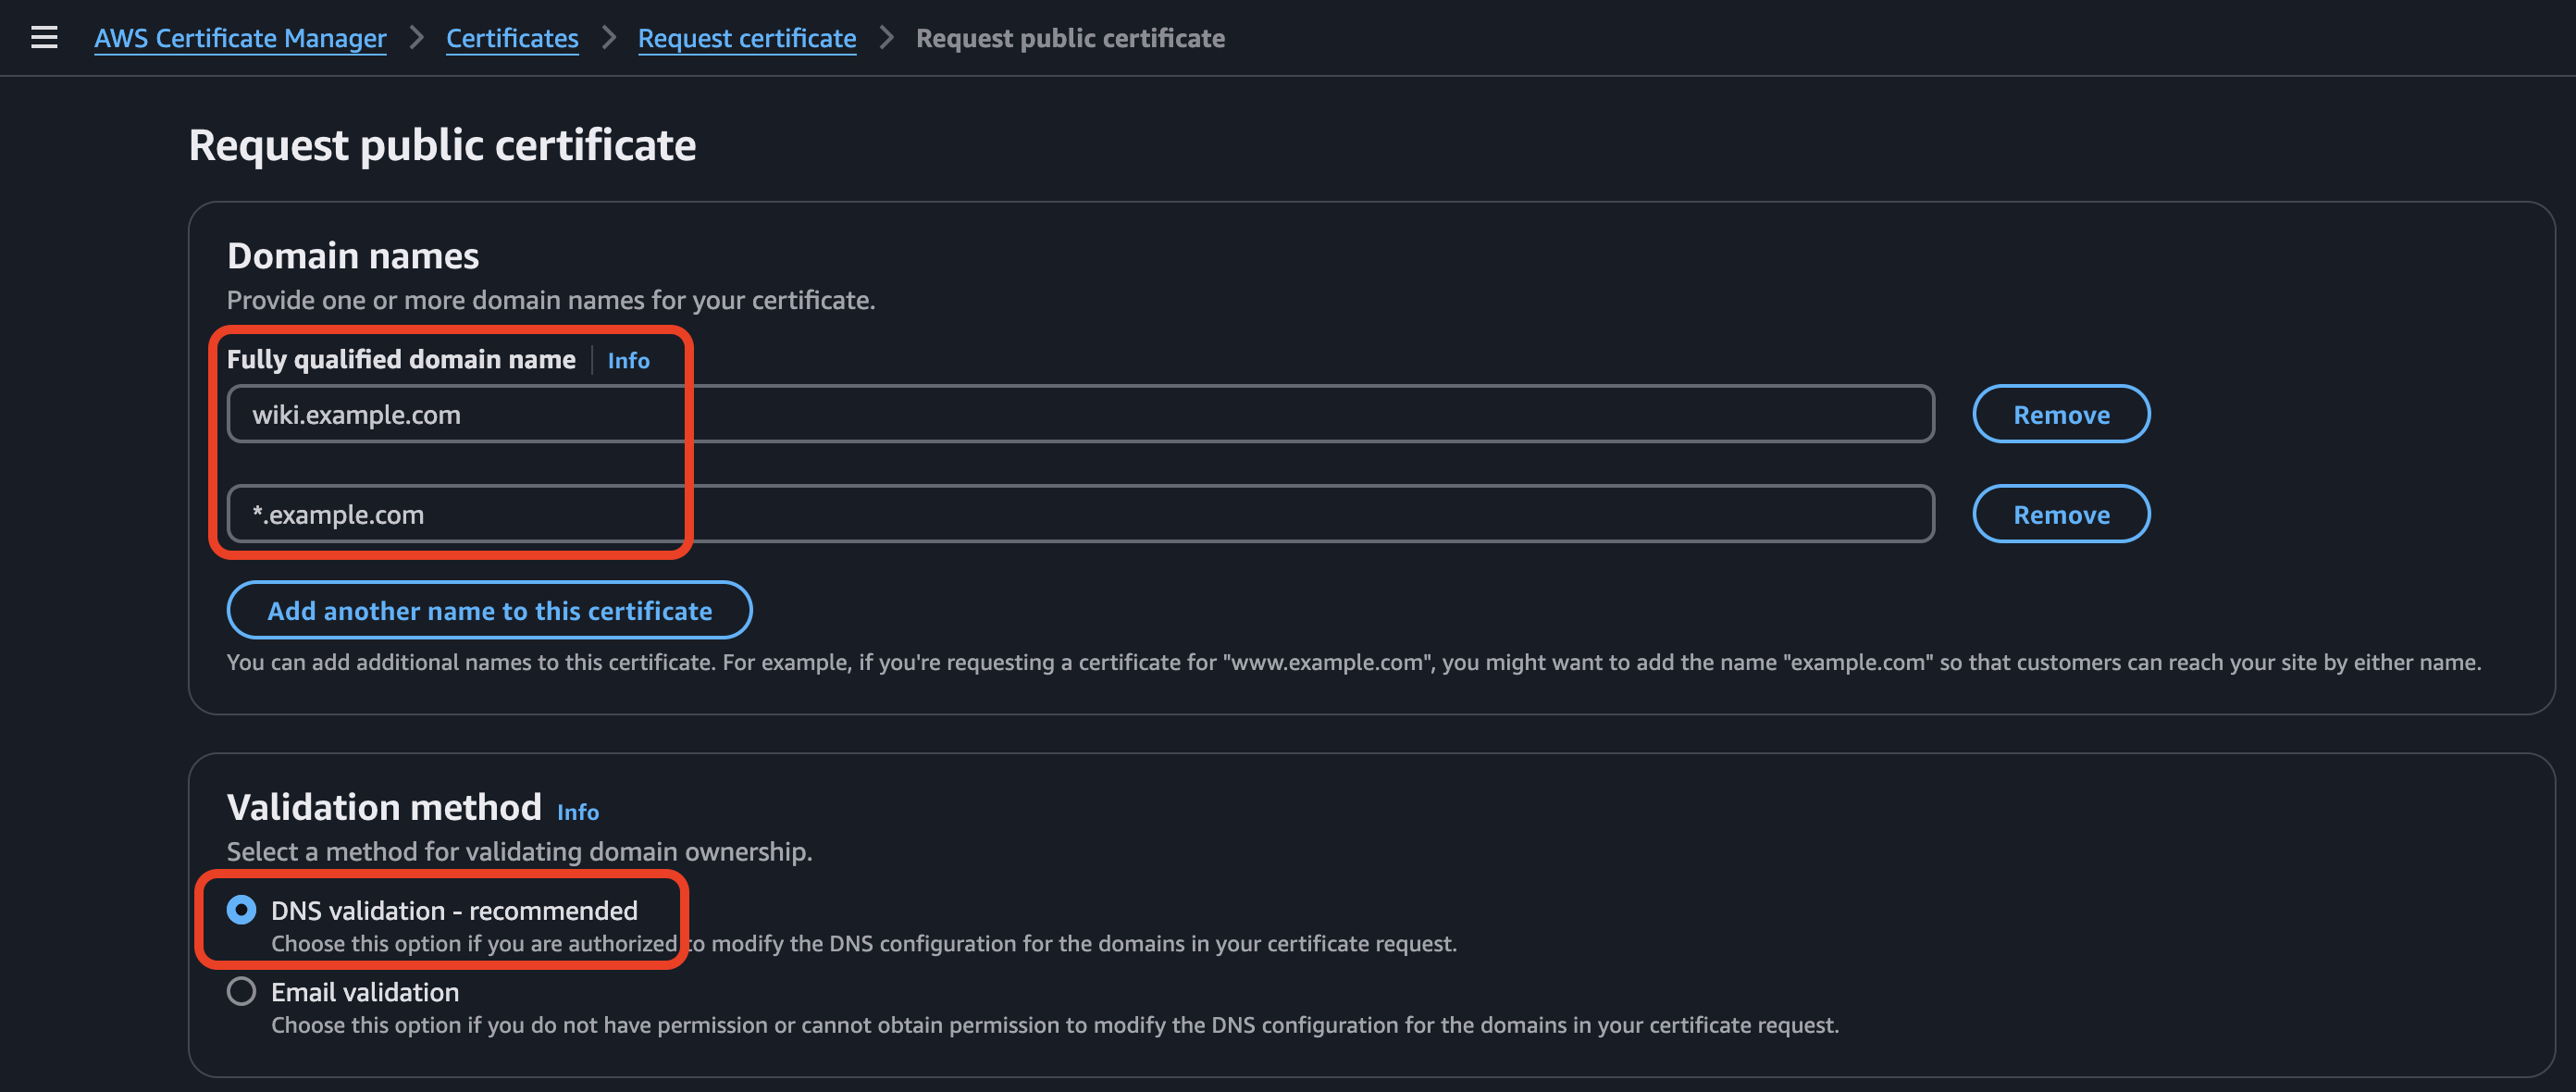
• Follow the steps to validate your domain using DNS validation (recommended) or Email validation.
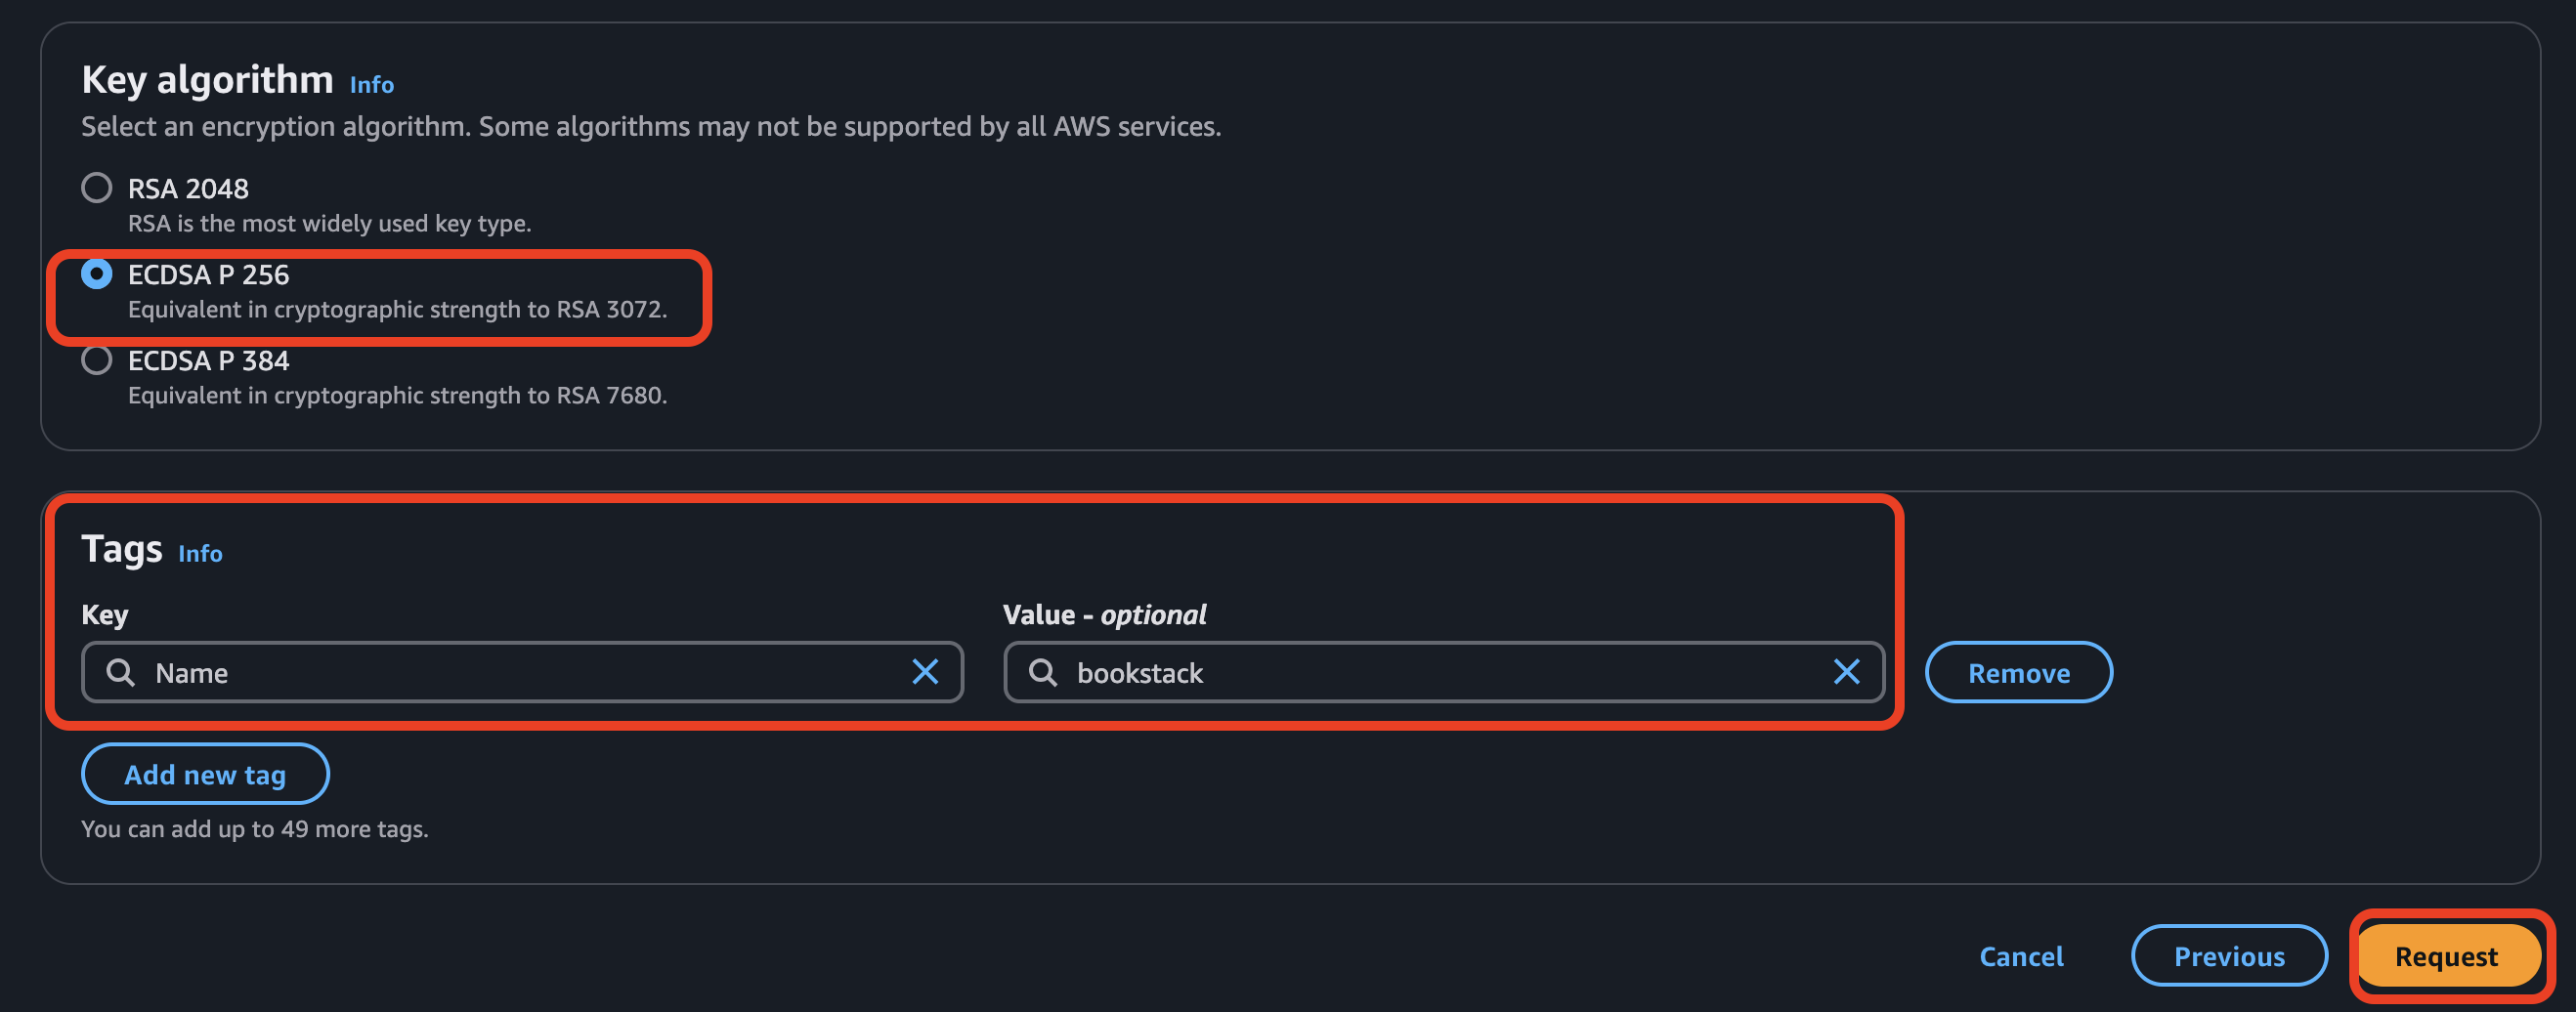
• Select ECDSA P-256 as the key algorithm. This is equivalent in cryptographic strength to RSA 3072 but provides better performance. If ECDSA P-256 is not supported by your use case, you can use RSA 2048 instead (though it is less efficient). Create the tag with Key=Name, Value=bookstack (or any other meaningful name that helps you recognize it)
• Once the certificate is issued, copy its ARN and use it in the SSLCertificate parameter during deployment.
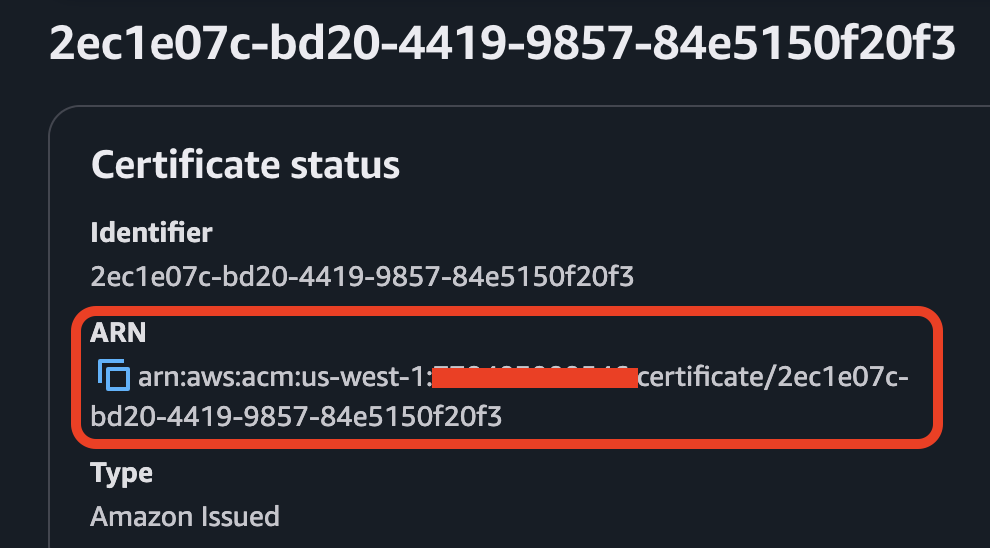
⚠ Important Notice! Ensure that the certificate is created in the same AWS region where you are deploying the CloudFormation stack. If the certificate is in a different region, the ALB will not be able to use it, and the deployment will fail.
📌 1. Check Region Availability for RDS MariaDB & EC2-instance
Check RDS MariaDB availability for your region
The availability of Graviton for RDS MariaDB may vary depending on your region. To speed up deployment and minimize the risk of an unavailable RDS instance type in your chosen region, we recommend referring to the MariaDB availability table based on the region from which you plan to deploy the BookStack infrastructure.
📅 Last availability scan date: March 19, 2025.
Checking region: ap-south-1 |
Checking region: eu-north-1 |
Checking region: eu-west-3 |
Checking region: eu-west-2 |
db.m6g.large |
db.m6g.large |
db.m6g.large |
db.m6g.large |
db.m7g.large |
db.m7g.large |
db.m7g.large |
db.m7g.large |
db.r6g.large |
db.r6g.large |
db.r6g.large |
db.r6g.large |
db.r7g.large |
db.r7g.large |
db.t4g.medium |
|
db.t4g.medium |
db.t4g.medium |
db.t4g.small |
db.t4g.medium |
db.t4g.small |
db.t4g.small |
db.t4g.small |
Checking region: eu-west-1 |
Checking region: ap-northeast-3 |
Checking region: ap-northeast-2 |
Checking region: ap-northeast-1 |
db.m6g.large |
db.m6g.large |
db.m6g.large |
db.m6g.large |
db.m7g.large |
db.r6g.large |
db.m7g.large |
db.m7g.large |
db.r6g.large |
db.t4g.medium |
db.r6g.large |
db.r6g.large |
db.r7g.large |
db.t4g.small |
db.r7g.large |
db.r7g.large |
db.t4g.medium |
db.t4g.medium |
db.t4g.medium |
|
db.t4g.small |
db.t4g.small |
db.t4g.small |
Checking region: ca-central-1 |
Checking region: sa-east-1 |
Checking region: ap-southeast-1 |
Checking region: ap-southeast-2 |
db.m6g.large |
db.m6g.large |
db.m6g.large |
db.m6g.large |
db.m7g.large |
db.r6g.large |
db.m7g.large |
db.m7g.large |
db.r6g.large |
db.t4g.medium |
db.r6g.large |
db.r6g.large |
db.r7g.large |
db.t4g.small |
db.r7g.large |
db.r7g.large |
db.t4g.medium |
db.t4g.medium |
db.t4g.medium |
|
db.t4g.small |
db.t4g.small |
db.t4g.small |
Checking region: eu-central-1 |
Checking region: us-east-1 |
Checking region: us-east-2 |
Checking region: us-west-1 |
Checking region: us-west-2 |
db.m6g.large |
db.m6g.large |
db.m6g.large |
db.m6g.large |
db.m6g.large |
db.m7g.large |
db.m7g.large |
db.m7g.large |
db.m7g.large |
db.m7g.large |
db.r6g.large |
db.r6g.large |
db.r6g.large |
db.r6g.large |
db.r6g.large |
db.r7g.large |
db.r7g.large |
db.r7g.large |
db.r7g.large |
db.r7g.large |
db.t4g.medium |
db.t4g.medium |
db.t4g.medium |
db.t4g.medium |
db.t4g.medium |
db.t4g.small |
db.t4g.small |
db.t4g.small |
db.t4g.small |
db.t4g.small |
Check EC2-instance availability for your region
The availability of Graviton for EC2 instance may vary depending on your region. To speed up deployment and minimize the risk of an unavailable EC2 instance type in your chosen region, we recommend referring to the EC2 availability table based on the region from which you plan to deploy the BookStack infrastructure.
📅 Last availability scan date: March 20, 2025.
Checking region: ap-south-1 |
Checking region: eu-north-1 |
Checking region: eu-west-3 |
Checking region:eu-west-2 |
r6g.large |
t4g.small |
c6g.large |
m7g.large |
|
|
r6g.large |
m6g.large |
r6g.large |
c6g.large |
c6g.large |
t4g.small |
r7g.large |
m7g.large |
m6g.large |
r6g.large |
m6g.large |
t4g.small |
m7g.large |
m7g.large |
t4g.medium |
r7g.large |
r7g.large |
t4g.medium |
t4g.small |
m6g.large |
t4g.medium |
c6g.large |
Checking region: eu-west-1 |
Checking region: ap-northeast-3 |
Checking region: ap-northeast-2 |
Checking region: ap-northeast-1 |
c6g.large |
c6g.large |
t4g.medium |
t4g.medium |
t4g.medium |
t4g.small |
m6g.large |
t4g.small |
m7g.large |
t4g.medium |
r6g.large |
c6g.large |
t4g.small |
r6g.large |
c6g.large |
r7g.large |
r6g.large |
m6g.large |
m7g.large |
r6g.large |
m6g.large |
m7g.large |
t4g.small |
m6g.large |
r7g.large |
r7g.large |
m7g.large |
Checking region: ca-central-1 |
Checking region: sa-east-1 |
Checking region: ap-southeast-1 |
Checking region: ap-southeast-2 |
t4g.medium |
r6g.large |
m6g.large |
t4g.medium |
c6g.large |
c6g.large |
t4g.small |
t4g.small |
t4g.small |
m6g.large |
m7g.large |
m6g.large |
r6g.large |
t4g.medium |
r7g.large |
r7g.large |
m6g.large |
t4g.small |
r6g.large |
r6g.large |
m7g.large |
r7g.large |
t4g.medium |
m7g.large |
r7g.large |
m7g.large |
c6g.large |
c6g.large |
Checking region: eu-central-1 |
Checking region: us-east-1 |
Checking region: us-east-2 |
Checking region: us-west-1 |
Checking region: us-west-2 |
m7g.large |
r7g.large |
m7g.large |
c6g.large |
m6g.large |
r6g.large |
t4g.small |
r6g.large |
m7g.large |
r7g.large |
t4g.medium |
m6g.large |
c6g.large |
r6g.large |
m7g.large |
t4g.small |
c6g.large |
t4g.medium |
r7g.large |
t4g.small |
m6g.large |
t4g.medium |
m6g.large |
m6g.large |
r6g.large |
r7g.large |
m7g.large |
t4g.small |
t4g.medium |
c6g.large |
c6g.large |
r6g.large |
r7g.large |
t4g.small |
t4g.medium |
📌 2. Configuring Parameters for main stack
Step 1. Prerequisite - Prepare template
We did the first step previously, when subscribed for the product in AWS Marketplace - Setup Guide, so move forward to the next step.
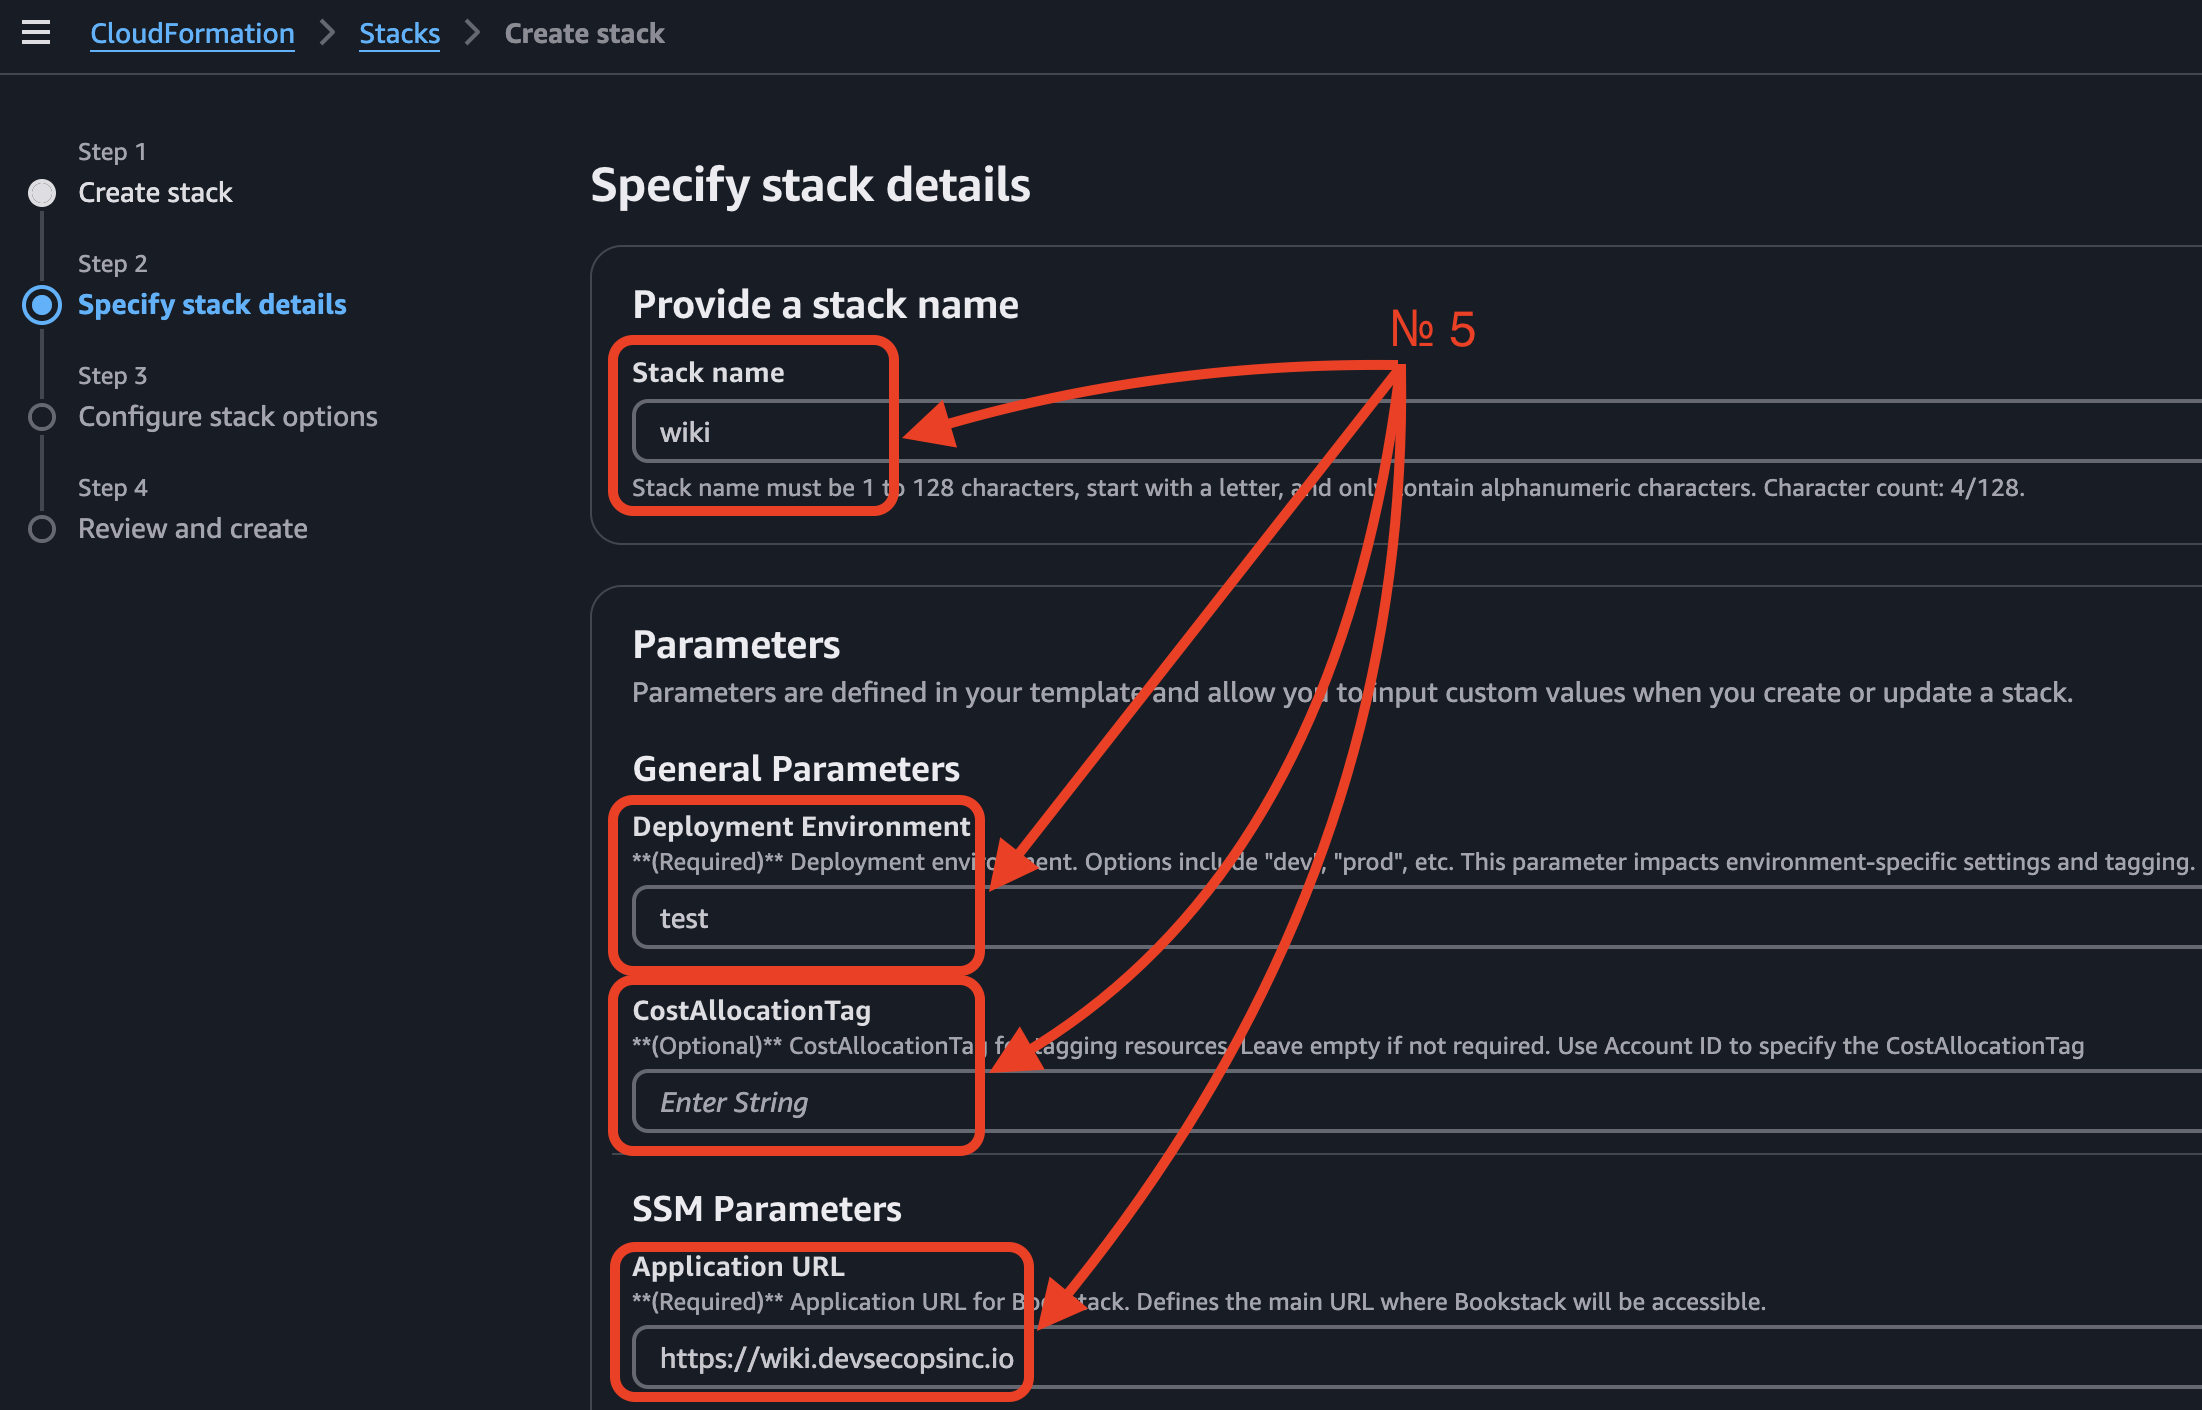
Step 2. Specify stack details
Here, you need to fill in the Stack name. You can choose any name for your stack, but we recommend using a structured format like: bookstack (e.g., wiki, docs, etc.).
For this guide, we will use wiki as an example.

There are 21 parameters, some of which are predefined. You don’t need to fill in all of them — just focus on the required and empty fields. For additional guidance, refer to the help description provided under each parameter.
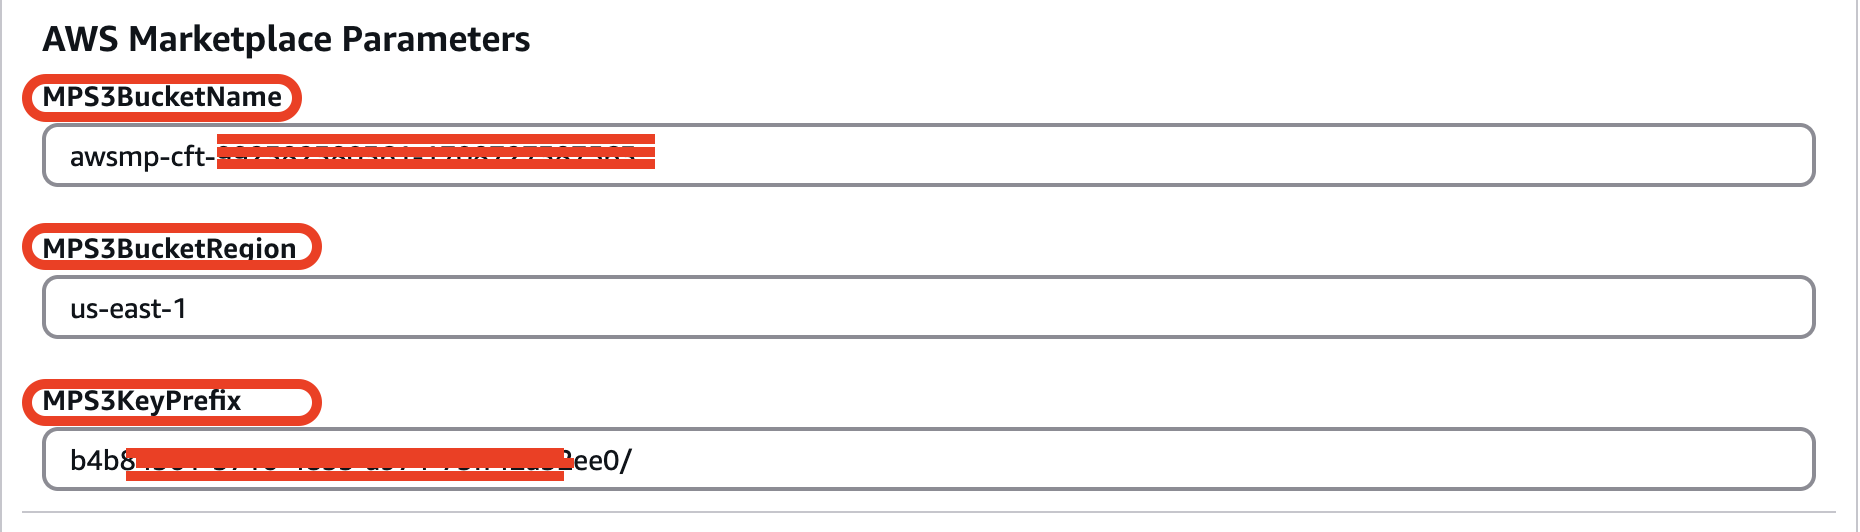
⚠ Important Notice!: There are three additional parameters for AWS Marketplace Store. They are starting from prefixes as "MPS", so you shouldn't modify them - otherwise, CloudFormation will fail with an error.
7 Required Parameters:
1. Deployment Environment – Specify the environment (e.g., dev, prod).
2. For optional parameters, you can leave the string blank, as we did with CostAllocationTag, GoogleClientId, GoogleClientSecret.
3. AppURL – Define the URL where BookStack will be accessible.
4. VPC ID – Enter the ID of an existing VPC.
5. VPC CIDR block – Provide the CIDR block of your existing VPC.
6. Subnet IDs – Enter the IDs of your existing subnets (e.g., Subnet 1 ID, Subnet 2 ID).
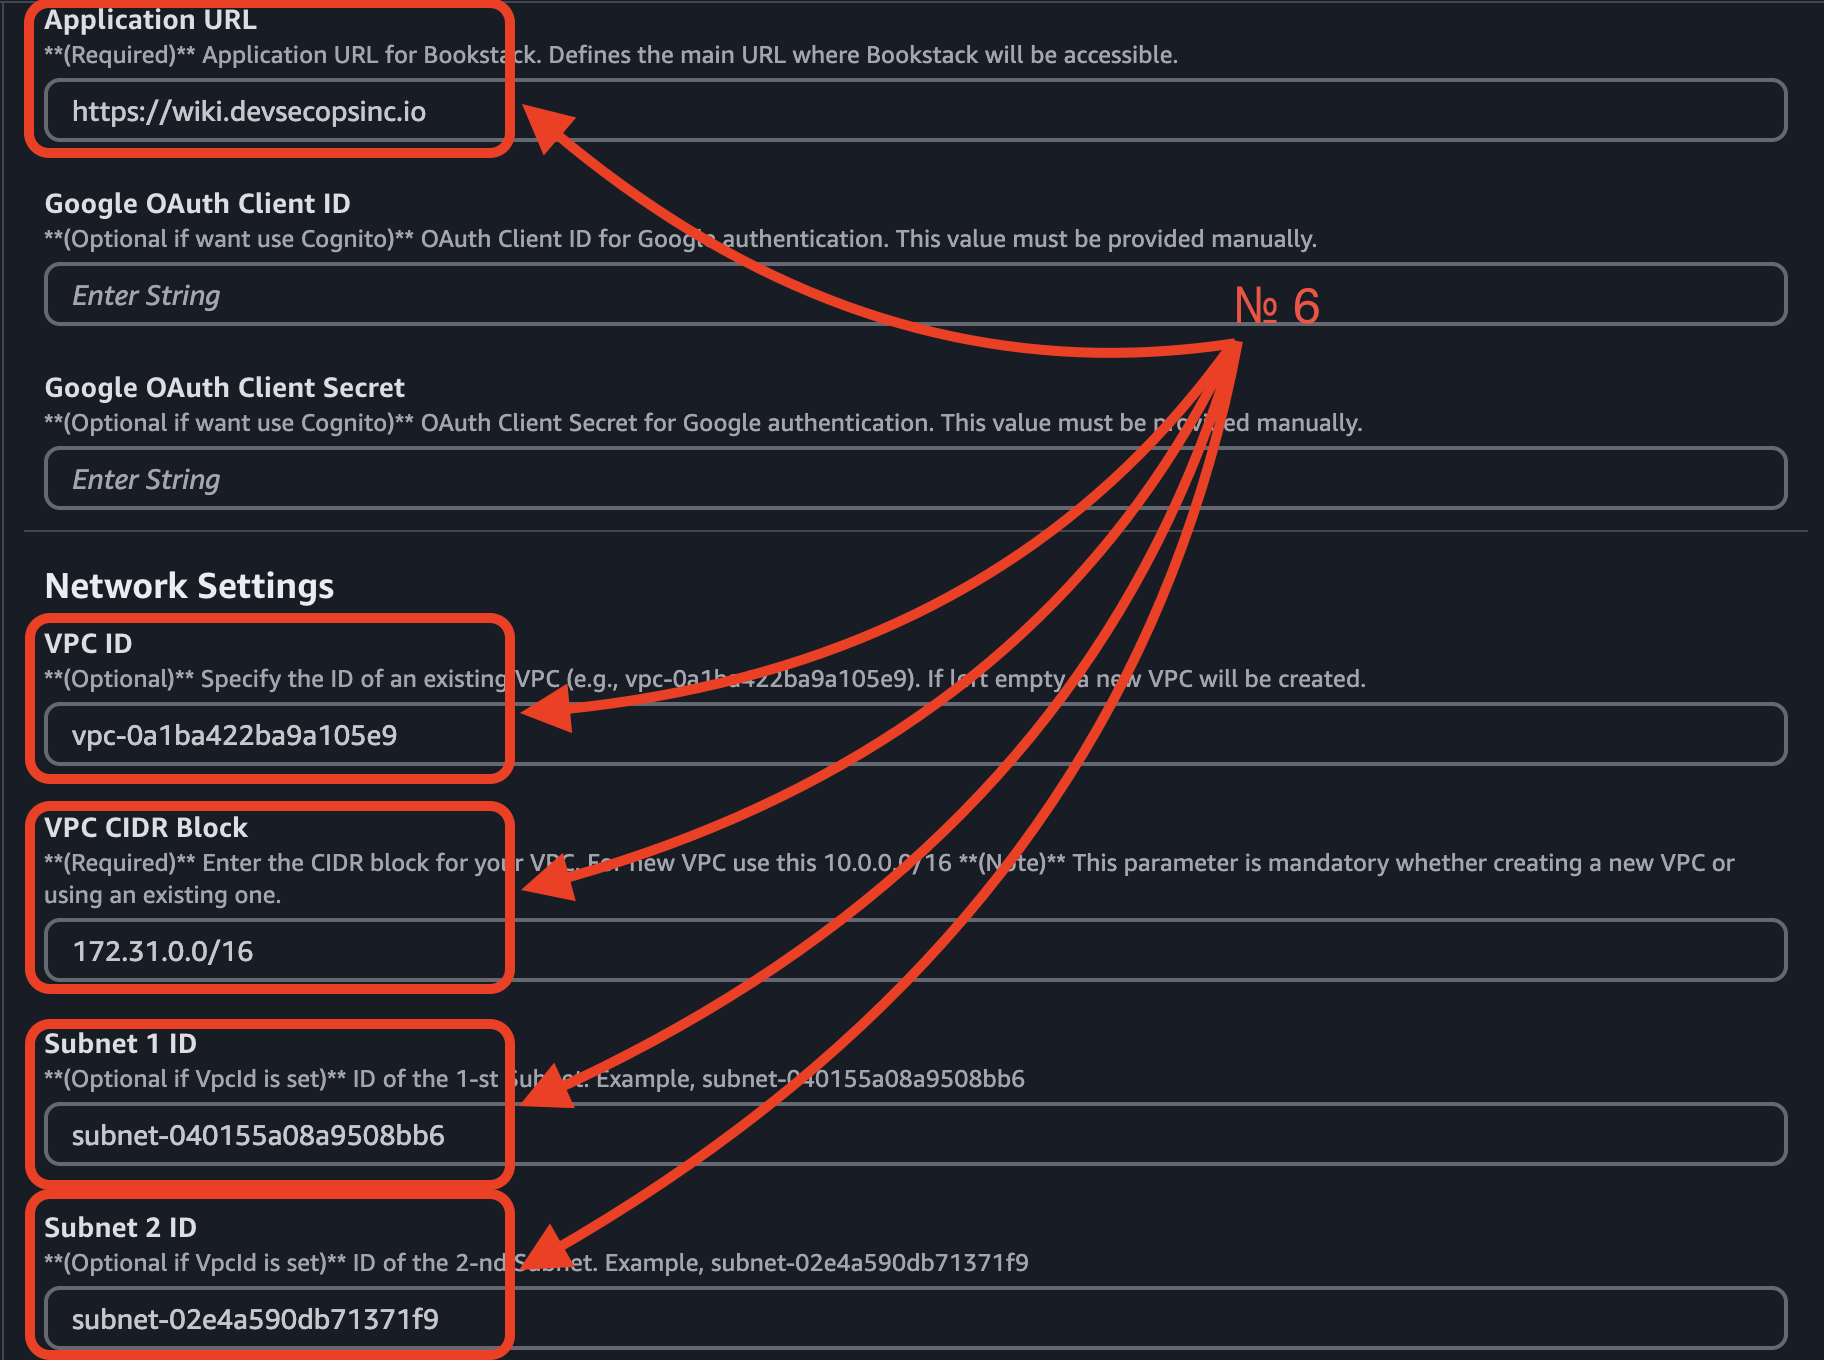
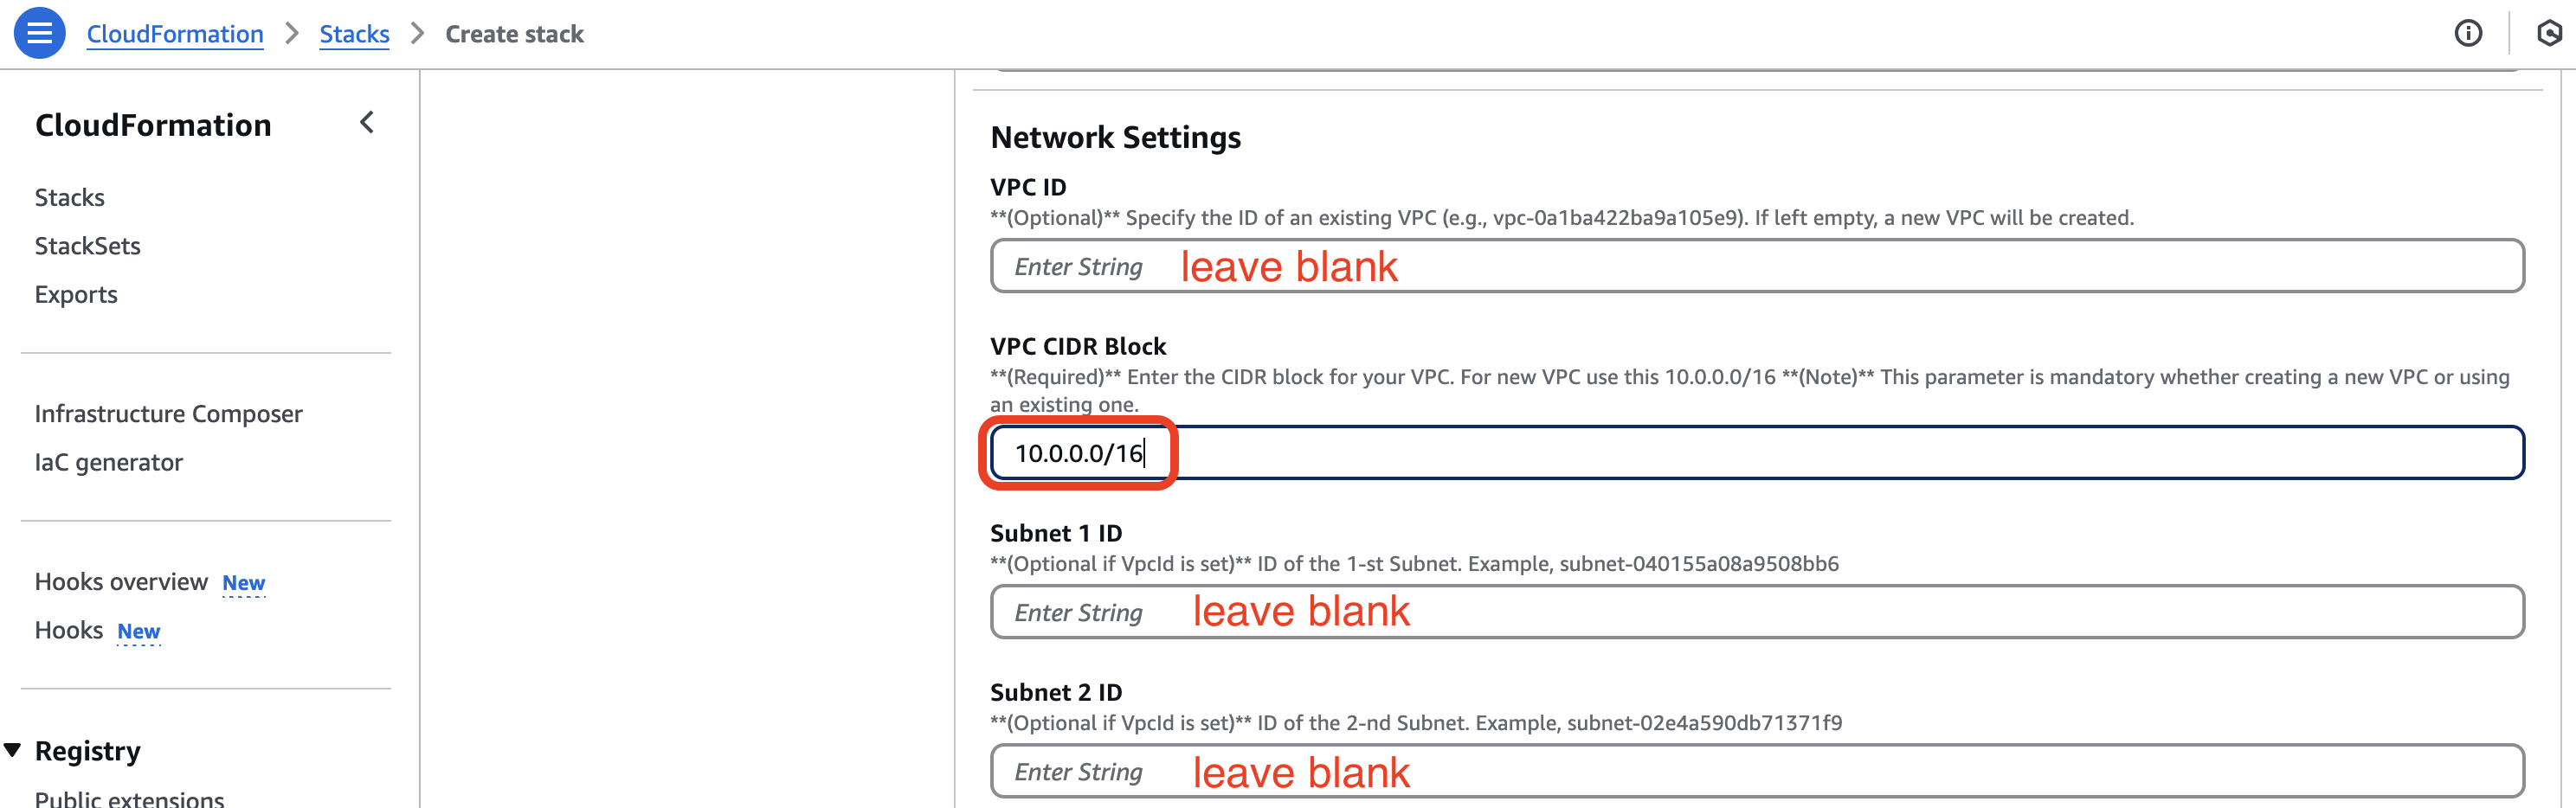
⚠ Important Notice!: If you want to create new VPC, you should fill ONLY the VPC CIDR Block.
7. EnableUserSignUp, MultipleAuthMethods - by default set to false for best security practices.

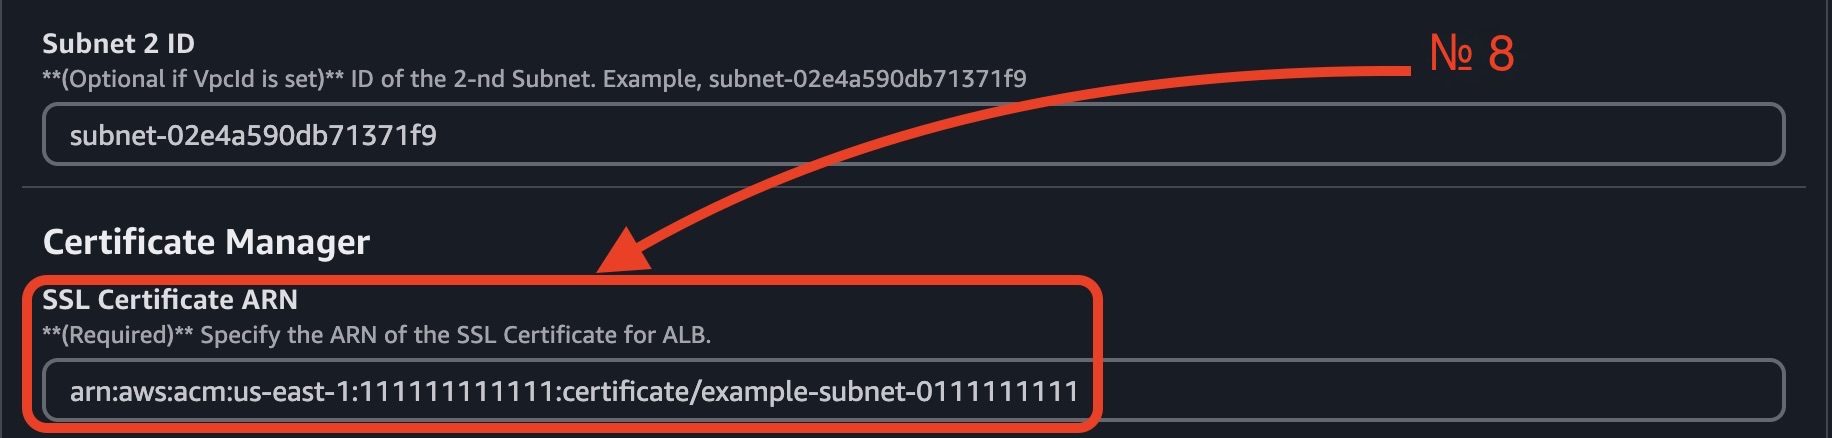
8. SSL Certificate ARN – Provide the ARN of your SSL Certificate for the ALB. (If you don’t have one, you must create it.)
⚠ Important Notice!: There is one required parameter for EC2AMI. Its value is set to "/aws/service/marketplace/prod-ymfbr3id36e3k/version-v1.0-bookstack-v24.05.4", so you shouldn't modify it - otherwise, CloudFormation will fail with an error.

Override Optional Parameters
Some parameters have predefined default values. You can modify them as needed or leave them unchanged:
• EC2 instance type (t4g.small is the default and is recommended for small environments).
• RDS DB instance type (db.t4g.small is the default).
• RDS storage size (20 GB by default).
• Multi-AZ deployment (set to false for cost efficiency).
• Enable/Disable RDS backups.
• Enable/Disable RDS deletion protection. ⚠ Important Notice!: If this parameter is enabled, you will not be able to delete the stack. To proceed with deletion, go to AWS Console → Amazon RDS → Databases, select your database, click Modify, and uncheck "Enable deletion protection" for bookstack-dev-rds. After this, you can delete the main stack in CloudFormation.
• Schedule backup rules.
• Schedule backup deletion.
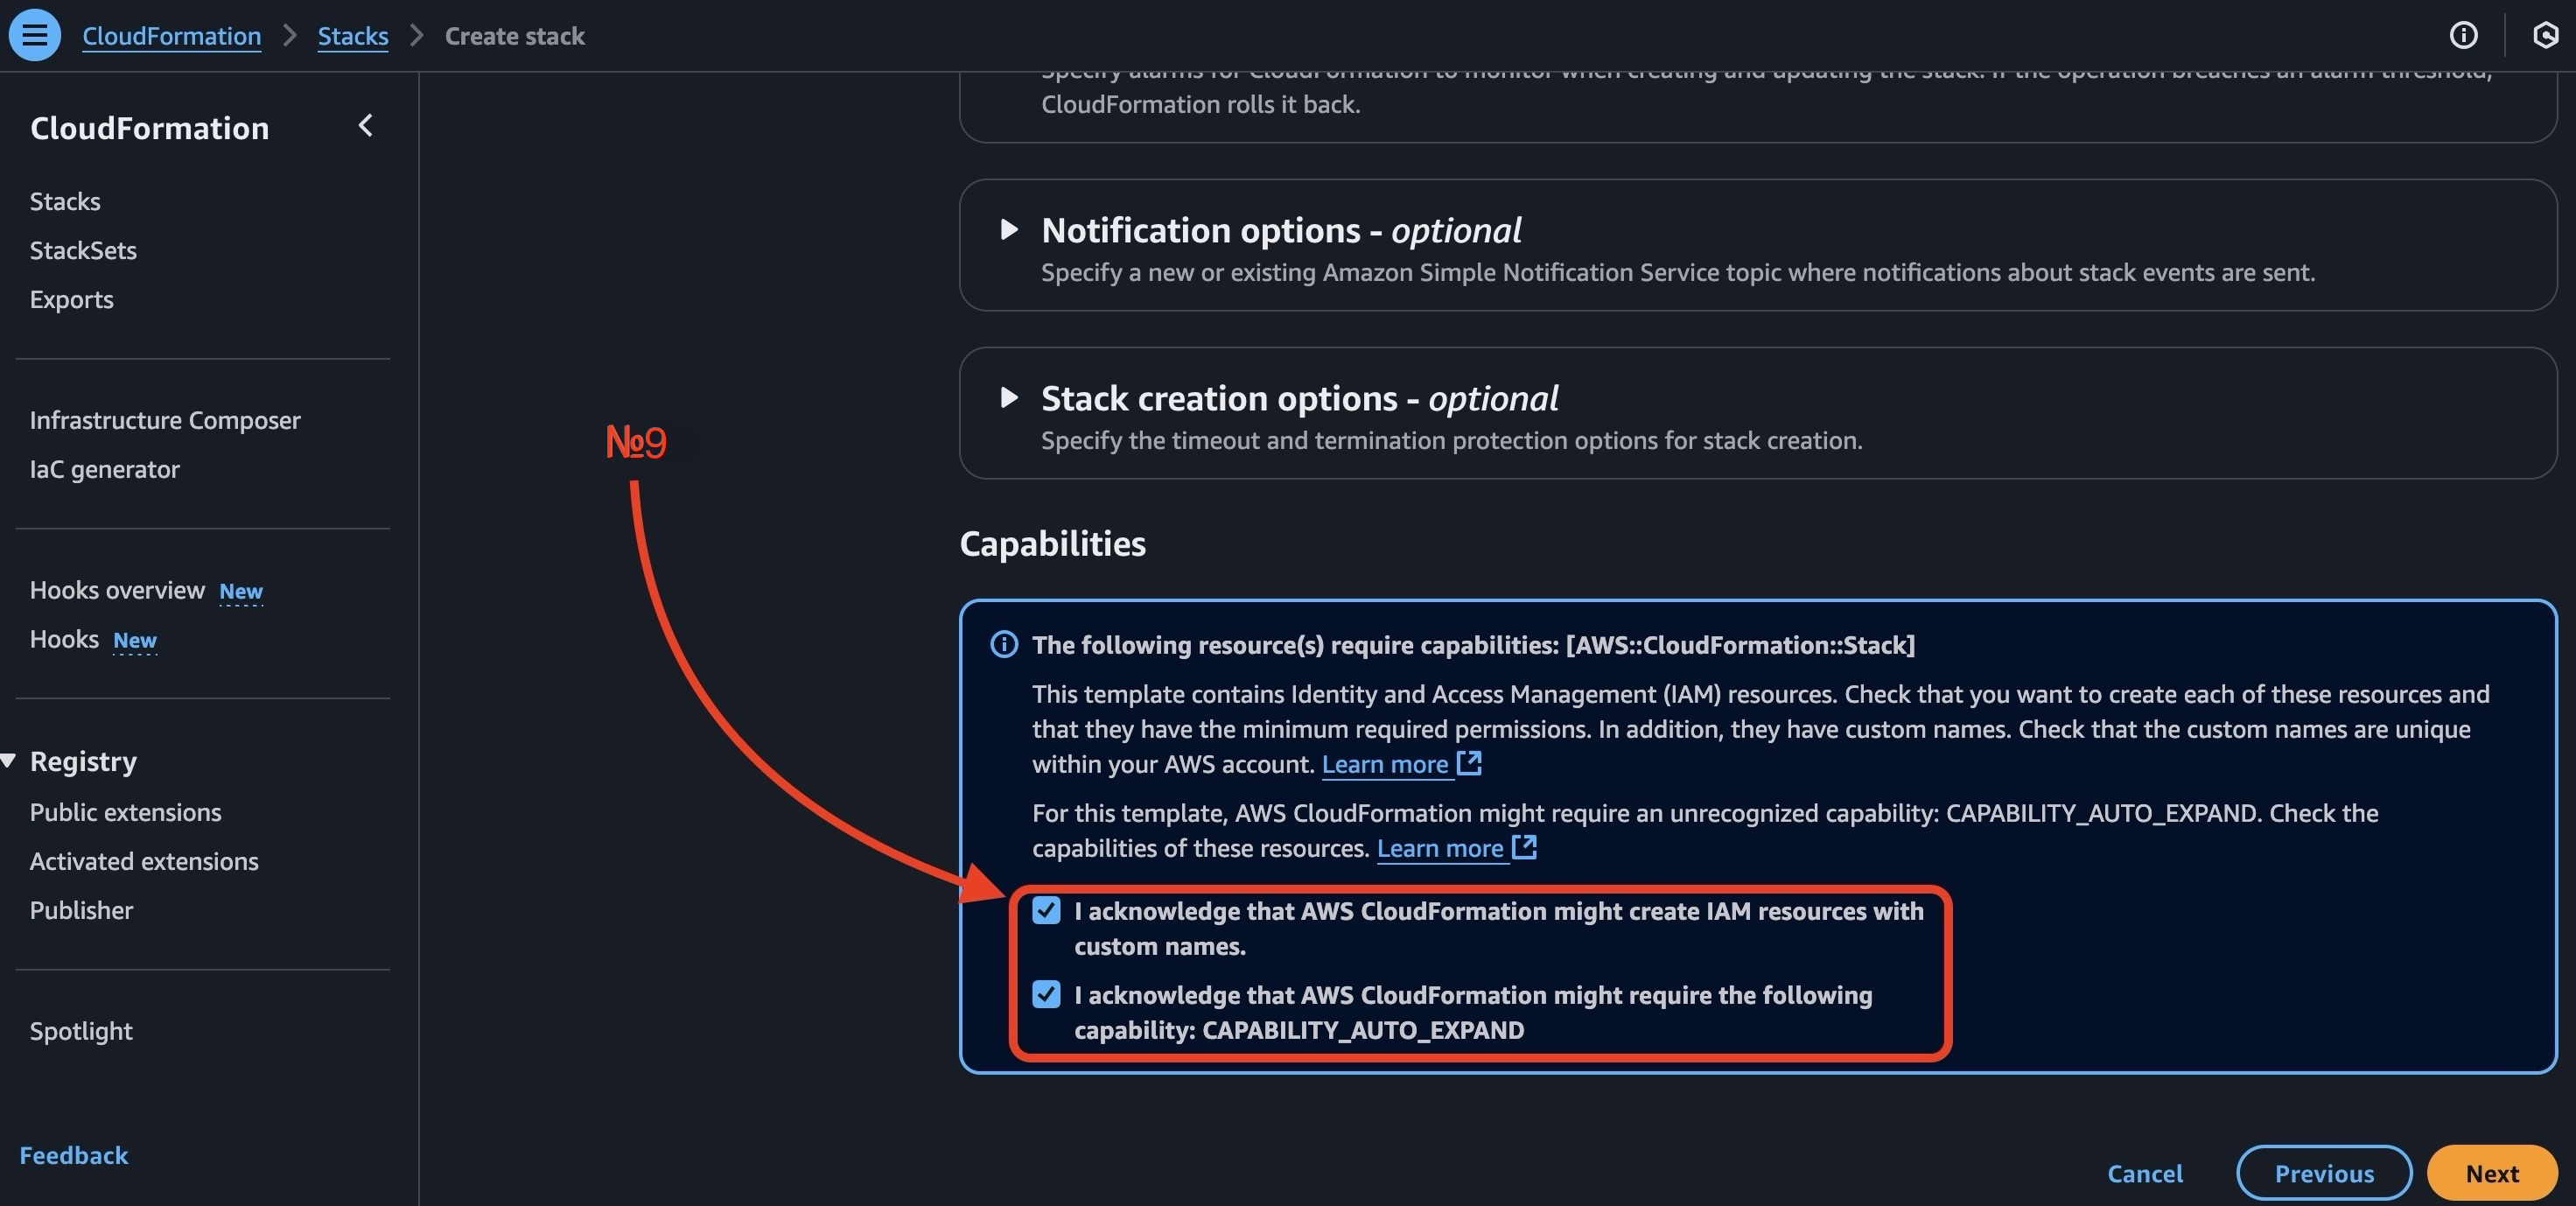
Step 3. Configure stack options
Scroll to the bottom, check both checkboxes in the Capabilities field, and click the Next button.
Step 4. Review and create
Scroll to the bottom and click the Submit button.
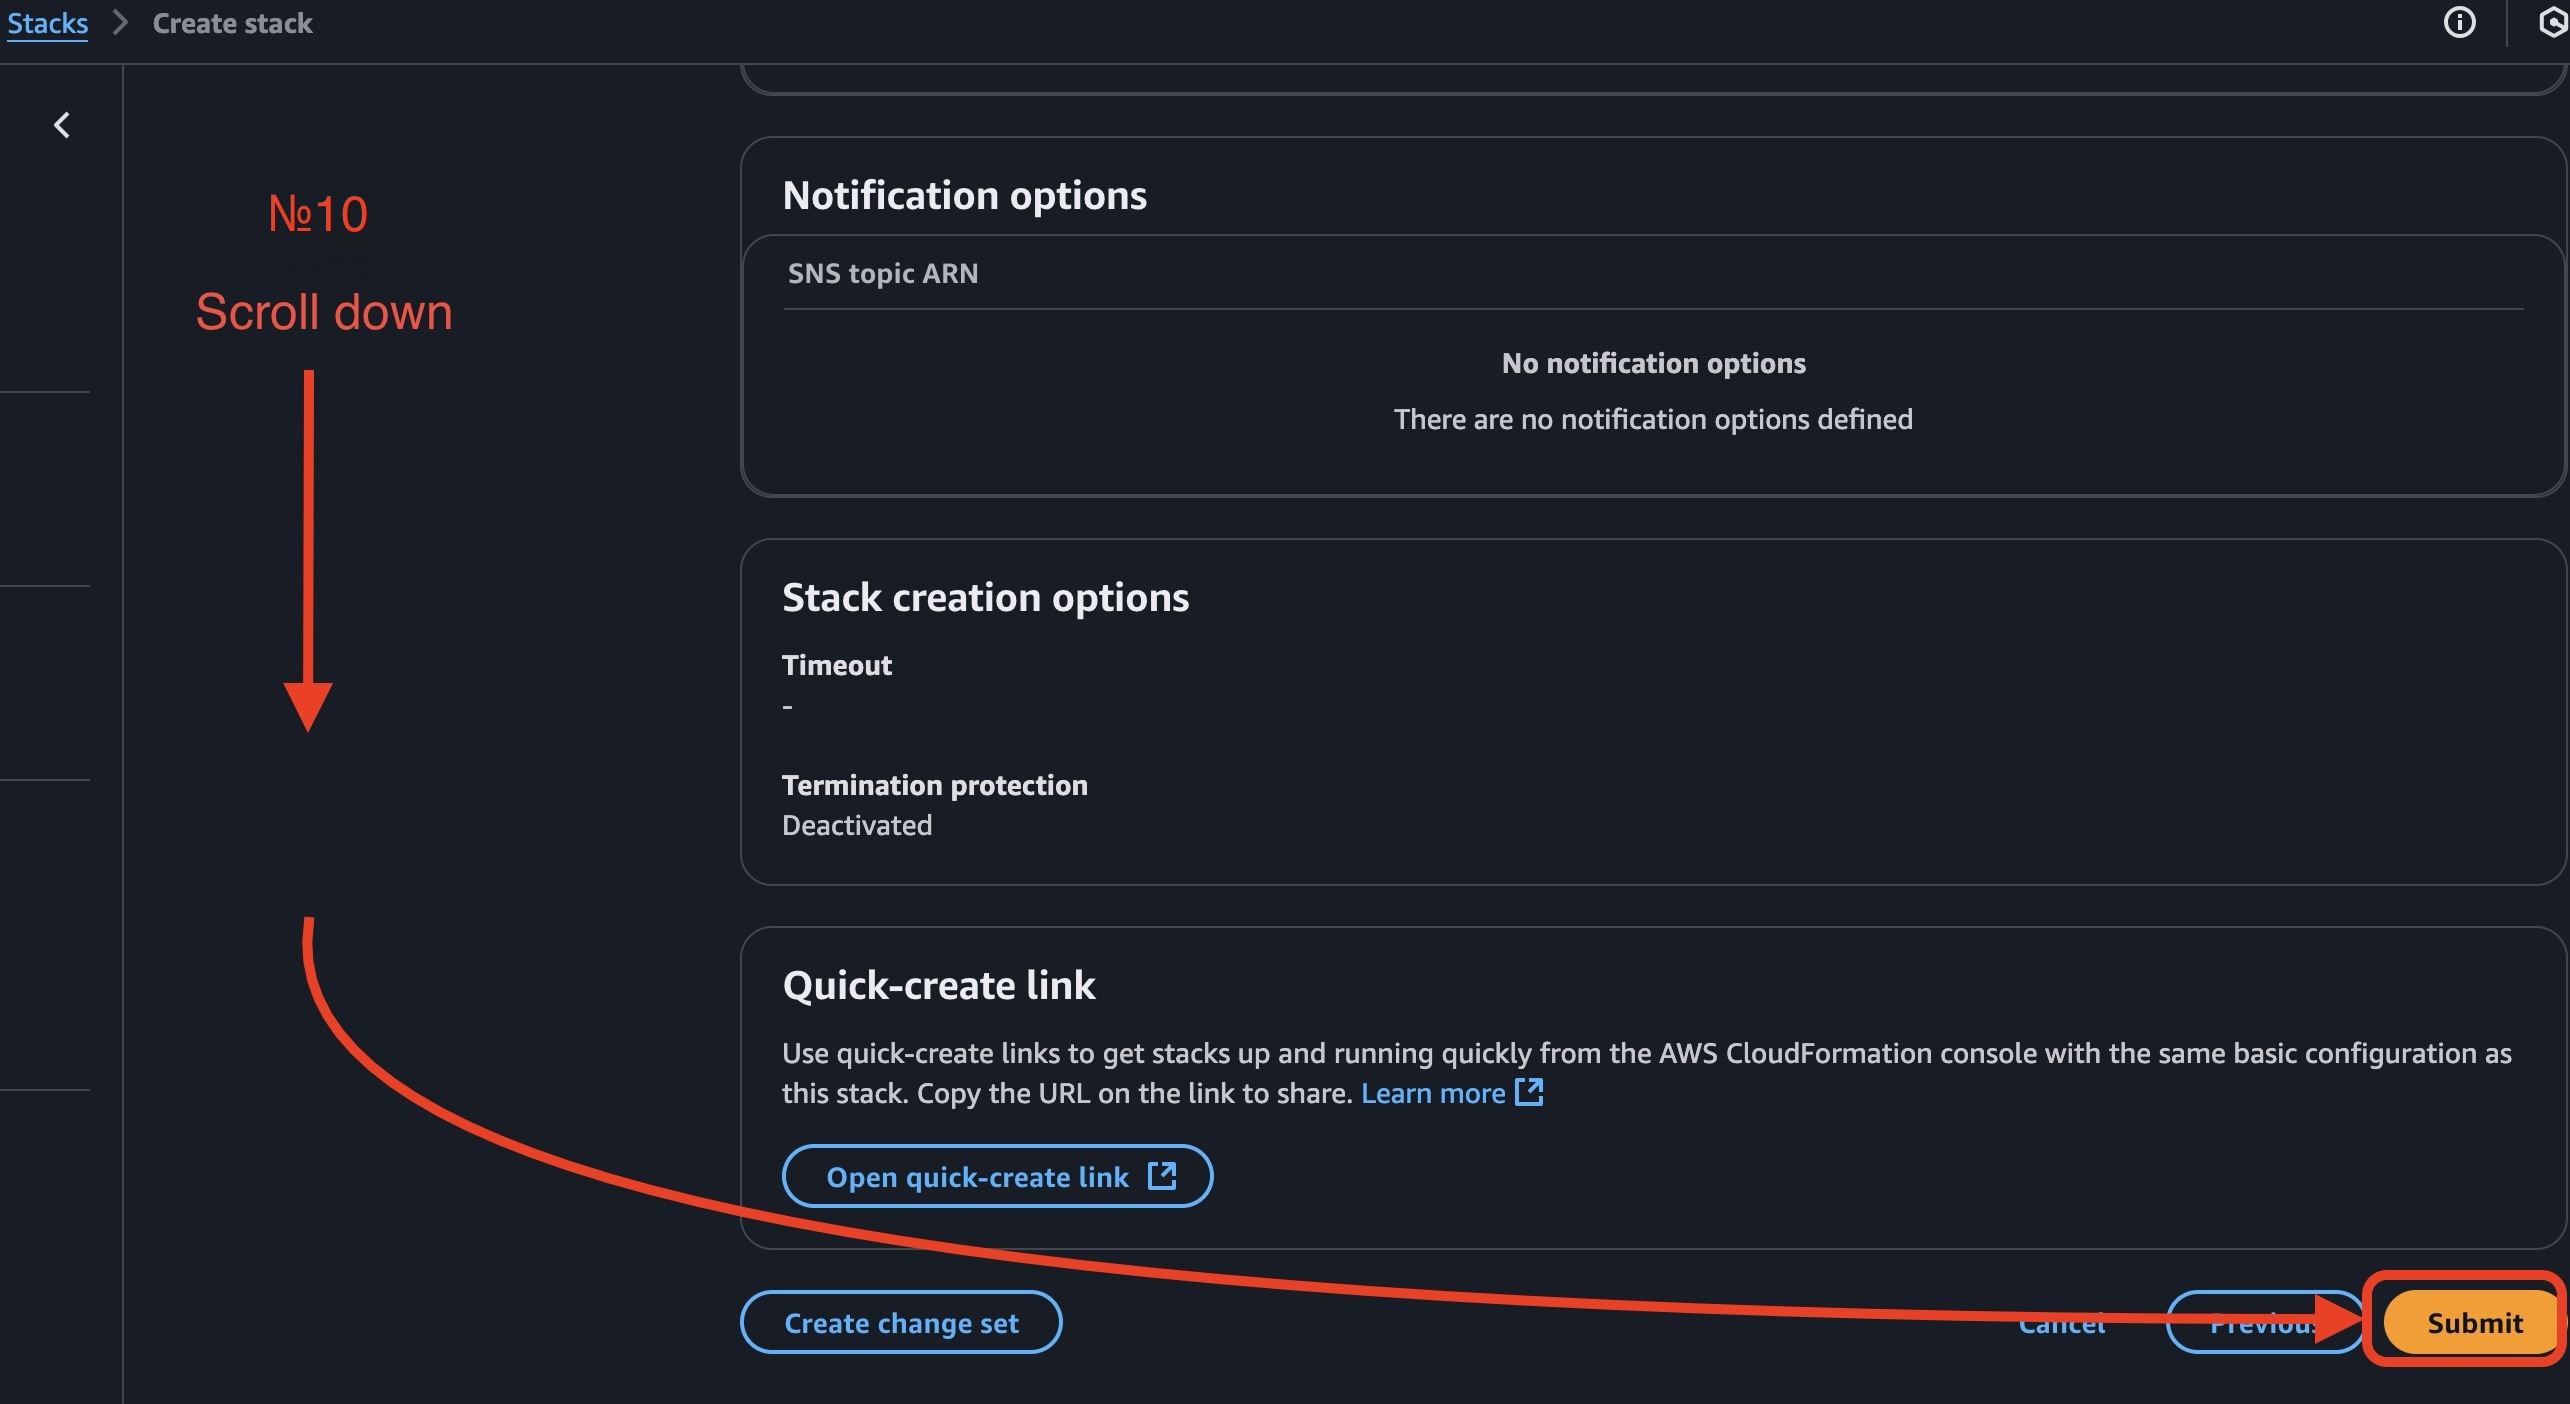
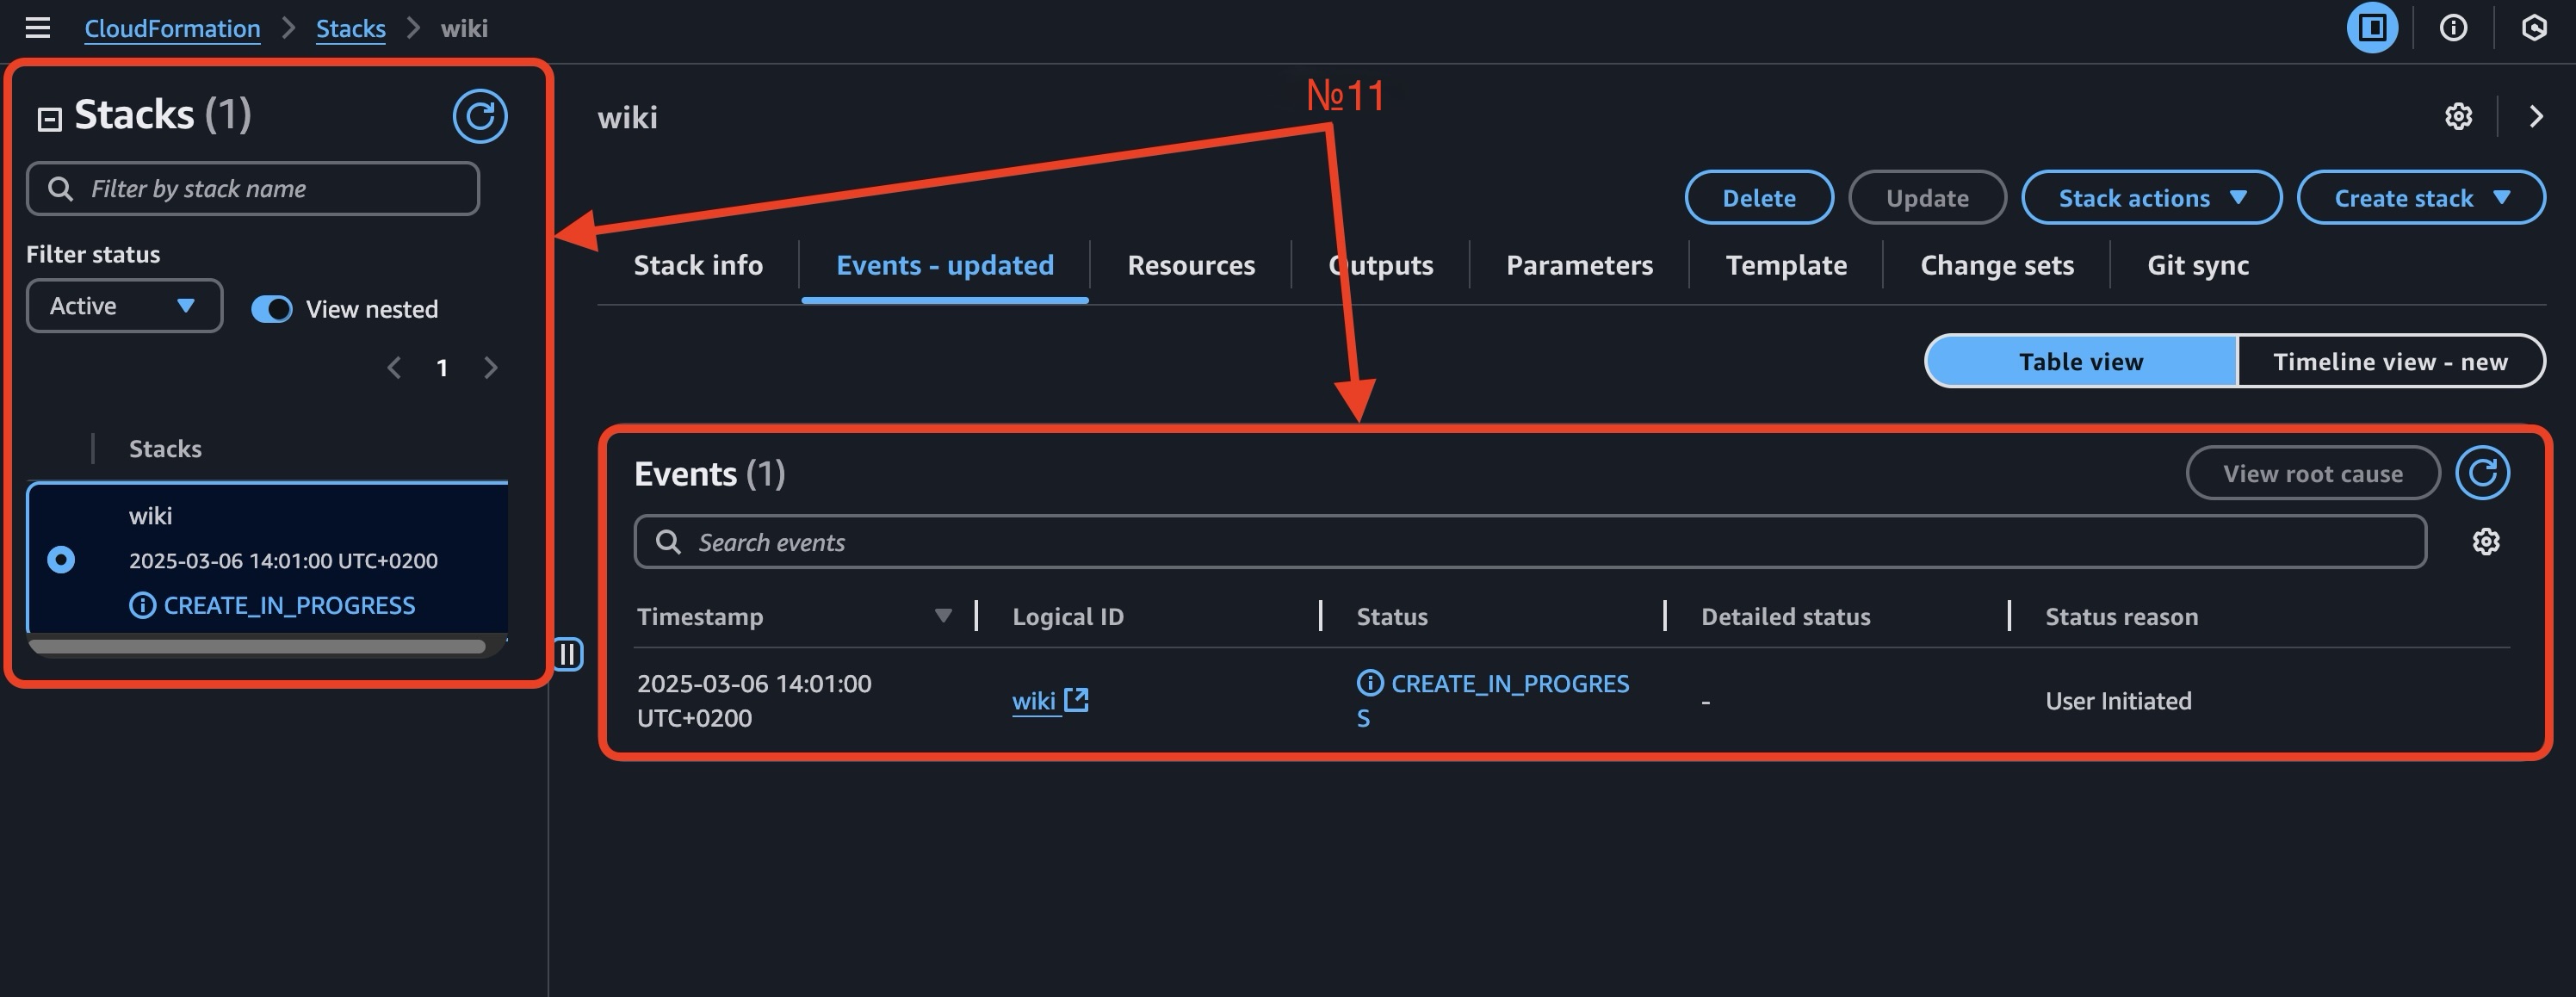
Now you can see how your environment is being deployed.
Follow these simple steps to access your product:
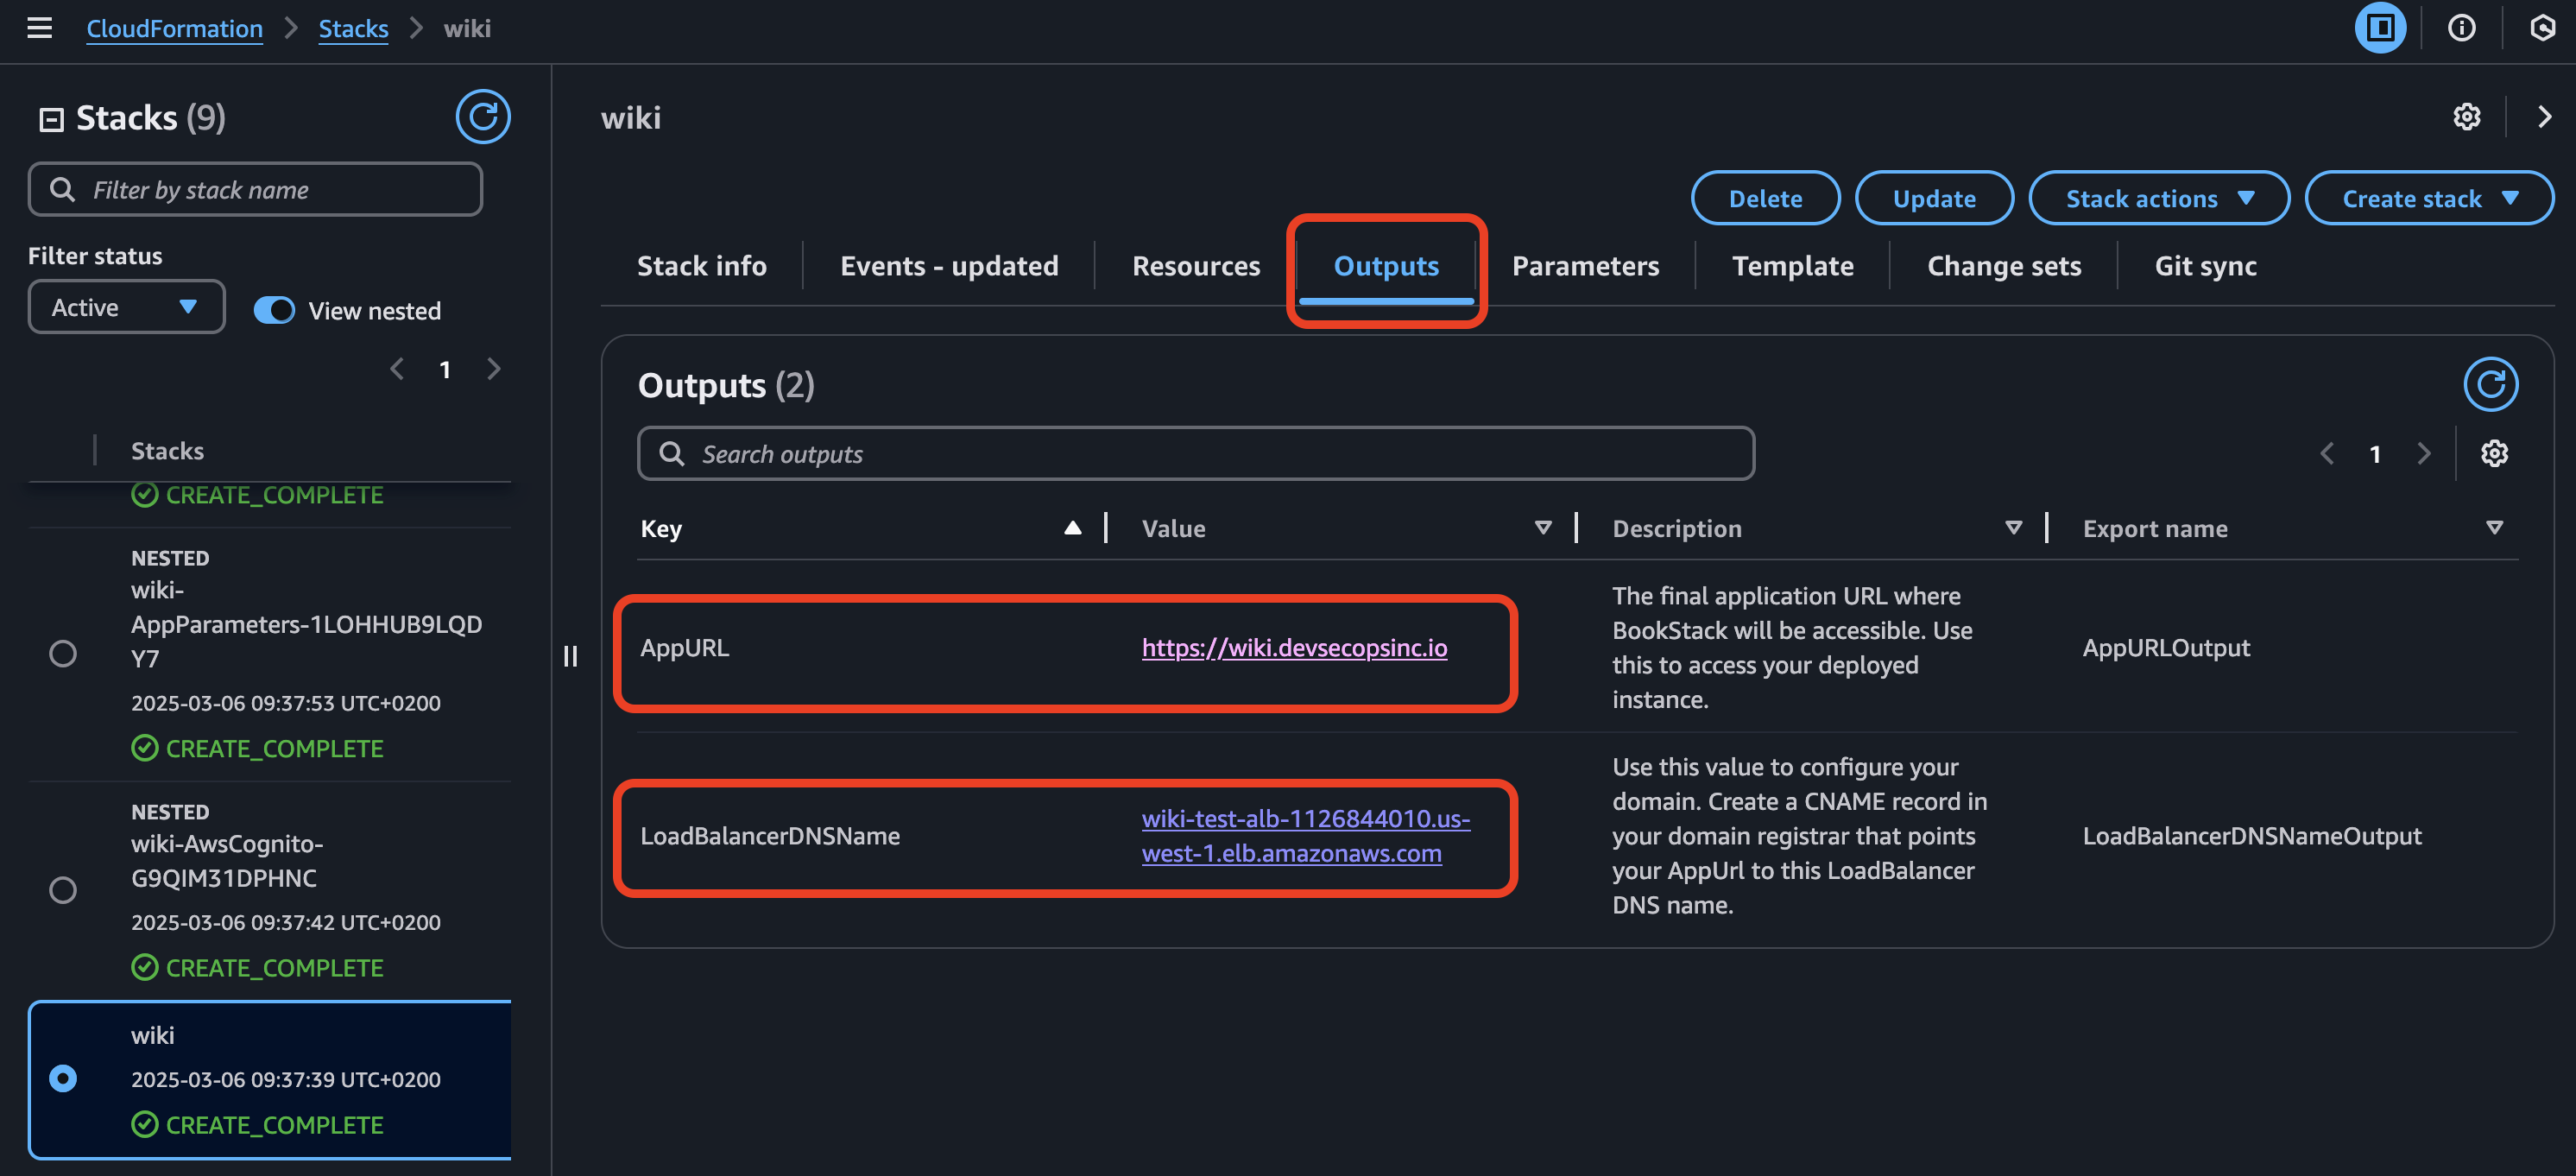
1️⃣ Retrieving the Access URL
1. After successful deployment, your product will be available at a generated URL, which can be found in the bookstack-$Environment-main stack under the Outputs section, key LoadBalancerDNSName, key AppURL.
2. In your domain registrar, create a CNAME record for AppURL, pointing to the generated LoadBalancerDNSName.
3. Open AppURL in your browser and enjoy!
2️⃣ Accessing BookStack
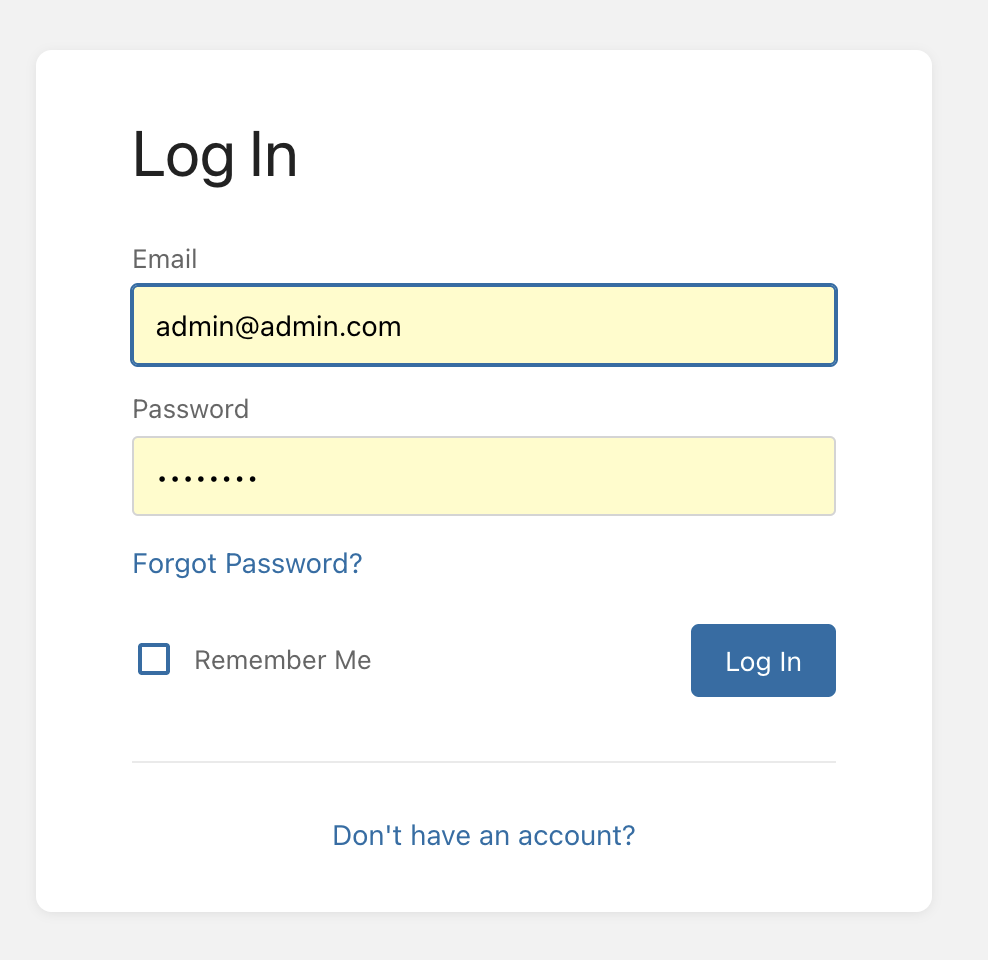
1. Open AppURL in your browser.
2. Log in using the default credentials:
• Username: admin@admin.com
• Password: password
3. Change your password immediately! You can do this under Profile → Settings.
Additional Information
✅ Application logs are available in CloudWatch Logs.
✅ Data is stored in RDS, while Bookstack files are stored on Amazon EFS.
✅ Deletion: If needed, delete the main CloudFormation Stack to remove all associated resources automatically.
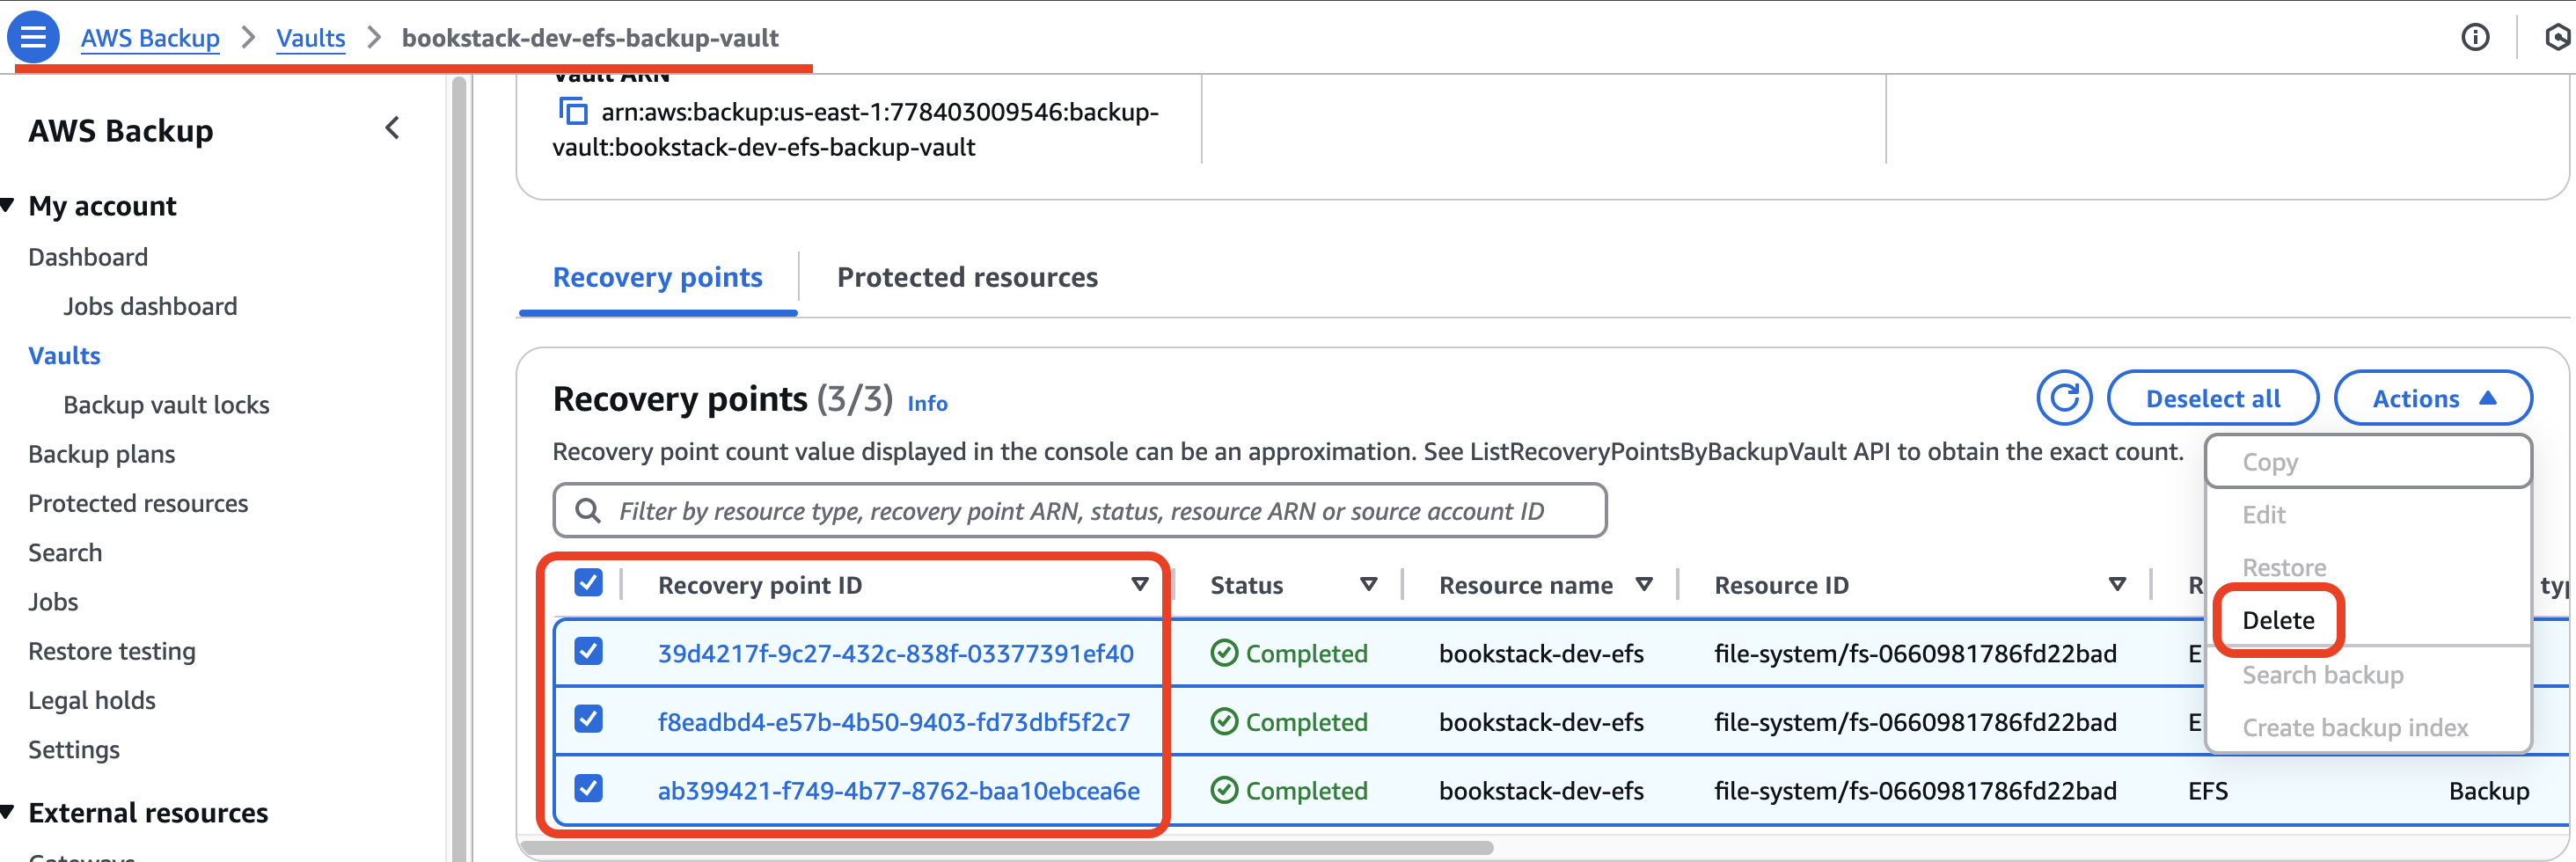
⚠ Important Notice! Before proceeding, navigate to AWS Backup → Vaults → your-backup-vault-name → Recovery Points. Select all recovery points, click the Actions button, and choose Delete. This will remove all EFS backups.
Otherwise, deleting the CloudFormation stack will result in an error.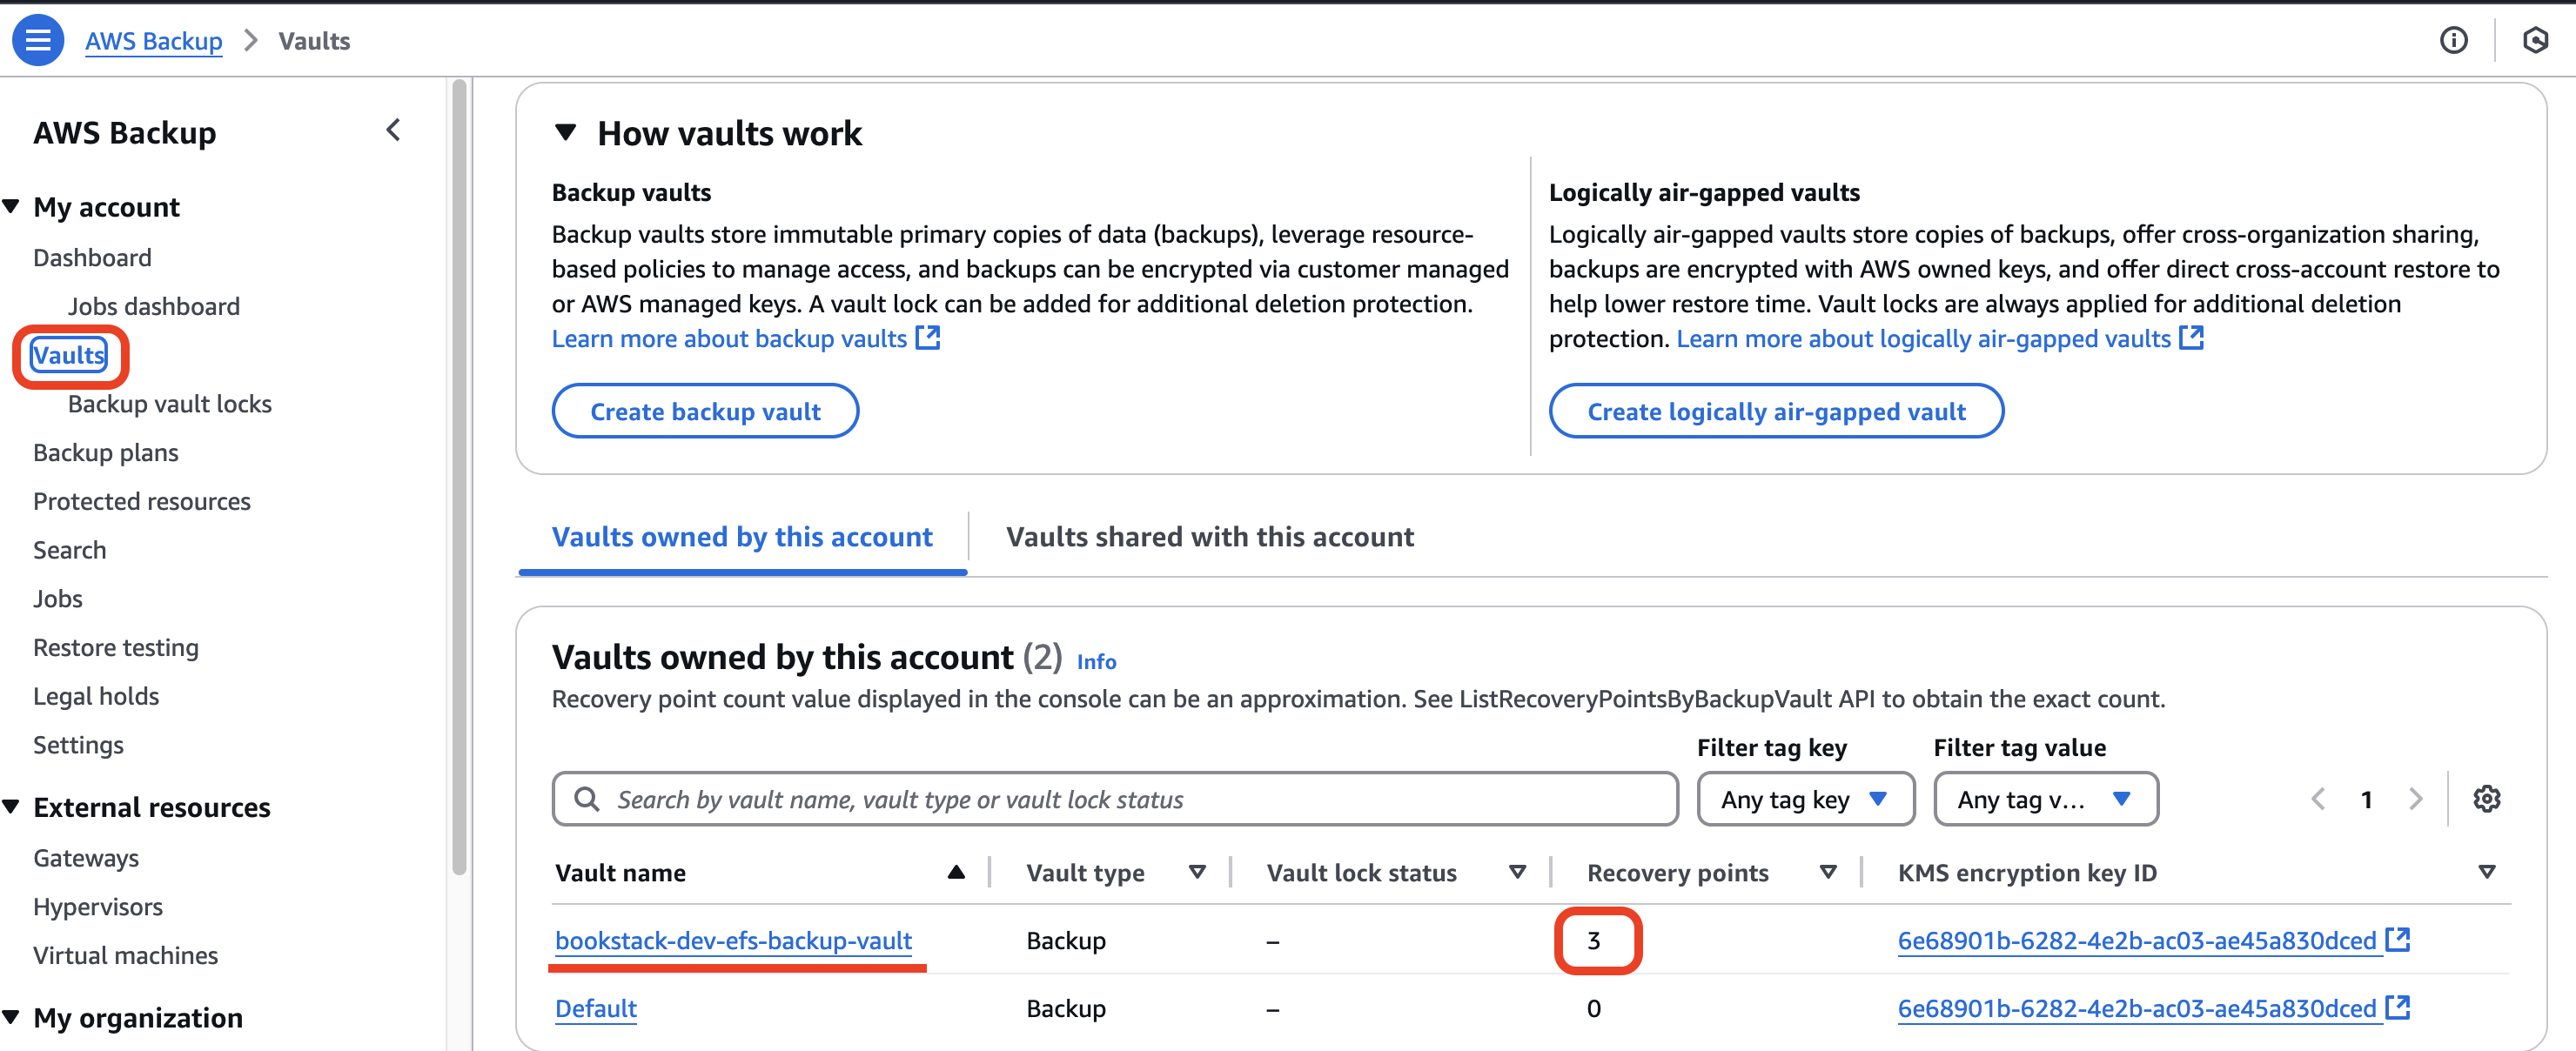
ℹ️ Additional Information:
Some minor issues may occur during the initial launch, which are known and documented. Please visit the BookStack Bugs and Known Issues section for more information.
#3 Switching Authentication Method in BookStack
If you choose to use Google authentication, you need to manually switch the authentication method to standard to log in as a local admin and enable user registration. Then turn in back to OIDC.
📌 One-Time Setup for Google Authentication
Follow these steps:
Step 1: Connect to Your EC2 Instance
1. Go to the AWS Console → EC2.
2. Locate your BookStack instance (named something like bookstack-dev-asg-instance).
3. Use Systems Manager to connect to the instance. In new window appear, enter in prompt: sudo su - ec2-user and hit enter
sh-5.2$ sudo su - ec2-user
Last login: Wed Feb 26 07:36:32 UTC 2025 on pts/1
Welcome to your EC2 instance!
-----------------------------
Operating System: GNU/Linux
Hostname: ip-172-31-42-121.ec2.internal
Current Date and Time: Wed Feb 26 08:33:35 UTC 2025Step 2: Modify the Authentication Method
In the .env file, change the authentication method from OIDC to Standard by modifying or adding the following lines:
nano bookstack/.env
#AUTH_METHOD="oidc" # comment in or edit exist line
AUTH_METHOD="standard" # or add the new one with value =standard Save and exit the file.
Step 3: Restart BookStack
Run the following command to restart the BookStack service:
docker-compose --env-file bookstack/.env -f bookstack/docker-compose.yml up -d
# After a few seconds, you should see:
[+] Running 1/1
✔ Container bookstack Started Step 4: Log in as Admin
Now, access BookStack through your AppURL and log in using the default credentials:
• Email: admin@admin.com
• Password: password
Step 5: Enable User Registration
1. Click on Settings in the top navigation bar.

2. Under Categories, select Registration.
3. Check Enable Registration.
4. In Default user role after registration, select Viewer.
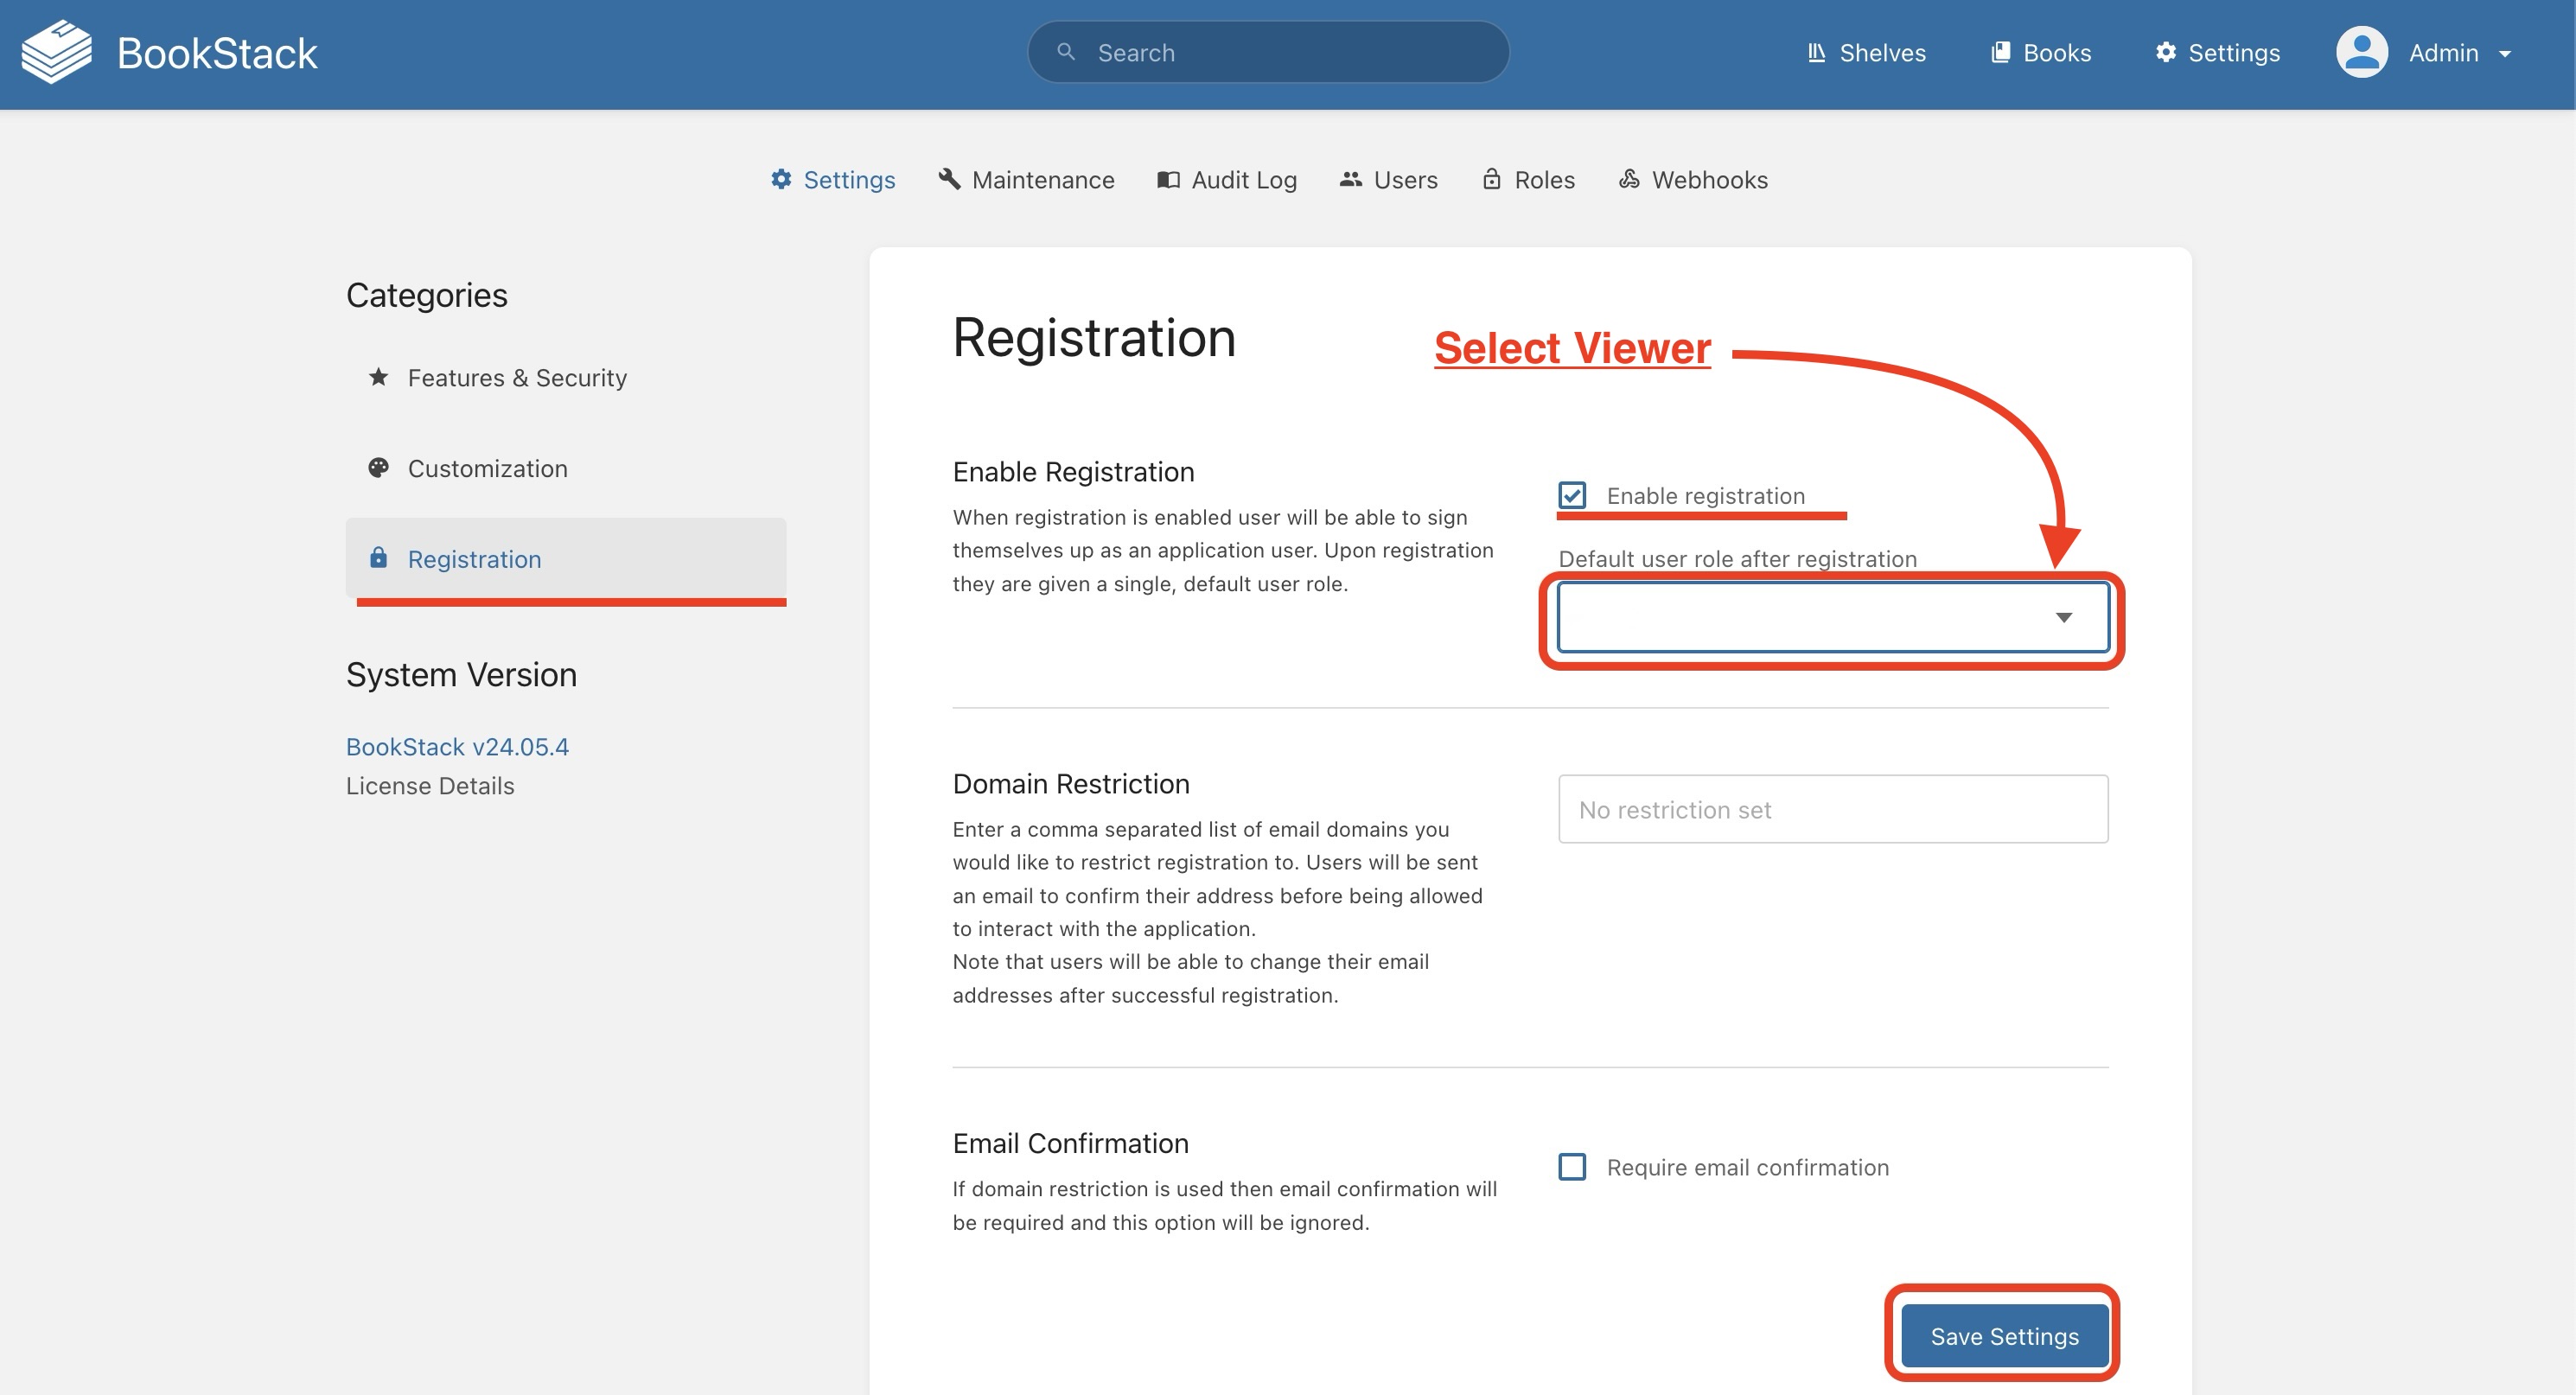
5. Click Save Settings.
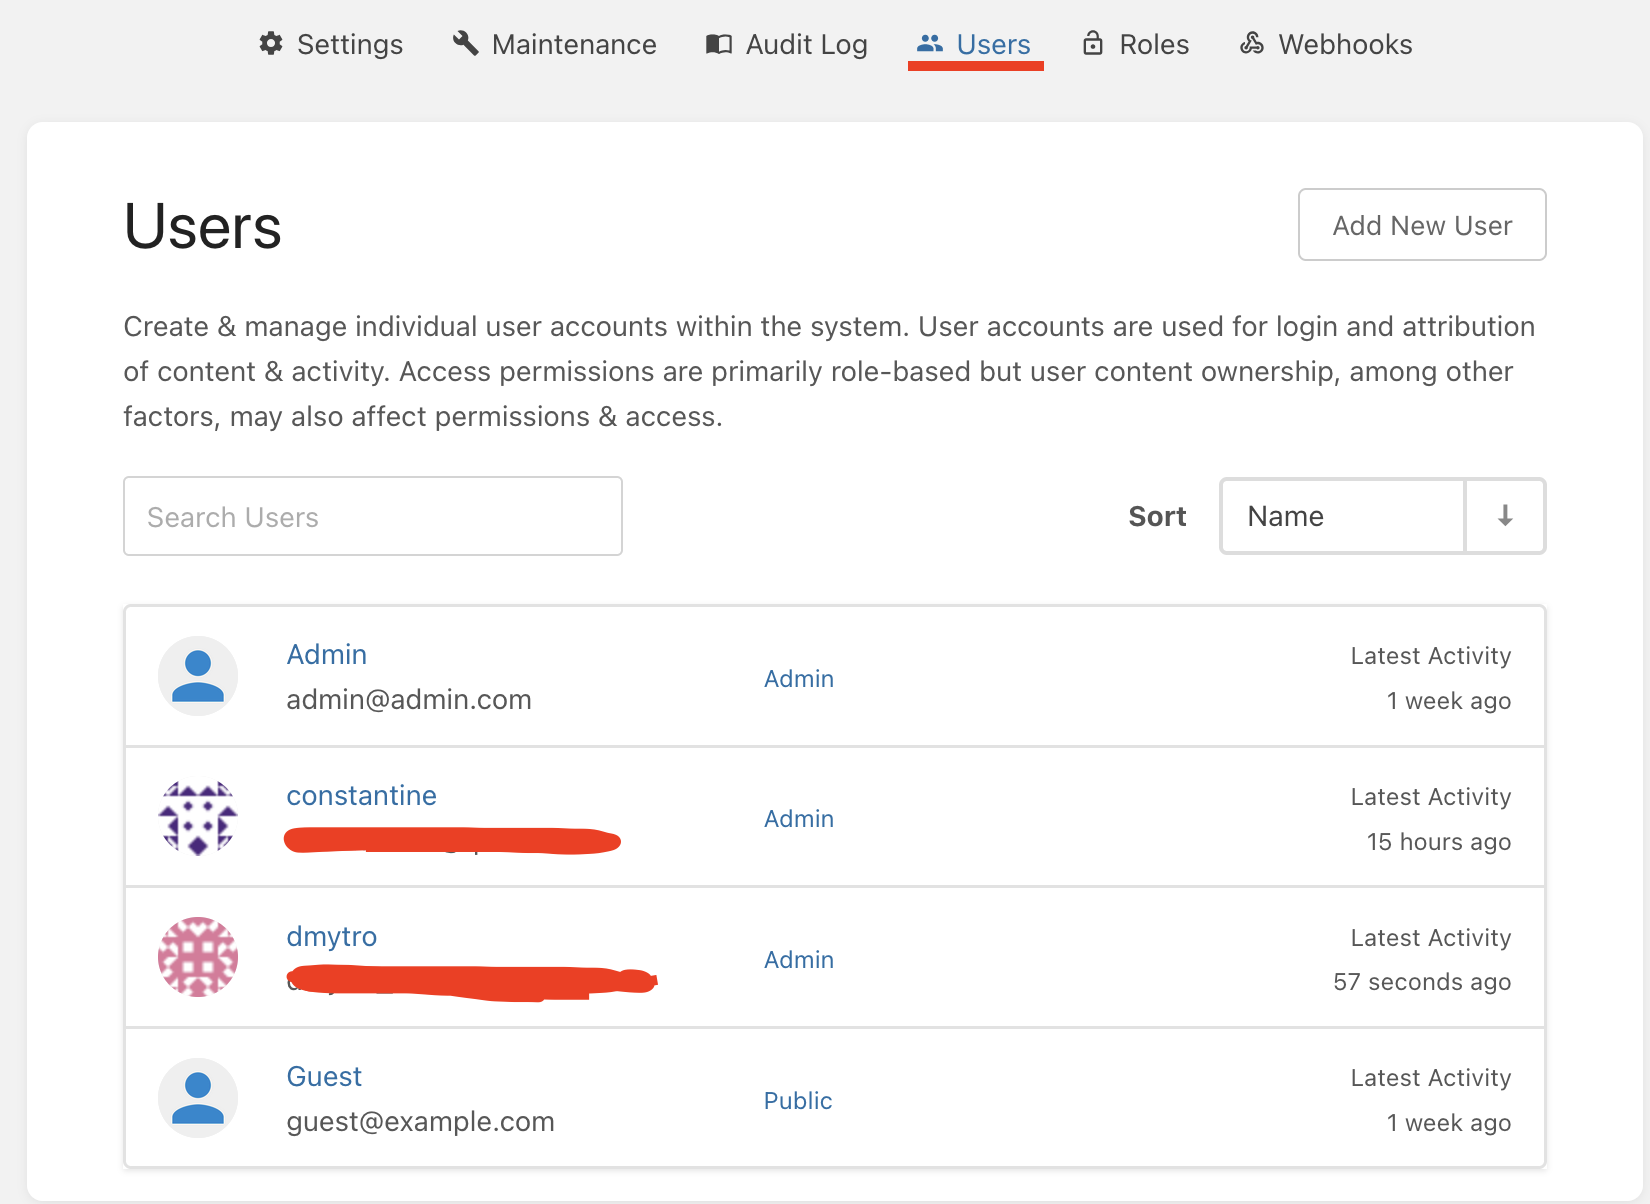
6. Click on Users tab. Choose user which you want to make an admin role.
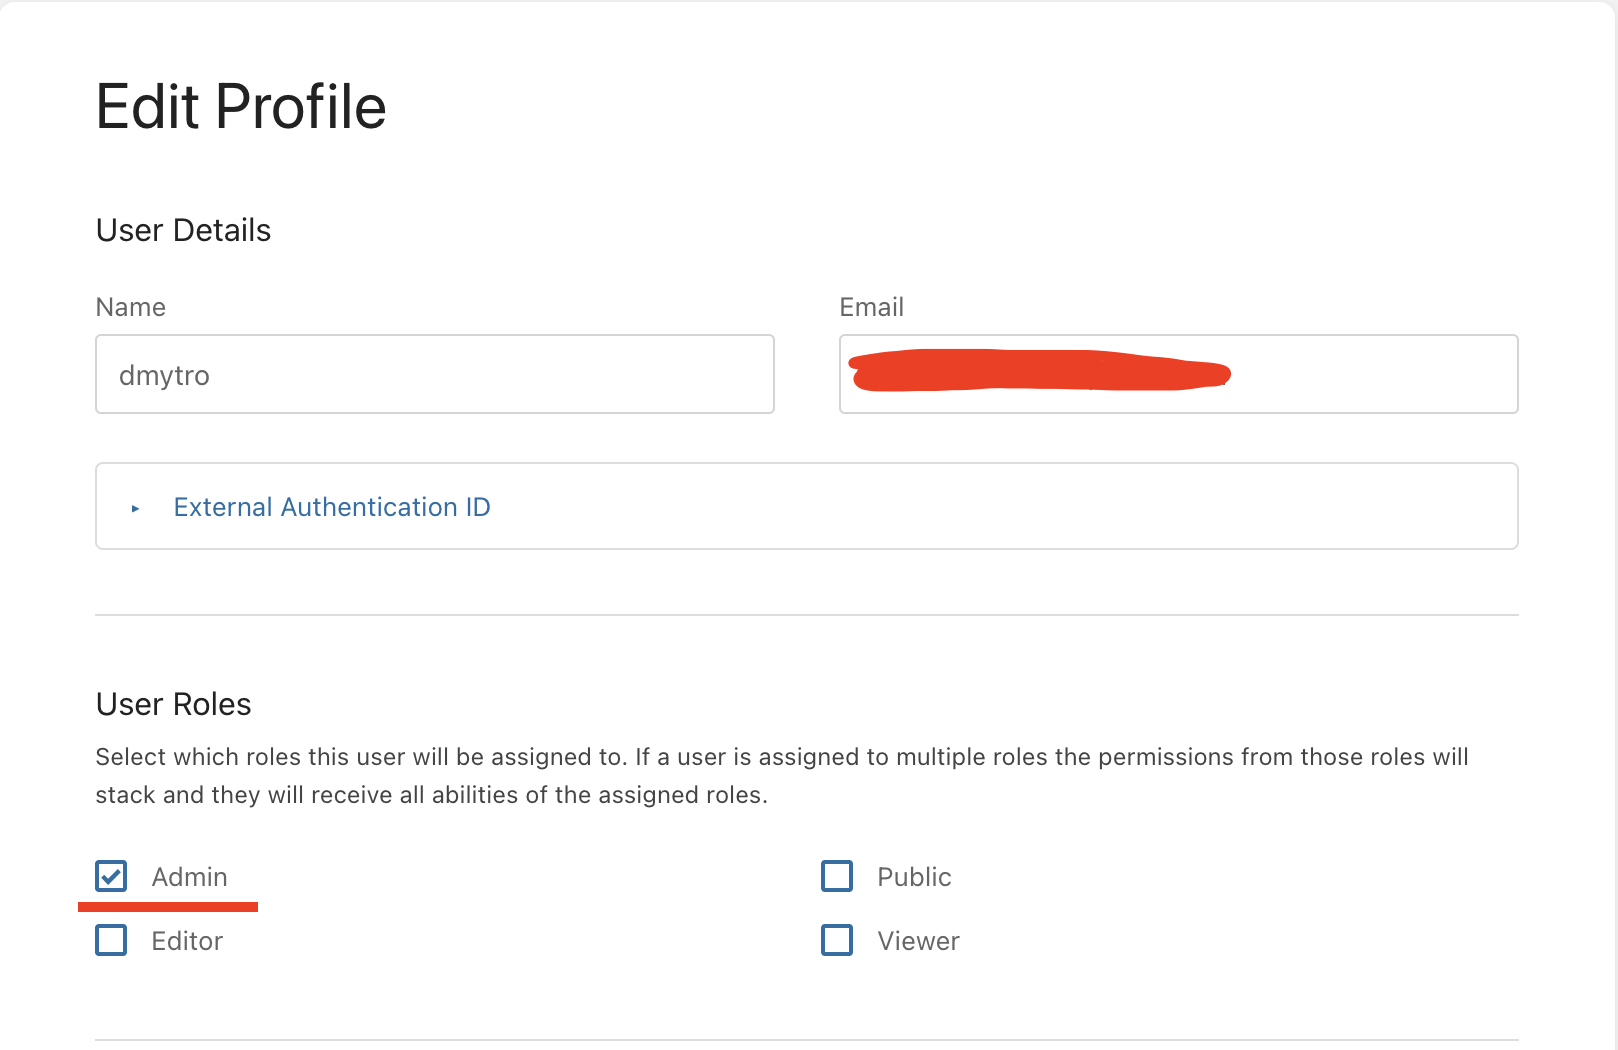
7. Select Admin role and click Save.
Step 6: Switch Back to OIDC Authentication
Now that user registration is enabled, repeat Step 2, but this time set the authentication method back to OIDC:
nano bookstack/.env
AUTH_METHOD="oidc" # uncomment or edit exist lineSave the file and restart BookStack again:
docker-compose --env-file bookstack/.env -f bookstack/docker-compose.yml up -d
[+] Running 1/1
✔ Container bookstack Started⚠ Important Notice! Don’t worry! If something goes wrong, the Auto Scaling Group will detect the issue and recreate the instance with default settings.